
24 days of Colourful Christmas Crafts
Join us on a journey for a 24-day advent calendar, filled with crafty Christmas creations.
We have compiled a stack of festive crafts using the fabulous and ever-colourful Life of Colour products that you get to spread out over the days leading up to Christmas.
Christmas is the time to be jolly and merry with your days filled with glee, so we are hoping to help bring your family together this silly season.
1 - Santa rocks!
This Santa rock would make an innovative table decoration to hold your napkins in place.
Everything you need to make colourful, creative and unique works of art on rocks is in our Rock Painting Art Box (a fun gift for all ages!)

Step one - Sketch a Santa holding a present and colour the face and belt buckle. Layer white dots all over the cuffs, hat, beard and the Santa jacket.
Step two - Paint the hat, jacket, pants and ribbon on the present in bright red.

Step three - Add a blue background followed by black detailing.
Step four - Complete the rock with white falling snow and blue snowflakes.
2 - Pastel rainbow ornaments
This activity will inject the perfect amount of rainbow fun into your Christmas, especially if the traditional colours like green, red and white are something that you are trying to move away from.

Art by Jessica Dalglish.
With our wooden ornaments as a base and the gouache stix to create this beautiful pastel rainbow, add that extra colourful element to your tree this year!
Step one - Use the creamy Gouache Stix to paint pastel rainbows on some wooden ornaments or wood slices. You can blend the colours using your fingers.
Step two - Wait until completely dry before you move on to the next step.
Step three - Use a black acrylic paint pen to add Holiday sayings or filigree patterns.
Our Life of Colour Christmas ornaments can be coupled with a range of different acrylic paint pens and paint stix depending upon what colours you would like to choose.
3 - DIY picture frames with ornaments
Turn an old (or plain) picture frame into a work of art in just a few steps.
With the addition of our fun wooden ornaments you can transform anything into a Christmas gift with a difference.

Image by @livinguponarainbow
The Christmas ornaments come with twine and a pre- drilled hole for hanging, however you can glue them onto most surfaces to use them in any way your imagination and heart desires.
Step one - Decorate the ornaments using the acrylic paint pens
Step two - Paint the frames to match
Step three - Glue the ornaments to the frames
And- Voilá! You are ready for the holiday season!
Step two - Paint the frames to match
Step three - Glue the ornaments to the frames
And- Voilá! You are ready for the holiday season!
4 - Christmas doodles card
There is beauty in simplicity and that is what we have embraced to bring you this design. We also have a pack of stencils available to assist your Christmas drawings as well.

Step one - Draw colourful Christmas items such as trees, lights, snow-people, presents, stars, hats and gloves all over the front of a card
Step two - On a smaller rectangular piece of paper, design a message and attach it to the front of the card! Too easy!
This card is very easy to create using the Dual Brush Pens because they have a flexible brush nib for colouring and lettering, plus a sturdy fine tip for line work.
5 - Christmas Lights Gift Tags
Creating a personally designed and crafted Christmas tag to your gift adds a special little touch that makes gifting ever so unique.

Create the cutest gift cards with this easy to follow picture tutorial from Tammy Klingner.
Step one - Using the Life of Colour Dual Brush Markers, add a wiggly line with the black marker. Make sure it has a few loops and begins at the top left and finishes near the bottom left.
Step two - Now add a few little squares at intervals along the line.
Step three - Now gather some bright colours, I used two shades of pink, green, blue, yellow and orange.
These will be little fairy lights, add a teardrop shape to each square and colour in, ensuring you leave a small section of white in the centre as the highlight.
Step four - Using a fine tip black paint pen, draw a finer line or two next to the thicker line, roughly using the thicker line as a guide.
Step five - Add a quote or hand draw a caption. Up to you!
Bring on the Sparkle suits the light theme perfectly.
6 - Metallic Baubles
Making use of last year's Christmas decorations to create a whole new look is simple with the shiny Metallic Brush pens. You can use any bauble that you have, a plain bauble would be best though.

We made use of an old transparent bauble filled with colourful pom-poms and added the simple word "JOY" using a few letter stickers to make the workload easy.
Step one - Use letter stickers (or washi tape) to save the shape of the letters that make up the word you want to write on the bauble. Affix these onto your baubles.
Step two - Glide the Metallic brush pen over the top of one letter at a time.
Step three - Remove the stickers / washi tape letters carefully, and trace around the edges using a silver fine tip for precision. Add some silver dots as snow to complete the look!
7 - DIY Wrapping Paper
We have got the most amazing DIY Life of Colour Christmas paper for you to provide to your little helpers to keep them busy whilst you hide away wrapping presents.

You could also design your own paper, all that you require is some creativity to make your own motifs! Here are two amazing ideas by @curious_columbus and @livinguponarainbow.
The Life of Colour Paint pens are great for making your own doodle wrapping paper, the acrylic paint upon white paper makes the colours absolutely pop!


8 - DIY snow globes
Rescue a few jars from the recycling and use your creativity to turn them into glitter snow globes. By securely glueing the lid in place you will make sure that the lovely (and at times quite messy) glitter stays inside the jar.

Step one - Collect old glass jars and transparent plastic jars with lids. We will transform them into cute glitter globes for the kids!
Step two - Draw small colourful trees on cardboard pieces using your paint pens.
Step three - Use a hot glue gun to attach the trees on the inside of the lids. Sprinkle with rock salt. You can also add other small trinkets such as tiny toys, etc.
Step four - Put some glitter, tiny pom-poms or confetti into the jar.
Step five - Affix the lid to the jar. You can decorate the jar with the paint pens and add a fun pattern to cover the lid.
9 - Crazy scribble card
Put a squiggle over here and a squiggle over there, put a lot of little squiggles on the paper everywhere, it's a squiggly kind of day!! After all the squiggles layer a "Merry Christmas" message over the top and tie it neatly altogether with a border.

Step one - Draw swirling lines in different Dual Brush Pen colours to fill the front of the card.
Step two - On a smaller rectangular piece of paper, write “Merry Christmas” and attach it to the front of the card.
Step three - Add a border around the edge and add silver dots.
10 - Rainbow Santa Stockings
We have some amazing Santa stockings or Tote bags available that would be perfect to add colourful Christmas themed images or simple designs along with names to hang above the mantel piece next to some Santa loot bags.
I used to love going to bed the night before Christmas and rising the next day to find they were all magically filled with goodies!

Vibrant Life of Colour Fabric pens are our “go to” for making these Rainbow Gift bags - the design could easily be for all year round too! You can create this same design on any size canvas bag.
Here is a design idea for the reverse side of one of our Tote bags.
Step one - Sketch a rectangle onto the centre of a canvas bag. Add arch shapes to fill the rectangle in.
Step two - Follow the rainbow arches, adding darker edges and fun shapes onto the outside of each coloured arch.
11 - Santa’s Mug
Every year I get pulled into the gimmick and purchase some craft sets with those small paint pots that always end up in a messy disaster! Life of Colour comes to the rescue with a lovely selection of Acrylic paint pens that are perfect for the job minus all of the hassle with an added colour injection too!

Revamp a plain mug with our acrylic paint pens. You can either find a mug that already comes with a black and white design, or make your own using a black fine tip acrylic paint pen.
Step one - Wipe the mug clean to make sure no dust or grease in on the surface.
Step two - If your mug is all white, use a fine tip acrylic paint pen to draw a Santa Claus character with some presents around him. You can choose any other motif.
Step three - Choose your acrylic paint pen colours and fill with colour!
Step four - Seal in the oven at 150-180•C for 30-60 minutes. A light spray of clear acrylic spray paint will also further protect your handy work.
12 - Seasonal paper lanterns
Grab a brown paper bag, some scissors, a hot glue gun and some Life of colour markers and get set to create magic!

Make this adorable paper lantern and add warmth to your decoration with a small battery-powered tea light. Craft by @livinguponarainbow
Step one - Draw fun and colourful motifs with your acrylic paint pens on brown parchment paper squares.
Step two - Use glue to add four wooden sticks (one on each side of the square).
Step three - Use a hot glue gun (with adult supervision) to join the four sides of the lantern.
13 - Rainbow Leaf Angel
Just imagine a hand made rainbow angel sitting neatly atop of your Christmas tree, this is a creation for all of the family to get involved - no matter what age or skill set!

Step one- Grab your creamy Silky and Gouache Stix and make some bright and colourful pieces of paper.
Step two- Sketch lots of leaves onto the paper using some selected metallic Juicy gel pens, silver for the outline of the leaves and add dashes of the metallic blue for extra details.
Step three- Cut a paper plate into two pieces with a circular shape in the centre for the Angels face and wings.
Step four- Use a stapler to fasten the bottom edge of the plate around to make an angel shape and attach the wings.
Step five- Glue the leaves all over the wings and the bottom of the Angels dress. Use the easy flowing Juicy gel pens to give the Rainbow Leaf Angel a beautiful face.
14 - Easy lettering Xmas cards
These are the easiest lettering Christmas and Holiday cards you will ever learn how to make. You can recreate this same design on any colour combinations, for any occasion!

By Jessica Dalglish.
Step one - Think of your message, and figure out what you want on the bigger sized letters. For example: "Merry Christmas" (example above), "Merry" or "Ho Ho Ho Ho" (below)
Step two - Use your brush pens to letter this message. Change the colour for a rainbow look, or use a christmassy colour palette - your choice!
Step three - Cover the middle of the letters with washi (once dry)
Step four - Use a darker colour to go over the letters. The washi will preserve the middle section.
Step five - Remove washi and letter the rest of your message
Step six - Add details and enjoy sending them!


15 - Xmas Ladybug rocks
Follow the picture tutorial to create some magical Christmas lady beetle rocks to hide around the neighbourhood. Use the basis of our design and add a variety of Christmas features to your rocks to make new designs as well.


Make a ladybug rock and add Christmas decorations such like ribbons, antlers, Christmas trees, or even some rainbows! The kids will love hiding these beautiful beetles around for their friends to find over the Christmas break.
16 - Christmas themed fairy bottles
Whether you hand craft embellishments from clay or purchase some Elf trinkets to glue onto some recycled bottles, your Life of Colour Chrome paint pens will come in handy to add a beautiful element of mirror finish shine and glamour.


These amazing bottles are so beautifully created by Lizzie A. Borden.
The steps involved in one of these bottles involve painting clay embellishments and adding hanging trinkets! All the hard work is definitely worth it to be able to have your bottles on display for Christmas day.
17 - Fun Christmas wood banners
Recycle a few old fence palings to make yourself a wood banner complete with your all time favourite cartoon characters!
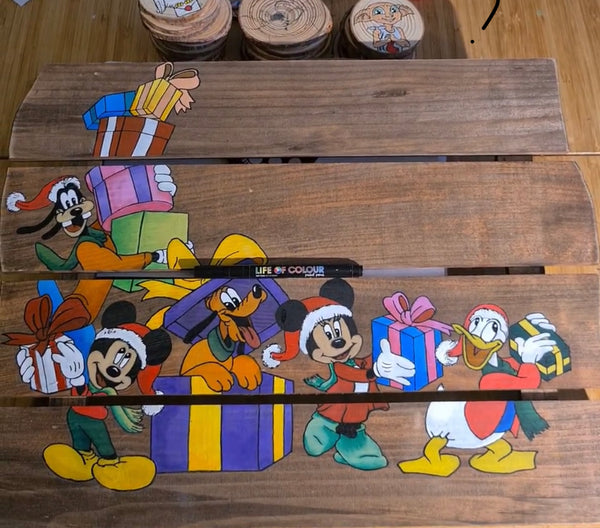
By Kylie Sherwood.
Everyone loves these adorable Disney characters, and you can create a nativity scene with any chosen characters. For best results sketch the scene and paint it white then add loads of colour using Life of Colour acrylic brush paint pens.
18. Watercolour Christmas humbug
The Life of Colour portable Watercolour Palette is the perfect holiday art companion and blending colours together with them is such a joyous experience! Dampen your Mixed Media paper and add your colours allowing them to blend together seamlessly.

Step one - Paint a beetle with a blended yellow and brown body with an aqua and green pigmentation on the head.
Step two - Add a ruby jewel on the centre of the back and use a handy brown dot paint marker to make precise spots.
Step three - Frame it with a Christmas paper frame and add phrases “Bah humbug” and “Christmas humbug”
19 - Groovy Grinch Sneakers
Design a pair of matching Christmas sneakers or get really creative and replicate a pair of "Hot Chocolate" mismatching shoes!

by Samantha Dorahy.
Grab yourself a pair of canvas sneakers and fabric pens and get busy designing an original pair of sneakers that will certainly be noticed this festive season!
20 - Heart gift tags
Purchase a set of these cute heart pegs or make your own using our Life of Colour Wood slices with pegs glued onto the back!

by Karlee Hewitt
Fasten your Christmas bags with gift tags that the kids made especially for each other! The 3 mm acrylic paint markers are perfect for the kids to paint onto the heart blackboard peg clips.
21 - Xmas symme-tree
Create your own dotty Xmas tree cards with this fun worksheet activity, the kids can practice their eye-hand coordination while making fun Xmas cards for the whole family.
22 - DIY wrapping paper
Who doesn't love a good surprise gift? Create this fun wrapping paper using a white crayon and any water based paint. Easiest craft in the world, ZERO MESS and it looks sooo pretty every time!
23 - Colourful Christmas paper ornaments
This one ticks all of the DIY boxes for paper craft activities- it’s quick, it's easy and it uses recycled paper too!

Step one - Take a piece of A4 paper and add all the colours of the rainbow to it.
Step two - Cut the paper in half to make two pieces, fold the paper into a concertina then crease in half. Glue the edges together to make semicircular shapes then glue both together to make a full circle.
Step three - add a hanging rope and decorate your tree!
24 - Xmas watercolour cards
Let's return to the tradition of sending postcards. Write your special message on the back and send it anywhere around the world.
“Rainbow baubles”
Step one - Sketch five circles that overlap in a arch format. Paint each space in order of the blended rainbow (red, orange, yellow, light green, green, aqua, blue, dark blue purple.
Step two - Add gold tops and string to the baubles
and flicks of paint everywhere
Step three - Glue onto a blue piece of cardboard.

“Christmas trees”
Step one - Sketch five different sized Christmas trees and paint them red, orange, yellow, green and blue using the watercolours. Add gold stars on top of the Christmas trees.
Step two - Glue onto a blue piece of cardboard.

Enjoy, be merry and have a wonderful Christmas!
How about you spread the love and share this blog with a friend who might need some ideas to create Christmas crafts?
Stay crafty!


3 Responses
Great ideas to try all year round.
Can choose different themes but use the base ideas.
Bright colors, dotting pens and metallics among other ones
All fun for everyone…
This is a great collection for family’s to do together and that’s valuable time to talk with your children! Looking forward to part 2!
Fab ideas.Cannot wait to try them out.Thankyou