Keep the kids entertained for the holidays with dozens of step by step art ideas, for kids of all ages.
Time to get busy and create something together!!
Colour in a painted tote bag
This has become the favourite craft for get-togethers and birthdays. One side of this Life of Colour tote bag comes with a convenient ready to colour image, and the other side is blank left for the kids to make their very own design.
All you need is a set of Fabric pens and an imagination filled with colour.
Shop the Fabric Painting Art Box
Monster Madness Pencil Caddy
This pencil caddy is easily crafted with a small box base and cardboard rolls inserted into place in the middle. Our multi-surface acrylic paint pens are perfect for this job because they are opaque and vibrant.
Design some fun spotted paper using our fantastic Brush Tips, strong and versatile 0.5-0.8mm flexible brush tips allow for both thin and thick brush strokes. Construct monster faces using recycled cardboard and pipe cleaners.
Shop the Brush Tip Acrylic Paint Pens Bundle
(56 colours, including 16 essential colours, 16 floral colours, 12 metallics, and 12 skin tones!)

Mini Canvas Art
Everything is better when it’s beautiful, especially when you can create rainbow art that brightens up your life.
Provide your kids with a Life of Colour mini canvas that they can easily complete in one sitting using the Life of Colour Silky Stix. The stix are so easy to apply to the canvas and they dry quickly too for a mess free art result.
Shop Canvas Painting Art Box


DAD Rainbow Canvas
Step one- Cut out the word "Dad" in capital letters and paste it onto the middle of a mini canvas.
Step two- Provide the kids with a set of silky stix and let them go crazy with colour.
Step three- Carefully peel away the letters and the masterpiece is complete!
Shop Canvas Painting Art Box
Easy crafts with egg shells: Eggheads
The masterful craft of painting eggshells will teach the children fine motor control and they will also learn how to be delicate enough not to crack their eggheads.
By Curious Columbus

Step one- Puncture a hole in the egg at each end using a pin and then blow through one hole until all of the egg runs out of the other end.
Step two- Allow the empty eggshells to dry out in the sun and then use a set of acrylic paint markers to give each egg a character face.
Step three- Save an egg carton and create a cute little place for your egg characters to live!
Shop the Any Surface Painting Bundle
30 water-based pens (choose acrylic paint pens or chalk pens, plus one set of 6-pack paint pens)
Fun with Juicy Gel Pens
Colouring in pieces of patterned paper can be therapeutic for the soul and the results are absolutely stunning when you use the Juicy Gel pen range from Life of Colour.
We found a fabulously coloured wood slice that we replicated into a paper print that was then coloured using a similar combination of pen colours.
Shop our Colouring Bundle
(Watercolour Brush Pens + Gel Pens)

Paper Mache Cacti
Once upon a time we all made use of the construction method known as paper mache. The handy recipe calls for using only pantry ingredients and recycled newspaper. Find the formula instructions below- we guarantee that the children will love making, mixing and then creating all sorts of wonderful of treasures to behold.
Sourced from Artbarblog
Step one- In a mixing bowl add one cup of flour and two cups of water with a teaspoon of salt and mix well. Adjust the consistency by adding flour if too runny and add water if it is too thick.
Step two- Tear pieces of recycled paper into ready to use strips and scrunch other bits of paper into cacti rod and cut some cardboard into circular shapes disc shapes.
Step three- Dip the strips of paper into the flour mixture and paste onto the cacti shapes and begin building the shapes to become solid.
Step four- Allow the cacti to dry and then paint a base coat of white acrylic paint. Next you can paint the cacti green with your brush tip paint pens, which allow you to reach the tiny grooves and cracks in any surface - and arrange them into small pots using pebbles to keep them in place.
Shop the Brush Tip Acrylic Paint Pens Bundle
(56 colours, including 16 essential colours, 16 floral colours, 12 metallics, and 12 skin tones!)
Intergalactic spaceman card
Do you know someone that has a heightened interest in all things intergalactic? This craft idea can be completed using a Life of Colour space stencil along with the easy-to-use silky paint stix!
Shop our Paint Stix
Step 1- Use the Life of Colour stencil to trace space shapes (A spaceman, rocket, telescope and planet) Paint the shapes with silver and add- blue highlights to the spaceman, flames to the rocket and a gold ring around the planet.
Step 2- Neaten up the edges with the 1mm black paint pen and cut each shape out carefully.
Step 3- On a separate piece of paper our spacy sky was created by simply smearing the silky paint stix in a pink, blue and purple in patterns mixed together. Add tiny silver dots for constellations across the sky.
Step 4- The moon is painted by simply placing down some silky-smooth white paint stix with a dash of black around the craters. You can use your finger to smear the black into the white paint to add depth and soften the edges.
Step 5- Time to put it all together! For the final construction of the card, we then pasted the spacy sky onto a card with the moon, spaceman and space items into place. You can add pieces of cardboard behind the spaceman and objects will give the card an amazing pop-up effect!
Happy Little Vegemite Rocks
The perfect rock for painting on can be difficult to find but search no longer because Life of Colour has the stone for you. Take a popular design and make it your own by adding different features, wording using a set of Life of Colour Essential Brush Pens and “hey presto” you have a mascot to be proud of.
Shop "All About Rock Painting" Bundle
Jungle Animal rocks
We have chosen five of the cutest jungle animals that you have ever seen to create some quick and easy to follow picture tutorials for you to try out. We used the fantastically round shaped and perfectly carved flat Life of Colour stones! Simply sketch the animal outline onto a white primed rock, paint them using your favourite Life of Colour Brights acrylic paint markers and then add black outlines for definition.

We have discovered that you all love cute animals so with that in mind we have found five of the most adorable little creatures for you to try. Follow the steps shown in the pictures below!
Shop "All About Rock Painting" Bundle
1- Groovy Giraffe

2- Toucan Sam
3- Perfect Panda
4- Purple Elephant
5 - Zippy Zebra

Egg Carton Animal Portraits
Portraiture paintings have always been a popular form of art and these animal portraits will make exceptional wall hangings for your children to display.
The first step is deciding upon an animal to paint, animals with long protruding noses like rabbits, foxes, pigs, raccoons, giraffes and birds are some examples that would work well to achieve the desired effect.
Shop the Brush Tip Acrylic Paint Pens Bundle

Art by Nylah Khan
Step one- Cut the spikes off an egg carton and use other pieces of the egg carton to make ears or tails and other animal parts.
Step two- Take another flat piece of recycled cardboard to fashion a picture frame shape for example a diamond, oval, square or rectangle. Paint a frame around the entire edge of the cardboard.
Step three- Sketch your chosen animal into the middle of the frame and then add loads of colour with your paint pens. Add your animals body parts (egg carton nose, ears and tail) making sure that all the parts are painted in colours that match the animal face. Glue everything into place!
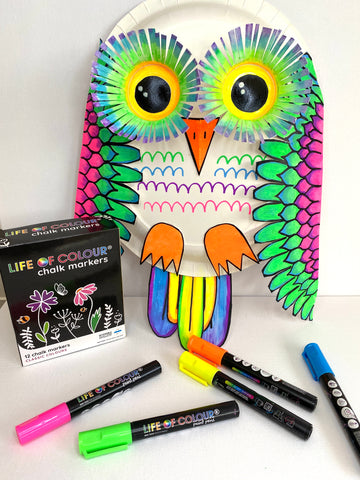
Hootie Owl Paper plate
Tu-whit tu whoo, tu-whit tu whoo! Ready for a hooting good time? Invite your children to create their own group of owls using paper plates and mess-free paint pens in all the colours of the rainbow!
Shop the Any Surface Painting Bundle
30 water-based pens (choose acrylic paint pens or chalk pens, plus one set of 6-pack paint pens)
Step 1- Cut the edges off one of the plates to make wings, use the leftover piece of plate to cut out two bird feet and a triangular shape for a beak.
Cut the two cups in half and cut slits down to the base of the cup. Use the leftover sections of the cup to cut out tail feather shapes.
Step 2- Make everything bright and colourful using the Fluro or Chalk pens! Paint the tail feathers and also put feathers onto the wings in rows. Next you need to paint a black edge to each feather. Add yellow, orange, green, blue and purple onto the cut cups and add a big black circle in the centre to complete the owl eyes. Make the beak and feet shapes all orange for a standout effect.
Step 3- Construct the owl onto the spare paper plate using glue and add. For the final step add layers of wavy feathers onto the chest of the owl.

Dotty artwork on any surface
The spectacular Spotted Seahorse has a million dots that were painted using a Life of Colour dot pen.
Provide the children with a colouring in image or a simple hand drawn sketch that they can use to complete with their dot pens using the stippling technique (many dots) to fill the picture in with colour. This is guaranteed to keep anyone occupied for hours.
Shop Dot Markers

Rainbow Dot Pen Pot
Beautiful art has never been so easy when you can achieve the perfect dot art using the Life of Colour Dot Markers. Simply apply the paint in a rainbow pattern onto a raw terracotta pot and then seal the deal with a coat of clear acrylic spray paint.
Shop Dot Markers

Art by Curious Columbus
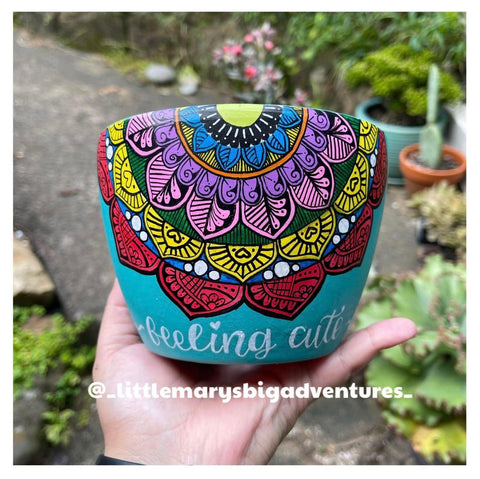
Perfectly Painted Pots
Grab yourself a pot, carbon paper and a few various sets of Life of Colour acrylic paint pens along with your favourite print to copy!
Simply copy the design onto the pot and go crazy with colour then trace around the edges with a black paint pen to define the pattern. Seal in the oven and with a light spray of clear acrylic paint to make it last in the outdoor elements.
Shop the Any Surface Painting Bundle
30 water-based pens (choose acrylic paint pens or chalk pens, plus one set of 6-pack paint pens)
Art by Mary-Anne Ramirez
Everlasting Cacti Pot
Ever wondered how to keep a plant in a perfect condition forever? It's completely possible when you make a pot like this filled with Cactus made of rocks - so low maintenance it of course will last until the turn of time! Paint your rocks and then construct them into cactus plants and arrange them into a pot.
Shop the Any Surface Painting Bundle
30 water-based pens (choose acrylic paint pens or chalk pens, plus one set of 6-pack paint pens)

Tin can recycling with rocks
Everyone loves painting rocks and recycling so we put the two together and came up with this neat idea!
Paint a tin blue, glue green felt hills around the base then glue painted rock houses and trees all around the hillside.
To complete the funky tin add some clouds and butterflies that can be constructed from white cardboard with black line-art.
Shop the Any Surface Painting Bundle
30 water-based pens (choose acrylic paint pens or chalk pens, plus one set of 6-pack paint pens)

Rainbow Air Dry Clay Starfish
Starfish are my favourite marine animal and I love having these arranged on a table to display. Alternatively, you could add holes and turn them into hanging ornaments.
Our stars are moulded with a cookie cutter out of air-dry clay. We have found that the most successful air-dry clay creations are left to dry slowly and naturally in a warm environment.
Turn the creations carefully every so often to dry them evenly. When the creations are dry you can give them a spray with a clear acrylic spray paint to make them easier to paint.

Step one- Make DIY air drying clay (mix 1 cup of cornflour, 2 cups of baking soda and 1.5 cups of water together over low heat in a saucepan until the mixture thickens. Cool the mixture and gently knead it. Bring the clay together into a ball and store it in a wet tea towel until ready to use.
Step two- Flatten the clay into a one centimetre slab and use a cookie cutter to mould stars. Place the stars onto a baking sheet and allow them to dry slowly. Turn over every day to evenly dry.
Step three- Spray dried stars with a clear acrylic paint to seal and allow to dry.
Step four- Choose Life of Colour rainbow coloured paint pens to paint them in bright colours and once they dry coat them with clear acrylic spray finish them off.
Fantastic Floral Spoon art
Keep all of those split wooden spoons to upcycle into puppets. A fun flower design can be painted onto the handles with a set of easy to apply Life of Colour Floral brush pens. The brush pen design simply glides across the surface every time!

Art by Curious Columbus
Step one- Paint the handles of the spoons white and add alot of flowers and leaves.
Step two- Add darker coloured outlines to everything to make it all pop.
Step three- Draw some facial features onto the spoon face- you can even glue some woollen hair into place too!
Shop the Brush Tip Acrylic Paint Pens Bundle
Fruity Maths
Learning at home can be fun when you get to create your own maths fraction fruits and you could add magnets on the back of them so that the kids can continue learning all day.

Art by El Mundodemama
Step one- Take a compass and sketch circles onto a piece of recycled cardboard.
Step two- Use a set of Life of Colour Gouache stix and paint the circles with fruit designs.
Step three- Cut the circles out and into mathematical fractions. Glue magnets onto the backs of the fruits, display them on the refrigerator and let the learning fun begin!
Cardboard Ice cream Dream
Turn pieces of cardboard into delicious treats. All that you need is a pair of scissors, some craft glue and a set of Life of Colour acrylic paint markers to make the ice cream dream! You could even take this craft a step further and make a mini ice cream stand to keep the children entertained for hours. Add faces to the popsicles and you also have an instant mascot!.
Craft by @emaloukidsartcraft
Shop the Any Surface Painting Bundle
30 water-based pens (choose acrylic paint pens or chalk pens, plus one set of 6-pack paint pens)

Chrome Bike and Skateboard helmet
Look at the glee on that little face - he is just so proud to have been able to get creative with the Life of Colour Chrome pens. Transform a plain dark coloured bike or skateboard helmet into a personalised helmet featuring the children's favourite animal using a set of Chrome paint markers. Our child chose a shark and for added effect they also placed splashes of water and bubbles everywhere.
The chrome paint pens glide easily across the helmet surface and adhere without the need for a sealer!

Mega Marble Run
There’s no better art than something that can actually become functional once it has been completed!
Start the process of building a marble run by placing a couple of large, weighted boxes in the centre then add painted ramps, obstacles and tunnels all around the outside from top to bottom. This craft requires cognitive planning to assess where ramps should be positioned to be successful, you will be bound to use loads of recycled crafts so start collecting!
Image sourced from Minimadthings
Creepy Crawly Cups
Save your used cups from the kids next party to create some cool hanging spiders. They are so quick and easy that you will have time to make a whole gang of spiders! Many phantasmagorical creatures or other animals such as octopus could also be constructed in the same manner.

Sourced from kidscraftroom
Step one- Paint the outside of the cup - use one colour for all of it or paint the bottom inch of the cup one colour with stripes for the remainder of the cup.
Step two- Turn the cup upside down and paint two eyes and a mouth on the side of the cup (close to the bottom edge)
Step three-Cut leg slits from the top rim of the cup about an inch or so away from the bottom then make folds so that the legs bend. Turn one of the strips into two fangs.
Step four- Make two holes in the base of the cup to thread string through so that it is ready to hang.
City Building
Chalkboard houses, cities and cut outs come in readily made kits that can be painted together as a family to make a perfect play set.
The Life of Colour Chalk pens would be the ideal medium to use for the chalkboard surfaces- simply construct the building and then add colourful details everywhere.
Shop Liquid Chalk Markers

Sourced from Lisa Lee Stats
Freaky Friday brushes
Hold onto those old art brushes and transform them into a work of art! This art creation was submitted by Janice Devlin along with a powerful message “My paintbrush family shows the importance of showing everybody fits in.. my art is all inclusive. We are all one….
Repurposed art at its best 💚”

Art by Janice Devlin
Reused, recycled and repurposed art at its finest, simply add paper mache or air dry clay faces along with trinkets, string, wool and buttons to the brushes and then paint everything with a set of Life of Colour acrylic brush paint pens which will easily get into all the grooves, holes and spaces.
Mr Doodle Supermascot
A great design idea is to sketch your main superhero image into the middle of a piece of blank white paper and then fill the background with lots of patterns and doodles. Add a minimal amount of colour to the background pattern to help make your image stand out even more!

Art sourced from Art Teacher Life
Magical Watercolour Blow Art
Keep your eyes peeled for this fantastic portable Life of Colour watercolour set. We used a combination of the fabulous watercolours with a bold black design layered over the top to achieve this magical blow art Zebra image.
Step one- Pick up the watercolour paint with a brush and create a slightly watery mix on the palette
Step two- Transfer the paint onto the page one colour at a time and use a straw to blow the colour all over the page
Step three- When the watercolours are dry you can add your bold black outlined image over the top.
Scribble Sneakers
We all love designing our own art and now you can also design your own fashion clothing! Just imagine the look on everyone's face when they complement your designer shoes, and you tell them that you made them yourself!

By Curious Columbus
Purchase a pair of white canvas sneakers and use a black Life of Colour Fabric marker to draw fun doodles all over them and then let the children colour in the images with the fabric pens.
Shop the Fabric Painting Art Box
Rainbow Painted Shells
Here is a wholesome fun family activity for you all to enjoy on a beach day outing. Take your portable Life of Colour paint markers along with you and collect shells together that can be painted right there on the beach!
Nature art importantly connects the children back to their natural environment, which is essential for development- plus nature is conveniently everywhere around us wherever we go! Collect it and then paint it for a fantastic learning experience.
Shop the Any Surface Painting Bundle
30 water-based pens (choose acrylic paint pens or chalk pens, plus one set of 6-pack paint pens)


Step 1- Take your set of Life of Colour 3mm Classic paint markers in rainbow colours and paint blocks of colour following the shell's contour. We have used the 3mm pens to blend our green and yellow, and pink with blue together to achieve softer shades.
Step 2- Using a silver 1mm paint pen we are able to place fine lines in between each rainbow colour and around the spiral of the shell to set a dividing line between each colour.
Step 3- Following the spiral in the centre, paint a second silver line then using a black fine tip place paint almond leaf shapes.
Step 4- Fill the black almond shapes with silver to wrap up the job!

Sunset Abalone Trinket shell
Step 1- Prime the abalone shell white.
Step 2- Paint yellow with a hint of orange using the 3mm markers for fast coverage, gently blend the colours.
Step 3- Mix orange with pink and red to achieve a sunset magenta that leads into a deep blue sky.
Step 4- Continue using the blue paint pen to fill the bottom half of the shell to resemble the sea.
Step 5- Merge hints of white into the blue to lighten the sea in small sections.
Step 6- Next we completed delicate features with a black and white 1mm paint pens such as the black mountain range on the horizon and white caps on the waves.
Step 7- For added perspective we completed a few palm fronds with a green 1mm paint pen around the edges.
Step 8- To add an antique feeling to the shell we painted a rough gold edging and continued to paint the back of the shell in gold as well. Spray the shell with a couple of coats of clear acrylic to protect your trinket shell and then it’s ready for displaying!

Rainbow Pippy shell
Step 1- For a quick opaque coverage use 3 mm Classic acrylic paint pens to paint the shell in rings in the following rainbow pattern - purple, blue, red, orange, yellow green, purple and pink.
Step 2- Allow the shell to dry and start applying tiny dots with the precision of a 1mm paint pen. Create a rainbow pattern upon each coloured ring, leaving out the colour that you are painting upon.
Step 3- Continue the dotted rainbow pattern until you reach the centre and leave a line blank and the centre pink spot to finish your shell!
Shop the Any Surface Painting Bundle
30 water-based pens (choose acrylic paint pens or chalk pens, plus one set of 6-pack paint pens)
Winter Camping canvas Relief Collage
When I was a child I owned a book by Jeannie Baker, her illustrations were created in the style called relief collage. Displaying a variety of materials like bark, moss, leaves and twigs upon the canvas we were able to use Life of Colour paint pen products to bring a camping scene to fruition.

For this craft you'll need to gather some natural resources- paperbark, leaves, twigs, moss and various bark matter.
Step 1- Draw a simple campsite and paint the background with a selection of colourful silky paint pens. We went for a winter scene and happily combined bright green with dark green for the grass and light blue, blue and purple for the sky.
Step 2-Paperbark was cut into neat pieces to create a tent, we added a natural wood and stone colour over the top using the Earth paint pens. The moon was cut from bark and the white silky stix added the white textured surface.
A cute campfire made from bark and moss was pasted into place after being painted using the stix.
Step 3- It’s time to get creative with silky green painted leaves and make tiny pine trees- these are a bit fiddly but also fun to create.
Step 4- Layer the trees around the tent and arrange painted moss to resemble grass around the front of the scene and tent. We achieved a “yurt” looking tent by pasting a host of tiny twigs sticking up from the peak.
Step 5- Random bark and twigs were arranged around the scene for logs and we also painted them in places with the Earthy succulent green.
Where will your camp scene take you? Try adding extra details like people sitting on the campfire logs for an added challenge!
Dot Koala Poster art
We proudly present to you Cassie the Koala, she is a dear friend to our beloved Life of Colour mascot "Kai the Koala" When making a poster it is a good idea to make sure there is a balance of patterns, shapes and colour.

The combination of dot pens and dual pens complement each other to complete the perfect background patterns and leaving a white border around the foreground images means the design is not lost in colour.
Toilet Paper Roll Bugs
Turn an empty cardboard tube into a brilliantly bright, fun and colourful craft is the aim of the game here! So save those toilet paper rolls and cardboard rolls that you usually throw away to make these cute little insects! Not only are they super easy, they are interactive, and the kids can use them for puppetry play afterwards!

Cardboard Tube Buzzy Bee
Step 1- Gather your cardboard rolls, a pencil and a pair of scissors. Cut a circle with antennae for the bee's head and two wings. (You can cut the butterfly parts at this stage too, detailed below).
Step 2- Measure the size of the toilet roll into white paper. Cut to size. Use our honeycomb stencil to create the perfect pattern for your toilet paper roll bee. We chose a lovely pastel yellow from our Gouache Stix set to add a soft touch to our little friend! (if you are using our Silky Paint Stix, you can use the yellow from that set).
Step 3- Mark out lines across the page using a pencil and ruler, these will become the stripes for the bee. Fill every second space using your black Silky Paint Stix - so quick and easy!
Step 4- To create the bee's face, use your black paint pen to draw a heart in the centre of the circle. Colour the area outside the heart with the same black pen, leaving the tip of the antennae and the inside of the heart blank.
Step 5- Draw the bee's face features on the inside of a heart shape using a fine tip black paint pen.

Step 6- Paint the face and antennae with a yellow paint pen. A couple of pink spots on the cheeks complete the buzzy bee face. Both colours are included in our handy Classic set of 12 medium tip paint pens.
Step 7- Wrap the black and yellow paper around the toilet roll and glue into place. On the opposite side of the glued seam, fasten the face.
Step 7- Colour the wings you cut out in the first step with our wonderful silver metallic paint pen. Next, use the honeycomb stencil with your fine tip black paint pen to add a lovely detail.
Step 8- Glue the buzzy bee wings towards the back sides of the bee so that the curves of the cardboard stand out. There you have it, a Buzzy Bee zzzzz!

Cardboard Roll Rainbow Butterfly
Step 1- Cut out a circle with antennae and four butterfly wings (two large and two small). You will also need to cut out six small, cute hands that will be used for butterfly legs.
Step 2- Measure the size of the toilet roll into white paper. Leave around 2 or 3 cm around to make sure it's easy to paint, you will cut to size when you are finished painting the paper.
Step 3- Choose a rainbow spectrum from the Gouache Stix (yellow, orange, pink, green, blue and purple) to add colour to the wings, paper, face and hands of the butterfly. The Gouache Stix are the perfect medium to complete this fun and colourful background quickly, and they blend together beautifully!
Step 4- Colour the butterfly's face and hands with a colour on the darkest side of your rainbow spectrum - we used purple!

Step 5- Let's create a bashful pattern on the rainbow paper. Take a gold metallic paint pen and paint cheetah spots and shapes all over the rainbow paper. Leave the rainbow wings blank for now.
This pattern was so effective because the gold shimmering across the page turned out to be a stunning effect, and the fine design was a cinch to complete.
Step 6- Cut to size and glue the shimmering rainbow paper onto the cardboard roll.
Step 7- Paint the wrists of the tiny hands with a purple metallic paint pen.
Step 8- Google a picture of a Monarch butterfly and use it as a guide to design the butterfly wings. We used our purple and gold metallic paint pens for the ease of use when it comes to fine details. The shimmer details really add depth to the wings!
Step 9- Our bashful butterfly wouldn’t be complete without a unique face. Paint details using a black and white fine tip paint pens, and don’t forget to add a couple of flicks to the eyes too!
Step 10- Once the face is dry, it is ready to be glued into place. The butterfly hands are also glued in a line towards the centre of the cardboard roll, leaving space for the brilliant wings to fit in too.
Step 11- To attach the wings in place it would be handy to use a hot glue gun so that they set in place almost immediately- alternatively you could prop them up so that they sit correctly to dry!

My kids are still buzzing, fluttering and flying around with their bees and butterflies!
Rainbow Tie-dye Sock Puppets
Life of Colour Fabric Pens are designed to be used permanently on fabric and are the star of the show when it comes to upcycling an old white sock into a cute puppet. No sewing is required for the assembly, just some string and glue!
Shop Fabric Pens (20 colours)

Quick rainbow tie-dye effect
We will show you a way to use the fabric pens to create the appearance of the sock being tie-dyed in only a fraction of the time compared to using soaking methods, follow along to learn how!

Step 1- Time to transform that dreaded odd sock into a work of beauty! Choose the brightest shades from the fabric pens - yellow, green, orange, purple and blue. A white or lightly coloured sock works best for getting colours vibrant and true.
Step 2- Dampen the sock with water and start adding circular shapes of colour, the combination of water with the fabric pens will achieve a bleeding blend of colour.
Step 3- As more colours are added to the sock the spaces begin to fill when colours are close together they will blend in the middle due to the damp material.
Step 4- Once the sock has been completed, it’s time to put it in the clothes dryer or hang it in the sun. Drying the sock will further assist you to lock the colours into the sock, and it will be ready to create a craft with.
Shop Fabric Pens (20 colours)
No-sew Rainbow Caterpillar Sock Puppet
The beauty of making these no-sew sock caterpillars is that the kids can probably manage to make them by themselves. Minimal help plus cheap makes for a great activity!

Step 1- Let's turn this rainbow sock into a caterpillar critter by placing the filling inside the sock and secure the end with string or an elastic. You can use cotton balls, fabric scraps, wool, etc.
Step 2- Make the shape of the caterpillar by tying string around sections of the body. The head should be slightly bigger, and the tail should be slightly smaller.
Step 3- Add two button eyes with glue. Twist the ends of a pipe cleaner to make them resemble antennae.
No-sew Rainbow Bunny Sock Puppet
There are so many colourful creatures to make using the rainbow sock. We have chosen an adorable no-sew bunny. Once the bunny is complete, it will bring a smile to both children and adults alike.
The versatile fabric pens allow this craft to be highly customisable, allowing you to add cute designs and details to make your bunny a one of a kind.
Shop Fabric Pens (20 colours)

Step 1- Place your chosen filling inside the sock and tie the end leaving at least 5-8 cm of sock, then make a small circular shape for the head and secure it with a piece of string.
Step 2- Use your scissors to cut the end of the sock (from the top to the head) to shape into two ears. Tie string around the tip of each ear with a bow.
Step 3- Turn the bunny over and give him a cute cottontail by tying a piece of string around a small amount of the stuffing and sock.
Step 4- Using the black fabric pen, paint a unique face. The emoji faces are a great tool for choosing an expression to use!
Doggy parlour

Work on scissor skills (and taking care of a doggy!) with this fantastic idea created by Clare from Curious Columbus, a toymaker from Tasmania that loves to create colourful and bright games for children.
Cut a lid the size of the cardboard tube and punch holes. Cut lengths of wool and feed them through the holes to create the dog's "hairdo". Store the excess wool length inside the tube for your kids to cut and style. They can grow the hair back by pulling the wool that is inside the tube.
Draw on a dog face using Life of Colour liquid chalk pens... and you are ready to go!
Shop Liquid Chalk Markers
Paddlepop/Popsicle Stick Puzzles
Stepping up the educational factors for this craft for kids by creating puzzle challenges that will support the creativity of children along with cognitive brain power to solve the puzzle too! You can choose any image for your puzzles keeping in mind the age appropriate type of challenge that you wish to create.
We took a stroll down memory lane for our sweet milkshake puzzle, Think of your favourite childhood lollies - rainbow straps, strawberries and cream, swizzle sticks and lollipops - colour galore! Luckily the Life of Colour paint pens have every colour under the sun to match so that you can re-create.
Time to grab all of your most vibrant colours in your Life of Colour collection- fluorescent heaven here we come!!

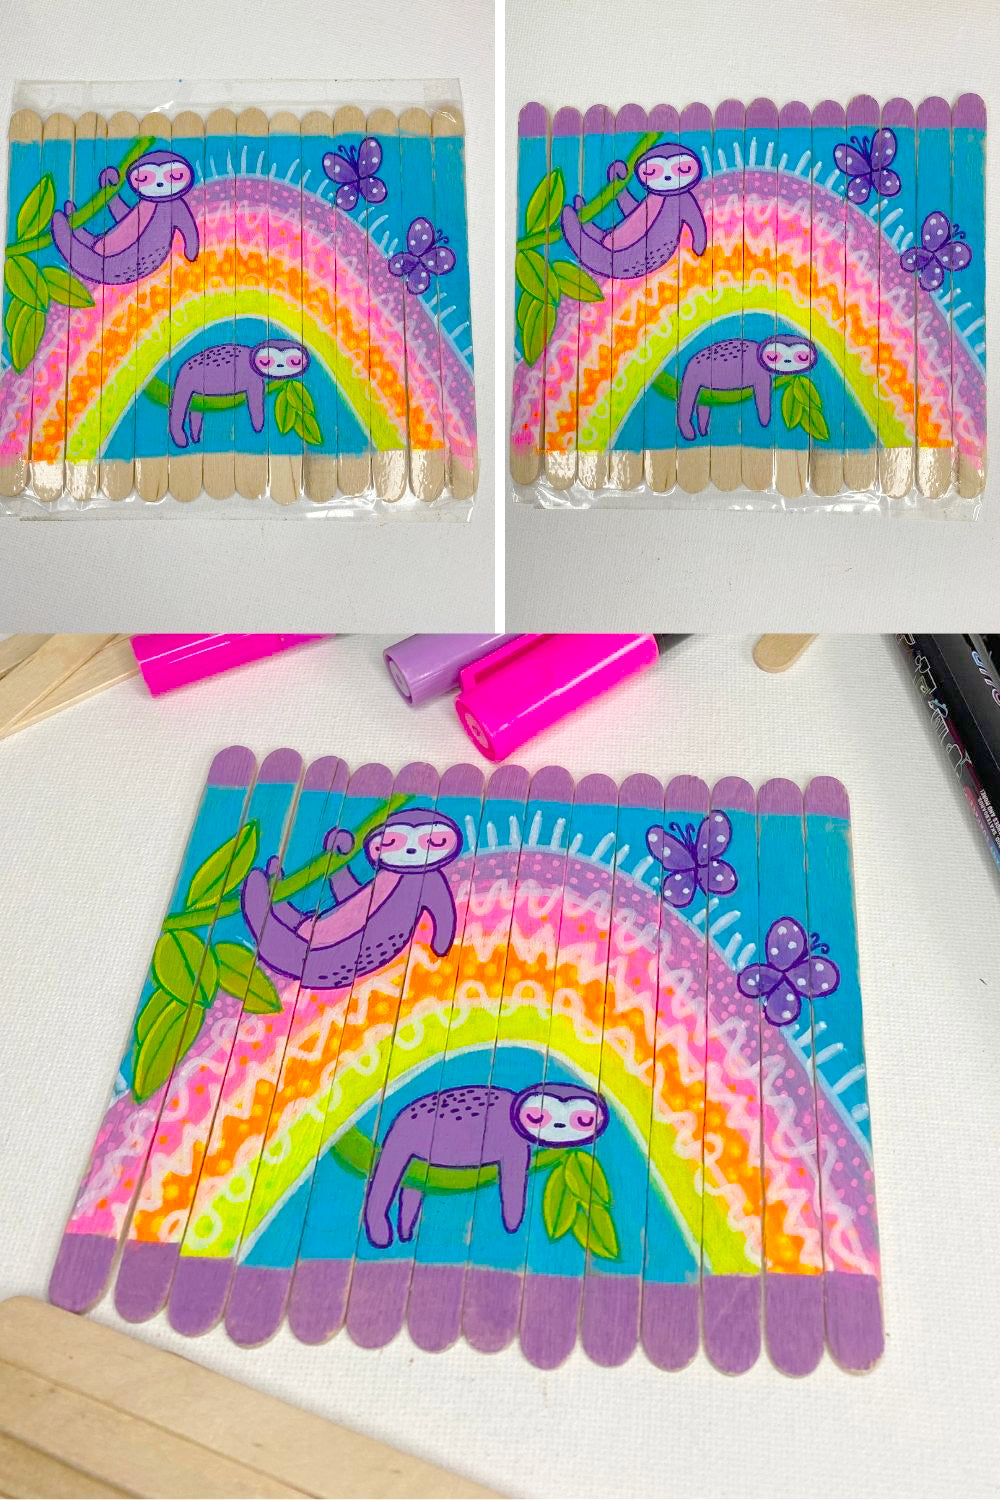
Sleepy sloth puzzle
Step 1- Fasten 14 paddle pop sticks together using sticky tape and gather your Fluro paint pens for maximum vibrancy and complete a curved rainbow with a blue background with the paddlepop sticks sitting vertically.
Step 2- Sketch a couple of sloth hanging from vines with leaves- one in the top corner and one underneath your rainbow. Add a couple of simple butterflies fluttering around in the sky.

Step 3- Using the Life of Colour Essential brush pen set for the convenience of brush accuracy to carefully colour the sloths and butterflies purple. Deepen the colour with many layers towards the inner edges of the butterflies. Use white on the sloth faces to show a good contrast in colours.
Step 4- Paint the sloth branches green with a variety of shades, the essential set offers two shades of green to use. Neaten up the edges of the sloth and butterflies using a fine 1mm purple paint marker.
Step 5- Add patterns of white around the edges of the rainbow and a few spots on top of the butterflies wings- either a 3mm or a 1mm paint pen would be suitable for these lines. Continue adding the finer features to the sloth faces, vines and leaves - we utilise the fine tip for paint accuracy for this.
Step 6- Take care to remove the sticky tape from the outside edges of the paddle pop sticks and complete the edges with the essential brush pen in a purple - you will notice the tip of this pen easily paints in the small creases and crevices.
Step 7- Pull the puzzle apart, mix up the pieces and then it’s time for the brain challenge to put it back together correctly! Have fun!
Candy loaded milkshake puzzle
Step 1- Fasten 14 paddle pop sticks into place with sticky tape and sit them horizontally ready to paint.
Step 2- Use your Gouache stix to quickly add a rainbow to the paddle pop surface, glide your finger over the top of where the colours meet to blend them together.
Step 3- Sketch a candy loaded milkshake in the centre of the puzzle.
Step 4- Hot pink from the 3mm Classic paint pen gives an added “POP” of colour to this sweet delight. Use the pink for the milkshake jar, lollipops and straw. It would be a crime to cover up all of the beautiful blending from the Gouache stix so turn part of the milkshake froth into the main details by placing a fine line around the dripping shake.
Step 5- Paint a smug face onto the milkshake jar (you’d be happy if you had a head of sweets for hair too!!) Begin to fill the lollies with colour- white, red, blue and bright green to name a few from the 3mm sets - fine enough to allow for neat edges and filling in the opaque colours fast.

Step 6- Strawberry cream froth on the top of the milkshake is achieved using a blend of red and pink.
Step 7- Add pink and white swizzle sticks, a rainbow strap, a blue and white swirling lollipop, peach pop and a heart stirring stick. All that is left to do is add sprinkles, sparkles and pizazz! A mixture of circles and dashes spread around for fun then a layer of sparkling silver for added shine and sugar. We always lean towards our Metallic range to add shimmer and shine!
Step 8- Remove the tape from the edges and run a silver paint pen around to complete the candy loaded milkshake puzzle.

Paper craft Lion King Mask
“Do you suppose we’ll meet any wild animals?…mostly lions and tigers and bears!!” My favourite line from the movie “Wizard of Oz” that marks the moment our character’s meet the supposed fierce Lion! Well it’s time to make a Life of Colour Lion of our own to use as a mask to prance around the room like a Lion too!
A combination of Life of Colour products are used for this craft- including the Gouache stix (we will show you the watercolour effect) and the Metallic brush pens for precision and to add a striking shimmer!
You will need cardboard to create this amazing mask! Bonus points for reusing cardboard that has served its purpose.

CUTTING SHAPES
Step 1- Take a plate and place it on top of your piece of cardboard and use it as a template to cut out a large circle.
Step 2- Cut a large “v” section from the base of the circle and sketch a circular lion face onto the centre.
Step 3- Use the leftover pieces to cut out a pointy triangle and two joined circles with a triangular shape for a nose.
Step 4- Cut long strips of cardboard that are slightly wider than the space that has been created for the lion's mane.


PAINTING
Step 1- Draw a diamond shape and paint it using a brown silky stix (for a deep tone of brown) and cut it out leaving tabs on the outer edge.
Step 2- Paint the Lion jowls with the brown from the Gouache stix (it’s a light creamy brown) and has the ability to blend with a damp paint brush to create a watercolour look.
Add a deep brown nose.
Step 3- Utilise the Metallic bronze brush tip to colour in a line formation over the top of the long strips of cardboard. The brush pen glides across the cardboard to easily achieve this textured shine.
Cut it into about 20 x 1 cm strips then cut a few long strips that can be used as whiskers.

Step 4- Glide the creamy light brown gouache stix across the outside of the face of the Lion and use a damp brush to spread a layer of paint towards the middle.
Step 5- Place a circle of blue, light blue and purple gouache onto your palette and use a paint brush to water down each colour. Paint the lions mane in a pattern of stripes using these colours. Use a deep brown for the inside of the cute ears.

Step 6- Wait for the paint to dry and then add an outline of black to the face and nose section. Add a set of whiskers to the nose with a few dots.
Step 7- In between each colour around the lion's mane, glue down a strip of bronze cardboard and glue the nose onto the bottom section of the face.
Step 8- Paint the pointy triangle hot pink from the silky collection and fold it in half and glue it into place.
Step 9- It’s time to add character to the mask by adding extra patterns to the mane- use Metallic white and gold to paint fine details -swirls, lines, dots and “v” shapes are simple to complete when using the brush tip pens.
Step 10- For even more character we have curled a few whiskers, glued on some eyebrows and put the diamond nose in place for a 3D effect!

Paint a cool design on a mirror

Is your teen thinking of adding art to their mirror? With the liquid chalk pens, they can do it again and again.
Liquid Chalk Markers are easy to use, long-lasting and washable from any non-porous surface, so you don't have to worry about the mirror's condition after the art session.
Chalk pens are perfect to add colour temporarily onto non-porous surfaces, when you (or the teen) is bored, simply wipe and create new art!
Shop Liquid Chalk Markers
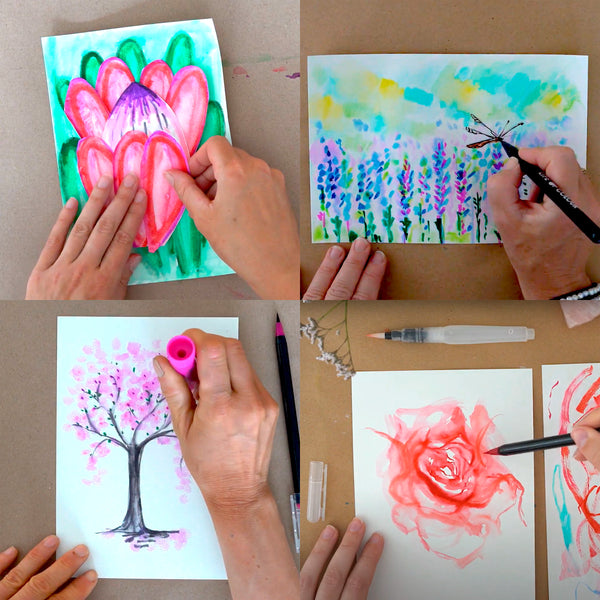
Rainbow drip name sign

Use your creamy Gouache Stix to create this fun rainbow drip effect with the guidance of artist Tammy Klingner. Get the Gouache with the perfect paper for this craft, here.
Follow the order of the colours in the rainbow to create this effect. Start at the top right corner with red, add water and allow it to drip down the page by tilting your mixed media paper card. Continue to do the same with every colour.
Use a cardboard tube as a stamp to add more flair to the rainbow: simply paint with the gouache on the border of the tube and stamp it on the paper.
After it's dry, children can write their names or add a message for a friend!
Paint a seashell

Turn seashells into works of art with this idea by Clare from Curious Columbus. Prime any shells collected from your latest trip to the beach and have fun with the Silky Paint Stix.
With the Silky Stix, kids can paint and blend directly on the primed seashell with their fingers or the Stix itself. Add a little water to make subtle gradients or create watercolour-like effects.
Bubble wrap and cotton bud Rainbow Tree

This Rainbow Tree by Tammy Klingner is the perfect mixed media piece to start experimenting with stamping using different textures from around your house. It is suitable for all ages and will be a fun piece to try in different colour palettes.
Gouache Stix are creamy and highly pigmented - make sure to get the perfect paper to make them shine (shop the Gouache and paper bundle and save).
The first layer will be made using bubble wrap as a stamp, and the second layer will be made using cotton buds. Read the step by step here.
Make awesome wood slices decorations

Make an easy drawer hanger by combining your wood slices and stencils, we have hundreds of designs combined into different sets for those days when you want to be creative and not think about drawing something from scratch.
You can paint on wood slices with paint pens, chalk pens, Silky Stix and more!
This cute drawer decor piece was made by Jaz (13 years old).
Bunny planter

Turn your favourite animal into a colourful planter! Cut a plastic bottle to resemble the animal you chose: it can be a bunny like the original, a cat, a dog, a shark... possibilities are endless!
Prime the bottle with white acrylic paint or an all purpose primer. Use your paint pens or liquid chalk pens to paint the face features and colourful details.
Idea by Clare from Curious Columbus
Recreate your favourite piece of art from your home

Do you have a great piece of artwork in the living room you just *loooove*... you can practice your drawing, painting and observation skills by recreating it in your style.
Sit on the couch with your favourite portable art supplies and a warm cup of coffee and make your own version of your favourite art! You can try again in a couple of months and see if you spot any differences between your pieces.
Take a family painting workshop
If you need some time to unwind, relax and connect with your family, then taking a painting workshop together can be a perfect activity to do at home.
We ship the supplies to your home and provide you with a fantastic video masterclass intended for all ages. Pick your favourite online workshop: lavender fields, abstract rose, cherry blossom tree or protea in 3D - or get all four of them.
Dinosaur pencil holder

This idea by Curious Columbus will be any dinosaur fan's favourite!
Draw a dinosaur shape onto an empty milk bottle (or any other plastic bottle with a sturdy base). Cut out the shape using scissors and paint the base colour.
Add googly eyes and decorate your dino. Clare used dyed pistachio shells to mimic dinosaur spots.
Paint your shoes

Shoes by Jaz, mum Daphne Birett
Revamp an old pair of shoes, or get plain shoes to colour in! The fabric pens are permanent and will be the perfect tool to create wearable art on shoes without the mess of liquid paint splattering all over the place.
Try this rainbow drip design as an easy way to begin the shoe hobby - you can also try some of these other designs:

Design by Bea, mum Daphne Birett

Hayley Harding
Unicorn rock

To try your hand at this adorable unicorn rock by Curious Columbus, gather wool with shiny accents and anything glittery that can be turned into a unicorn tiara! You will also need clay to mould the horn and a hot glue gun to help your little one glue the decorations onto the rock.
Prime the rock white or a pastel colour. When dry, draw the face using your Life of Colour fine tip paint pens.
Glue the hair, horn and felt ears to the top of the rock - and then have fun adding all the decorations!
Frida Kahlo painted eggs

Painted eggs are not just a thing of Easter - you can decorate your own dozen any time of the year! Choose a theme and have fun turning a plain batch of eggs into a wonderful collection. Curious Columbus chose Frida Kahlo and cacti to decorate their family's eggs. How creative!
You can use paint pens or chalk pens to create all the features. For the cactus, paint the entire egg green and then add details after the green base is dry. Glue colourful pompons or wooden beads to make Frida's iconic flower crown. Use flower shaped beads or fabric flowers to help the cacti bloom.
Prop up your new friends on nursery cardboard planters and admire your collection.
Pasta tic-tac-toe

This might be the cutest idea ever... and the best part is you can open the pantry and keep the kids entertained and off screens for a long while!
Make your own fantastic pasta tic-tac-toe, an idea created by Clare from Curious Columbus.
Collection of movie inspired rocks
Any Disney, superhero, Pokemon fans in your home? Why not make a fantastic set of rocks inspired by their favourite characters!? The world of rock painting is awaiting. All you need is to gather rocks from your surroundings or purchase some in a landscape shop.
Frozen, Aladdin, Beauty & the Beast and Star Wars rocks by @ruthless_artist


Our paint pens are perfect for rock painting and you can even mix the colours to make new ones.
Bottle to Fairy Fantasia
Fairies have always been so magical and enchanting with the shimmer of fairy dust sprinkling our imaginations we were able to make our very own fairy house that can be kept at our bedsides so we can imagine that maybe a sprite might visit us at night. Inspired to make one yourself? Follow along to see how!
Step one- Make DIY air drying clay (mix 1 cup of cornflour, 2 cups of baking soda and 1.5 cups of water together over low heat in a saucepan until the mixture thickens. Cool the mixture and gently knead it. Bring the clay together into a ball and store it in a wet tea towel until ready to use.
Step two- Prepare an empty bottle by gluing tissue paper over the entirety and then start sculpting your clay into place whilst the surface is still wet with glue. Add sculpted leaves, vines, rounds of imprinted flowers and of course a Fairy door.
Step three- Glue a cute paddle pop fence around the base. Wait for the bottle to dry completely and then paint in magical combinations of colour using Life of Colour Metallic brush pens.
Paint on your old phone case
If your case has seen better days, you can make sure it gets a second life! First of all, clean your case using a soft cloth and soapy water. Dry. If it is glossy or already painted on, be sure to prime the case before painting. Next, take out your trusty Life of Colour paint pens and start making art!
These are some vibrant ideas by our resident artist Ella Hore:


This dreamy beach scene with black silhouettes painted by Samantha Dorahy. She used the 3mm pens to make the gradient background, adding a touch of glitter pink to make it sparkle!

To finish your new case, and make sure it is protected, use your sealant of choice. We always recommend a matte finish, so it looks silky and smooth!
Make your own mug

Decorate any plain white mugs laying around with these super easy designs and make coffee time look a little bit more fun!
A quick dotted rainbow is a great idea to make with the kids. Give each child a mug for them to decorate however they desire!
This retro design allows you to change up the colours and shapes to make it your own. It’s also really unique with the quote “coffee time” lettered on the front.
Use a clear acrylic spray to seal the mug.

Use a clear acrylic spray to seal the mug.
Revamp your clothes and bring art into your outfits

Painting on clothes is one of the easiest ways to enjoy your artwork while wearing it. Start by adding pops of colour to your shoes, a scarf or a tote bag before moving up to larger pieces.
This stunning jacket was painted by Jen Hall. The best kind of inspiration to keep putting your art to the test with new mediums. You can find her on Facebook as Painty Hands.
Turn any gift box into decor

It is very easy to DIY craft boxes with cool designs. Little heart boxes like these are a perfect size to do some detailed patterns or simple landscape designs like these. Whether it’s a circle, triangle or square they would work perfectly for a small DIY project like this!
These boxes had already been painted before, so giving them a coat of white before starting makes coverage a lot easier. For a simple design like these, sketch out some outlines and colour in the block areas with paint pen colours of your choice. Outline the shapes with a black fine tip paint pen and colour the “rim” with any colour you have used.
Need more ideas?
Make sure you follow us on social media for the coolest video tutorials on everything crafty!