
DIY Memory Game, each player paints it's own tiles!
We've seen the memory games sold at stores, they have generic animals or items that most kids don't feel identified with. A pair of cows and a pair of ducks are fun... but how about asking your kids what characters or objects they would love to have in their own game?
The idea is easy: you divide the tiles between all the kids and adults that want to help and each person can decide what they want to draw! Favourite movie characters, beloved toys, animals they love, letters or numbers, anything! The result is a game that has a bit of each player personality, and makes it a lot more fun to play with because you'll want to find your own drawings.
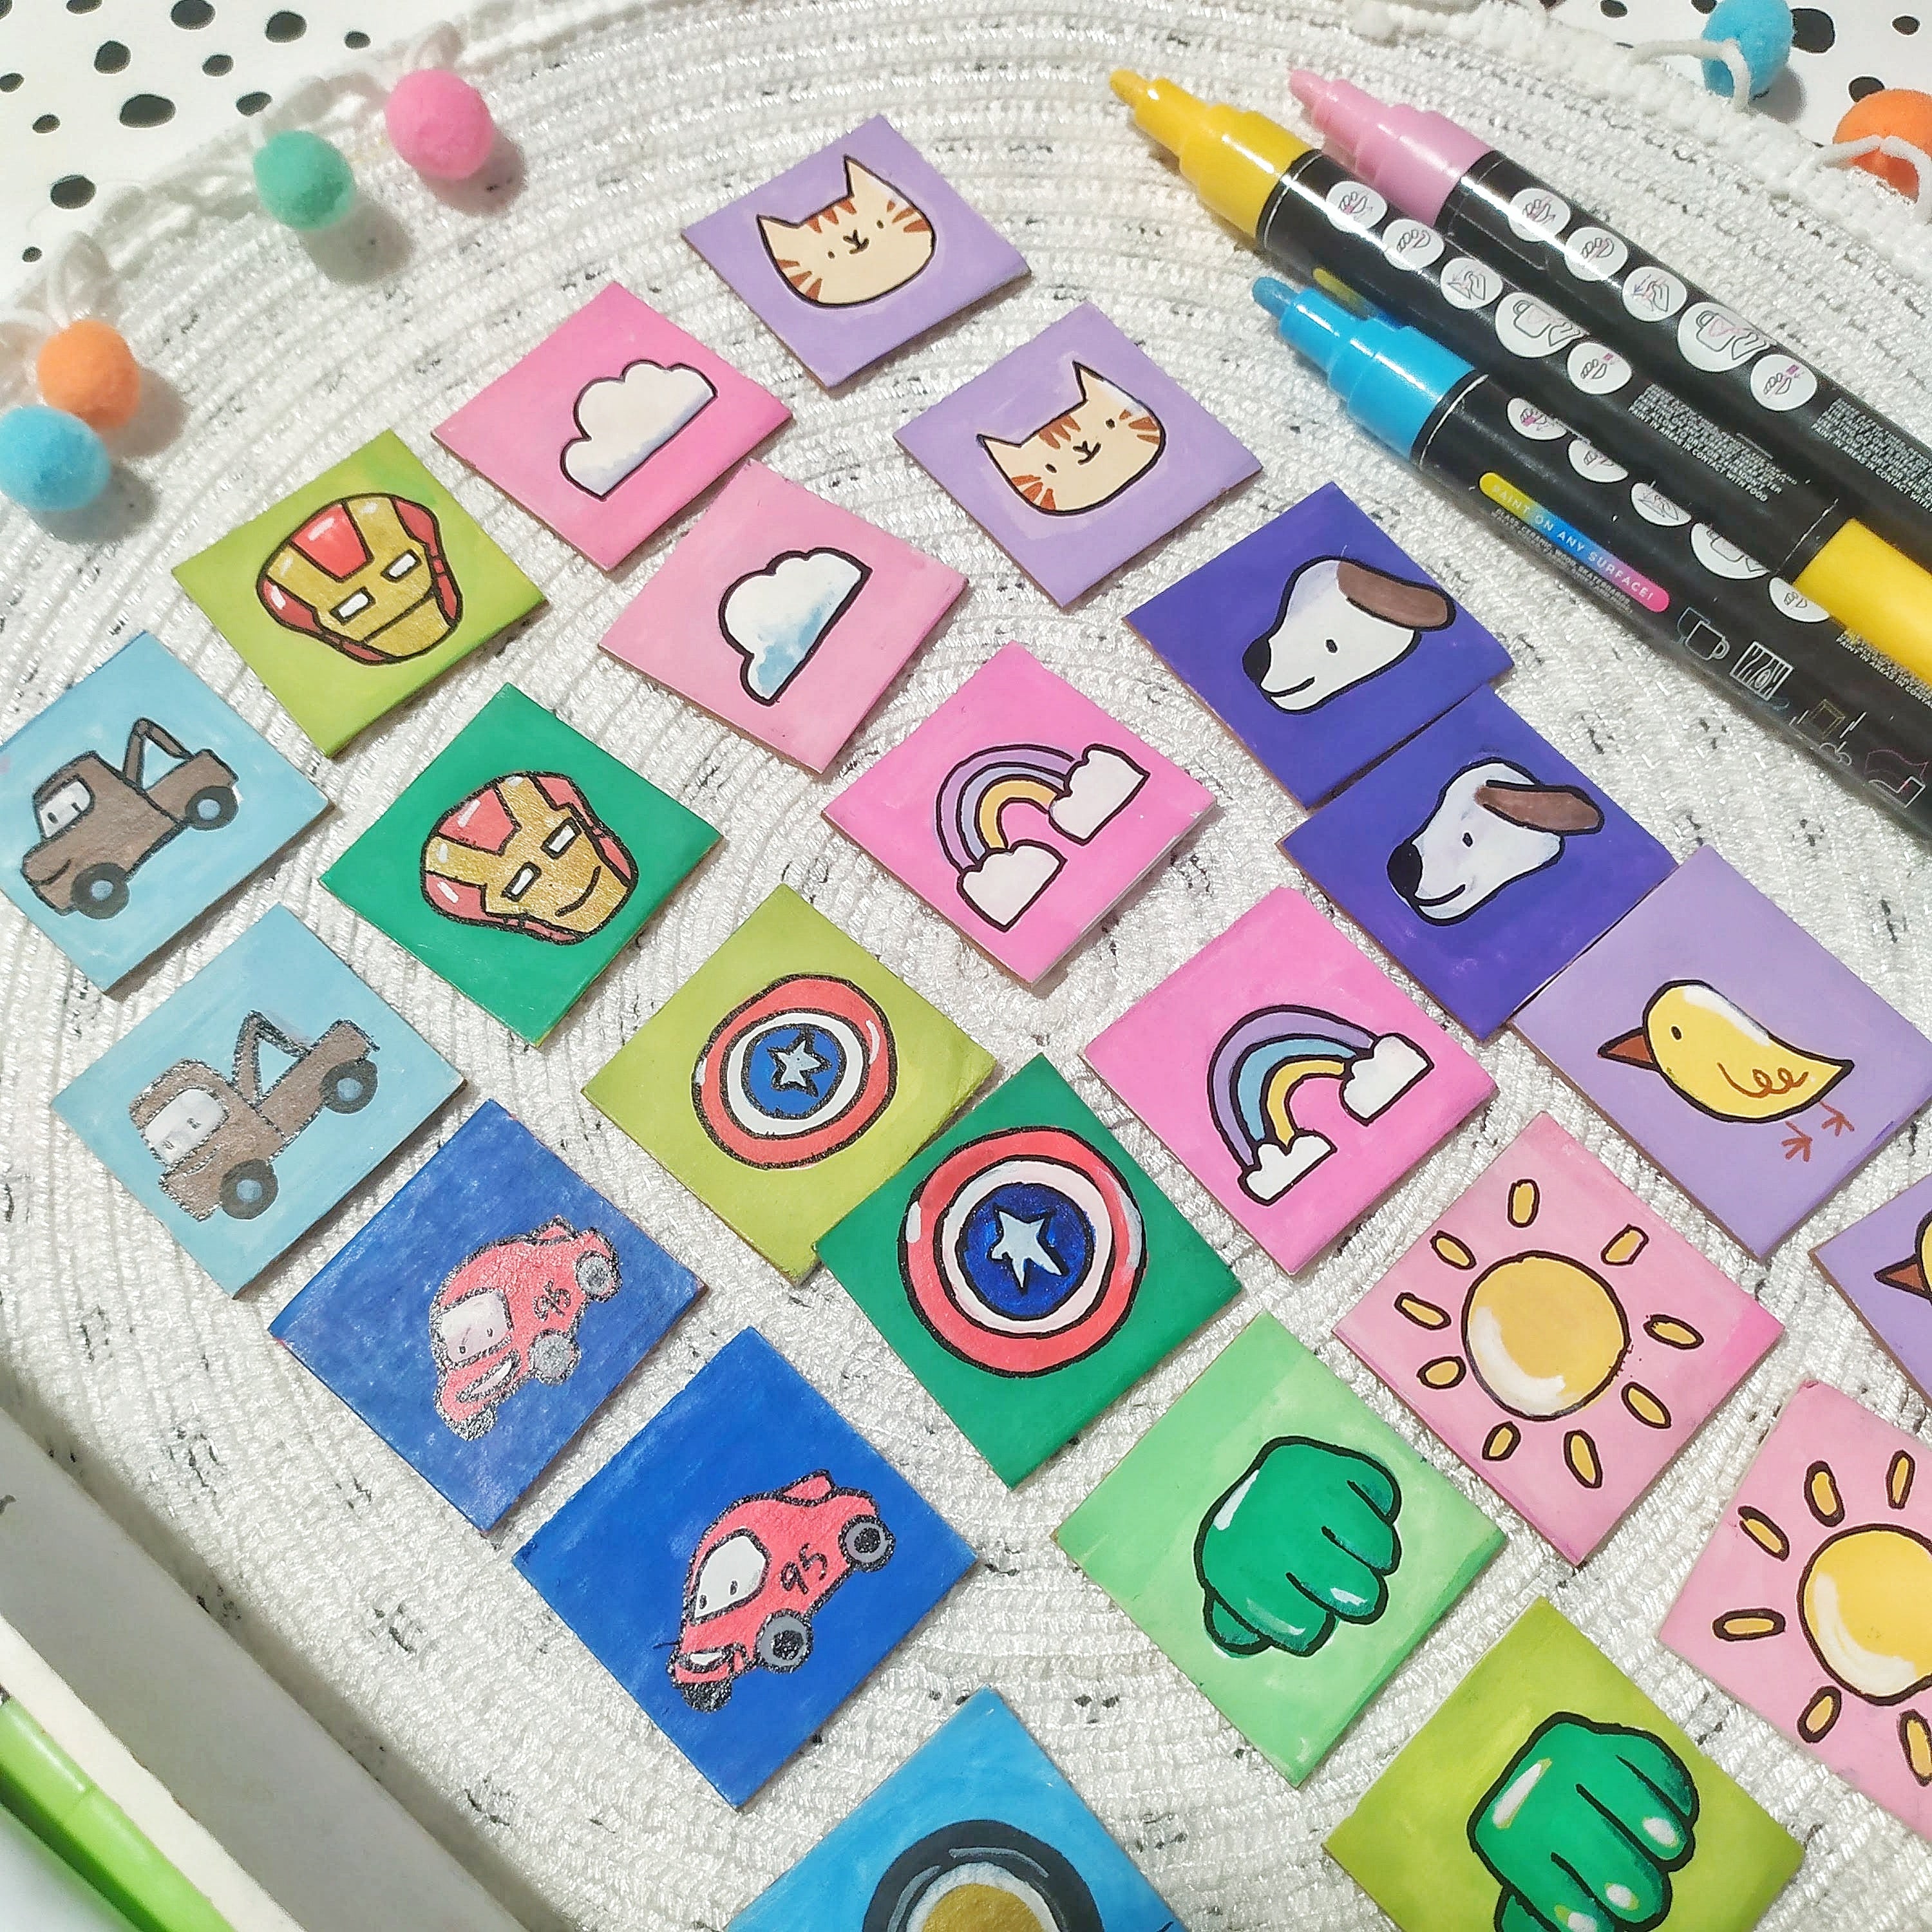
I know, probably two of them will want to paint Lightning McQueen... that's why each person also gets a unique colour. The characters can overlap because they will have a different background colour.

In my case, my son Tobi was the brain behind his tiles but I did all the painting - he stayed by my side instructing me when I was going too slow or a detail was missing! Fun, huh? I got the other half of the tiles and made sure to add a cat (or two).
What you'll need for this DIY Memory Game
- Cardboard (I'm recycling the back of a watercolour pad)
- 1mm Black paint pen for linework (they come in this set)
- 3mm Paint pens to colour: we used the Classics and the Special Colours
- Ruler
- Pencil and Eraser
- Cutter or scissors
- White acrylic to prime - recommended
- Masking tape - optional

Set up the tiles
Step 1: Prime your cardboard with white acrylic, it's of course optional but recommended! Go a step further and prime the back too - something I realized was missing when we finished painting and we started playing. Not only it looks a lot neater, the paint pens write a lot better too and you only need one coat to cover the surface (this really helps kids!)
Step 2: Trace the lines for the tiles
Depending on the cardboard you're going to be using, and the age of the children, figure out an appropriate size and amount of tiles. If younger children are painting, you might want to include less tiles in a bigger size, for example 4 tiles each of 5 or 6 centimeters. With older children or adults painting, you can make smaller tiles.

First divide the cardboard into vertical stripes. A good starting point is dividing by 4, so you can divide amongst the kids and yourself, but it could be 2 or 6!
Measure the width of each stripe and use that measurement to divide each stripe into an even amount of squares, don't cut the squares yet.
In my case I was able to make a total of 24 tiles that measure an inch and a half, high amount of tiles to paint by hand without a helper, but so much fun to play with!!

Step 3: Divide the stripes and colours
- Cut each stripe without separating the squares so it's easier for the kids to draw on them.
- Hand out the kids their stripe and let them choose a background colour. Remember this helps if they have the same taste in characters and hobbies.

Painting the pairs
Step 4: Each person doodles their own favourite characters in pairs
Here comes the fun part... thinking of all the cool stuff each kid and adult loves and making little doodles in our tiles.
There should be a pair of each design. If two kids want the same character, they can each do their version and use a different background.
If you run out of ideas you can use a motif from the same character or object in a different position or size! For example two car tires!

Step 5: Colour the doodles using paint pens
Start applying layers using the 3mm paint pens and let it dry before painting above the previous layer. Since acrylic paint pens are opaque, you can layer light colors above bright colours (white over red).
It doesn't matter if they look perfect, it's all about having a game we made ourselves, with our favourite people, our favourite colours and characters!
The time you take drawing the tiles is also part of the fun, so if the kids get a bit tired or bored, consider removing some pairs of unfinished tiles so they can start playing sooner.

Step 6: Colour the backgrounds
After the doodles are dry, paint the background.
Since there should be a pair of each design that's easy to spot and not cause confusion, each player got their own background colour.
- 2 Lightning McQueen (blue background)
- 2 Lightning McQueen (green background)
Even if there aren't repeated items, it looks a lot more fun if it's very colourful!

Step 7: Lineart
When its all dry, make the lineart using the 1mm black paint pen. You can also add highlights using the 1mm white paint pen.
Step 8: Protect the set and cut the tiles
If you have any fixative at hand, you can spray a coat to protect the game (or use a layer of acrylic varnish). Quick drying is best so there's no waiting involved!
Cut the tiles and start playing!

Start playing
The game is very easy. Toddlers and up can take part. My 4-year-old took a few tries before getting the concept of returning mismatched tiles to their spot, even if it was of his favourite drawing, but in the end he understood it was all about finding each tile buddy and he's been having so much fun!
Place all the tiles on the table or the carpet with the drawing facing down making clear rows and columns. For example 6 columns of 4 rows each. This will be important to help each player remember where each drawing is.

The first player takes two tiles at random and flips them, so the drawings are visible to everyone.
If the tiles have the same drawing, the player can take them off the board.

If the tiles have different drawings, the player has to put each tile back in its place with the drawing facing down.
The next player does the same steps after the previous one either took their pair or put the mismatched tiles on the respective spots. Since it's a game about remembering where the tiles were, it's not cheating if the next player uses the information to make themselves a pair in their own turn.

The game ends when no tiles are on the table, and whoever has the most pairs wins!


