
All about rock painting Activity Sheet
In this lesson plan, kids will learn how to paint different designs on rocks - according to their age groups, they'll find step by step instructions to start this fun creative hobby!
Table of contents
- Benefits of rock painting for children and teens
- Where to find rocks for rock painting
- How to prep rocks for rock painting
- Sealing your rocks
- Activity 1: Fruits and ice cream rocks
- Activity 2: Britto inspired rock
- Activity 3: Wombat rock
- Activity 4: Poppy hill rock tutorial
- Activity 5: Paint a Rock Mandala
- Activity 6: Dinosaur eggs Jurassic Park rock
- Activity 7: City lights rock
- Activity 8: Solar System Planet Rocks
- Paint Pen care: How to clean a dry, clogged or dirty paint pen
Benefits of rock painting for children and teens
Some of the benefits of rock painting for children include teaching the concept of “sharing is caring”, supporting their creative outlets, learning new age-appropriate artistic techniques, improve abilities to follow step by step instructions and be patient. The list really is endless!
There are great ways to use rock painting in the classroom including for various educational activities, rock hunting, creating games, simple life cycles, gift giving and story stone sets.
More resources for parents and educators.
Where to find rocks for rock painting
The best types of rocks to use are smooth flat rocks. You can always go outside to look for them, on riverbeds, parks, beaches, forests, and so on, but if you have limited natural rocks in your area you can go to your local hardware store like Bunnings or landscape suppliers to buy them.


(Tuscan path 30-50mm pebbles)
You can buy a whole bag for pretty cheap so you will have plenty to practice with and improve your skills. Make sure you do not buy polished rocks as the paint will not stick very well, if you do buy polished, a bit of light sanding and priming will help.
Paint shows up better on light rocks than on dark rocks, although if you have dark rocks, all good, you can still prime them with some light paint.
The rock is going to be your canvas, so make sure you have rocks that inspire your upcoming creations! Find rocks with funky shapes, or beautiful colours, bigger for detailed scenes or tiny for tic-tac-toe projects and collections.

This fantastic watermelon and kiwi tic-tac-toe with rocks made by Samantha Dorahy is the perfect example that the perfect rocks inspire the artist!

Alan Spears' crocodile rock is another fantastic example of rocks that inspire you to create based on their shape!
How to prep rocks for rock painting

Wash your rocks to remove any dirt or dust before starting. Let them dry and then you have an option of sealing or priming the rock to make a nice smooth surface to the rock.
You can use a spray primer or a brush on primer/undercoat from dulux. Do one side at a time or both sides as you wish but make sure they dry first before starting to paint.
Another option is priming with white acrylic paint using a broad brush. Take the opportunity and prime a batch of rocks at the same time to make the process speedier for you.
Remember to always let your primer dry before applying colour with paint pens.
Priming your rocks before you start painting is important for two reasons: the surface will be smoother and less porous, but still porous enough to absorb paint permanently (as opposed to a polished rock, ceramic or glass for example).
This will help you in the painting process, less coats of paint and less damage to your paint pen nibs and/or brushes.
If your paint pen felt tips get damaged from heavy use or coarse rocks, don't worry you can buy 3mm felt tips and 1mm plastic nibs on our store and give the pens new life.
Sealing your rocks
The answer for us is always: ABSOLUTELY!
Preferably you would like to finish your artwork off by sealing the paint so that it is protected from the elements such as sun and rain and also time. This will also give it a pretty finish such as making it more matte or glossy. If you have decided to add things like goggle eyes or stickers to your rock, then a PVC glue would be helpful.
There are many different brush on and spray polyurethane sealants available, anywhere from your local hardware store, art store or even supermarkets. Choose either a glossy, glaze, matte or satin finish depending on what you prefer. Ask for a sealant that is waterproof, especially if you want to leave your rocks outside. This step is not a necessity for if you are just playing around, but if you want to keep these rock for a long time or hide them in nature for someone else to find, then we recommend it.
Activity 1: Fruits and ice cream rocks
This fantastic tutorial was developed with Daphne Birett @scrapadills to bring you the recipe for a fresh and summery rock collection.
Get inspired by the flavour of summer and create this fun set of rocks, you can use them to make a tic tac toe to play with your family, decorate your garden or hide in a park for someone to find.
How to make an Orange inspired rock

- Start by priming your rock with white acrylic paint.
- Colour the edges of the rock using your Life of Colour orange paint pen leaving a free area on the center of the rock.
- Line the inner circle with yellow, and make lines to represent the orange segments. Use pencil first to correct the size of the segments beforehand.
- Colour each segment using a soft orange Life of Colour paint pen.
- Wait until the last step has dried, then use a fine point orange paint pen to add stippling to each segment.

Make your own Strawberry rocks

- Begin by choosing a triangular shaped rock, to mimic the shape of a real strawberry. Prime it to help the paint pens run smoother - and last longer!
- Draw the leaves of the strawberry with a pencil, and then proceed to paint it with a vibrant green
- Colour the rest of the rock using a red Life of Colour paint pen - you can find different red versions in our Classics, Brights and the Special Colours!
- Wait for the strawberry to dry and then use a fine point white paint pen to make the strawberry seeds.

Watermelon rock step by step

- Prime a rock shaped as a slice of watermelon, or make the design on an oval-shaped rock to have half a watermelon.
- Draw the lines for the watermelon rind using a pencil. Colour the rind using green. Leave a white line between the rind and the flesh.
- Colour the flesh using red
- Once the flesh is dry, use a black paint pen to draw the watermelon seeds.

Ice Cream rocks tutorial

Pick your rocks carefully, get inspired by their shape and find the ones that have a shape that could be turned into a delicious (but not edible) ice cream.
- Prime the fronts of the rocks for smooth painting.
- Draw your ice creams using a pencil, you’ll need to make the cone with a waffle texture and the ice cream balls - you can plan the toppings at this stage or improvise after you coloured your bases.
- Use your beige paint pen (you can find different shades in the Brights, Earth Colours and Special Colours) to colour the cone.
- Once it’s dry, you can line the waffle texture using a white fine point pen. You can also add shading using a brown paint pen that’s slightly darker than your base.
- Choose bright colours to make your ice cream come to life. You can use pinks, chocolates, pastel yellows and mint… What’s your favourite flavour?
- Once the ice cream base colour is dry, you can paint the various toppings: sprinkles, chocolate or strawberry syrup, and more.

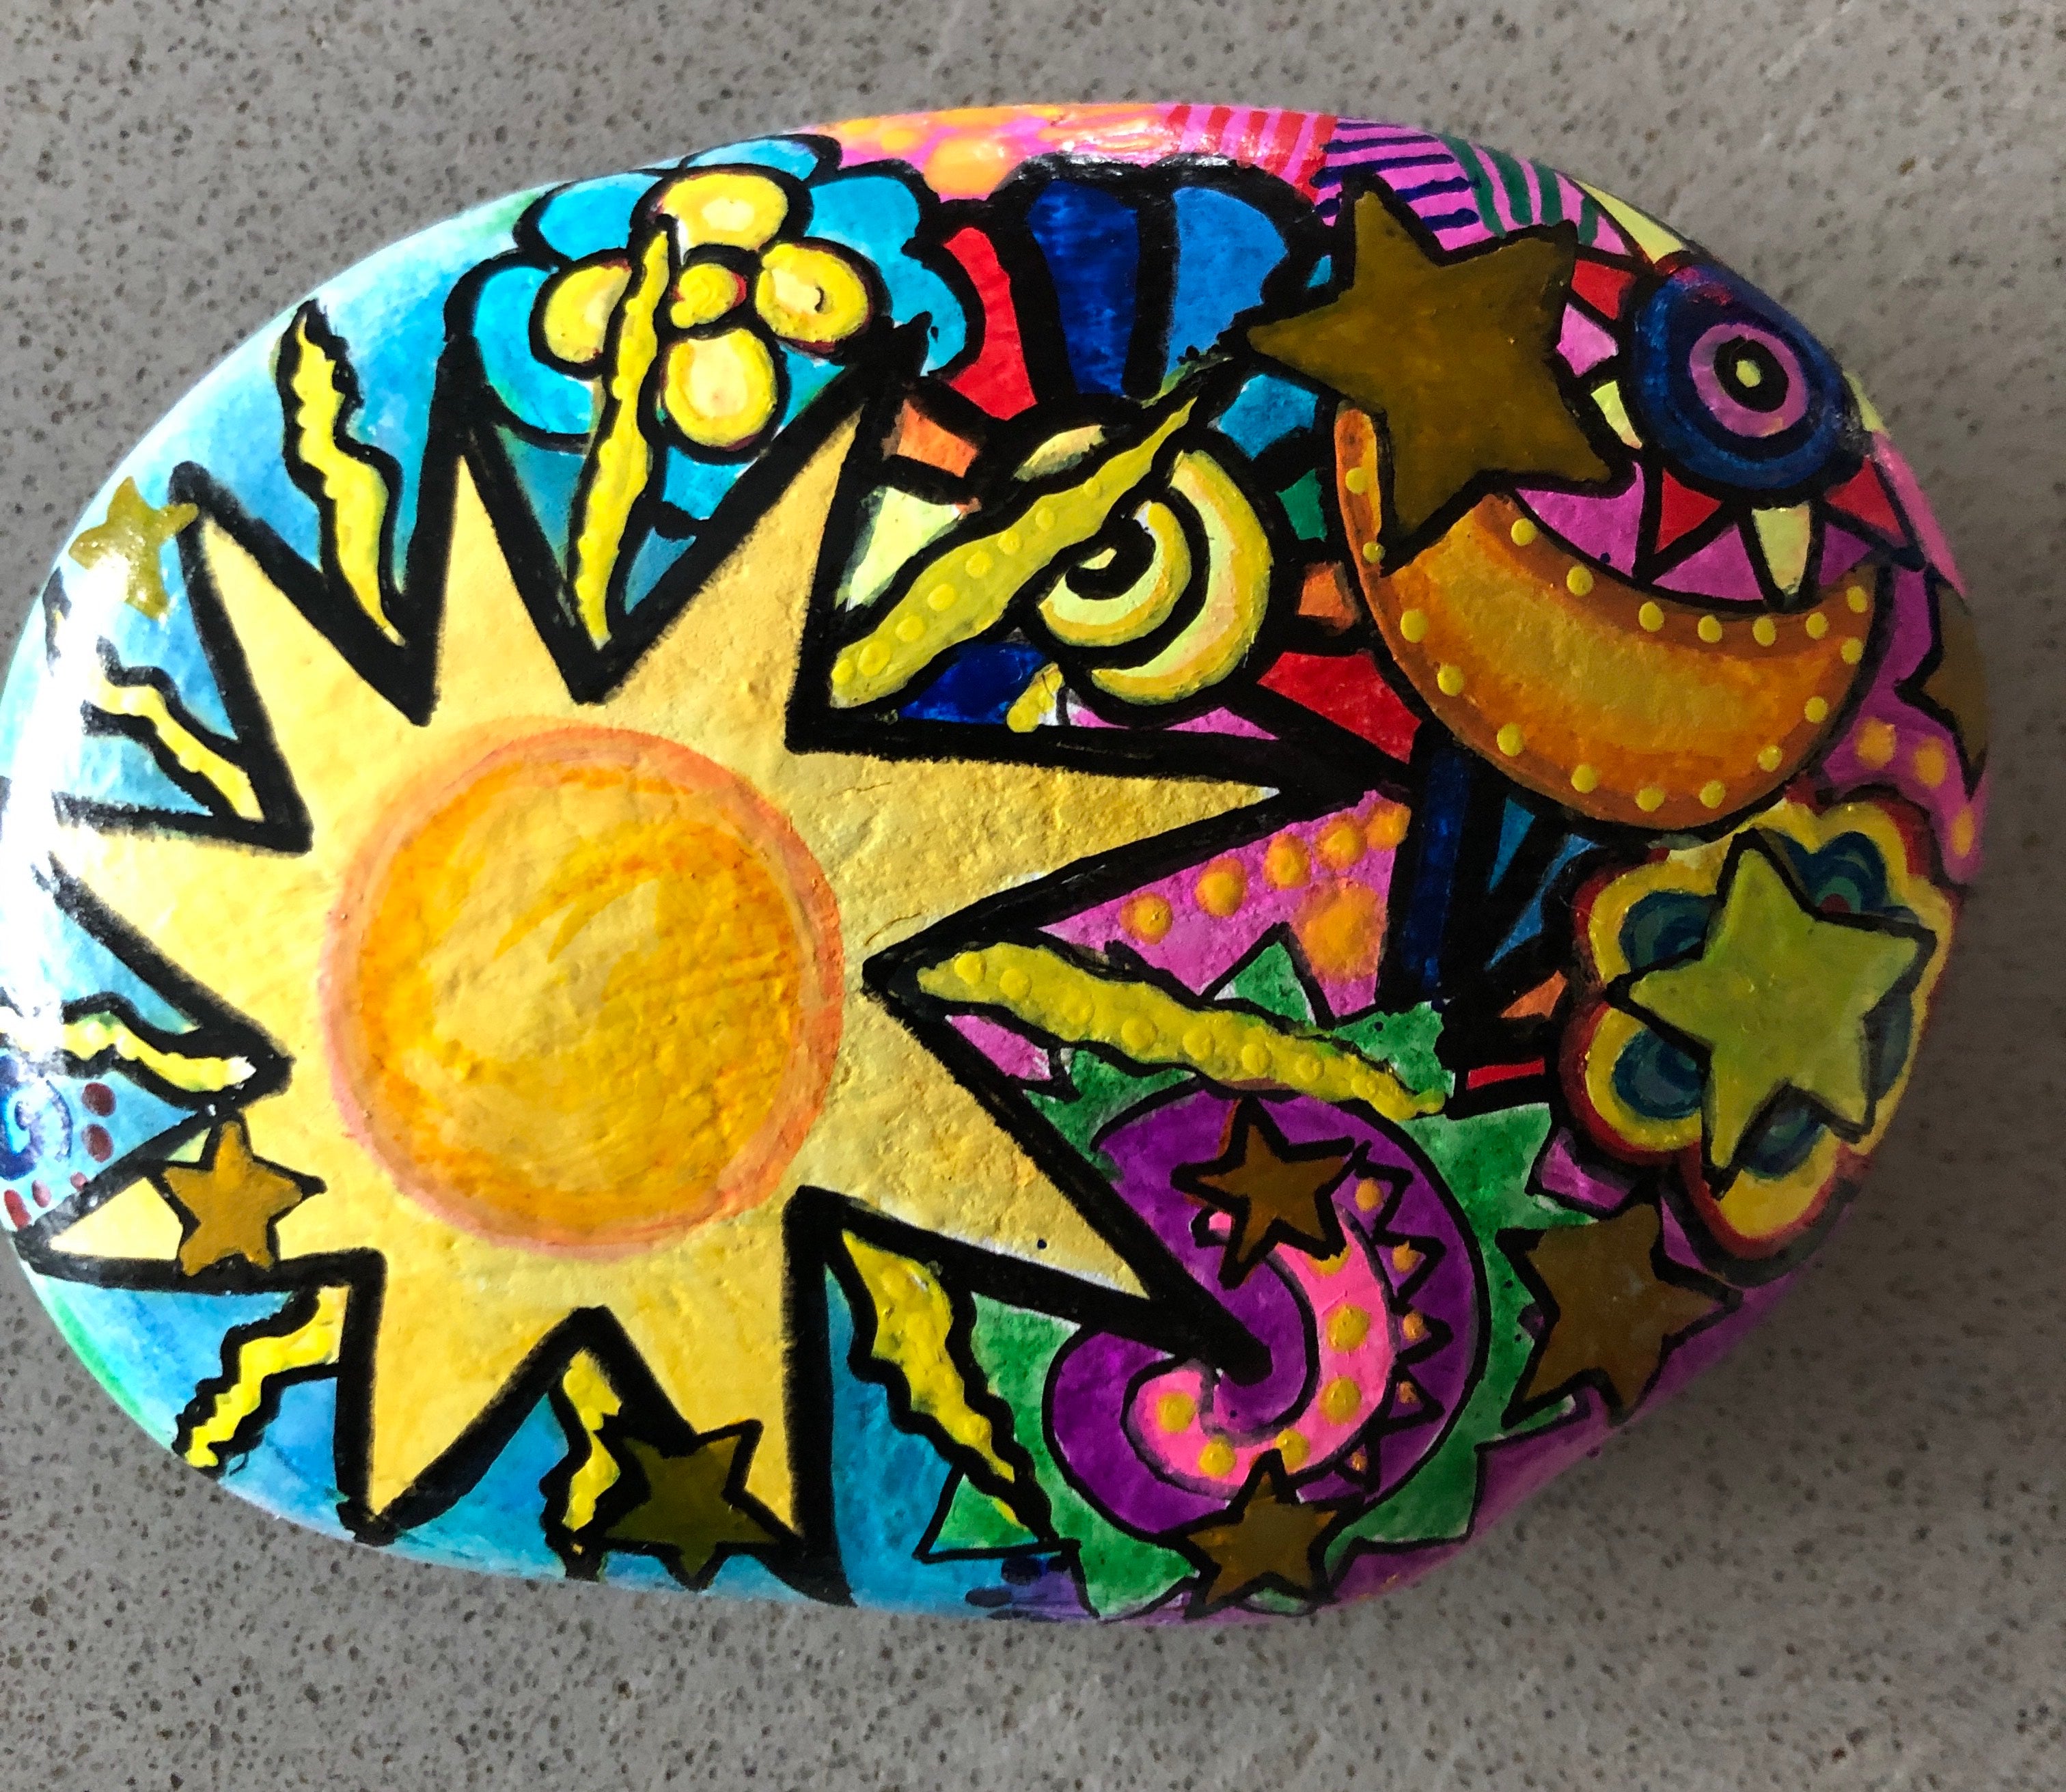
Activity 2: Britto inspired rock
Rock painting with Life of Colour paint pens for ages 8-12. Spread some sunshine with our Britto inspired rock creation!
Materials
- Life of Colour paint pens
- Rocks
- White water based acrylic primer paint
- Clear protective spray sealer

Step one:
Paint your rock with a base coat of white primer paint. If you do not have any primer paint use a white Life of Colour paint pen.
Copy the design from the following photo, but remember you can make any doodles you want.

Step two:
Wait until your rock is completely dry then use a 1mm acrylic paint pen to create a sunburst shape to one side of your rock. Around the other side place assorted shapes - flowers, stars, a moon, rainbow stripes, sunbeams and swirls until the rock is covered with designs ready for colours.
Step three:
Now comes the fun! Use your Life of Colour acrylic paint markers to give your rock loads of colour! Mix colours together to make new colours. We painted our sun shape in yellow then mixed in orange over the top. Always clean off your pens after mixing them together using a wet piece of towelling.
Step four:
Once you have painted the colours onto your rock it’s time to neaten up the edges and add some more small stars over the top.
Step five:
Drying time! Add extra drying time to make sure that when you seal your rock that you don’t have any colours bleed. Spray small amounts of sealant from a distance, wait for that layer to dry and repeat until you have sealed the rock.
Activity 3: Wombat rock
Rock painting activity for all ages

Materials
- Life of Colour paint pens
- Rocks
- Clear protective spray sealer
Step one:
To start off use your fine tip Life of Colour 1mm white to complete an outline of the wombat.
Step two:
I prefer to use a dry smudging technique when it comes to bringing Australian mammals and animals to life as it gives a textured look to their fur coats.
Achieving a dry smudge is easy - put a solid line of colour then quickly get your finger and rub the colour towards the inside area. Continue this method until the area is completely coloured in.
For a general rule, when trying to complete a shape to give it a 3D appearance, remember dark to light to dark again. This effect makes the middle section appear closer and the darker area further away.
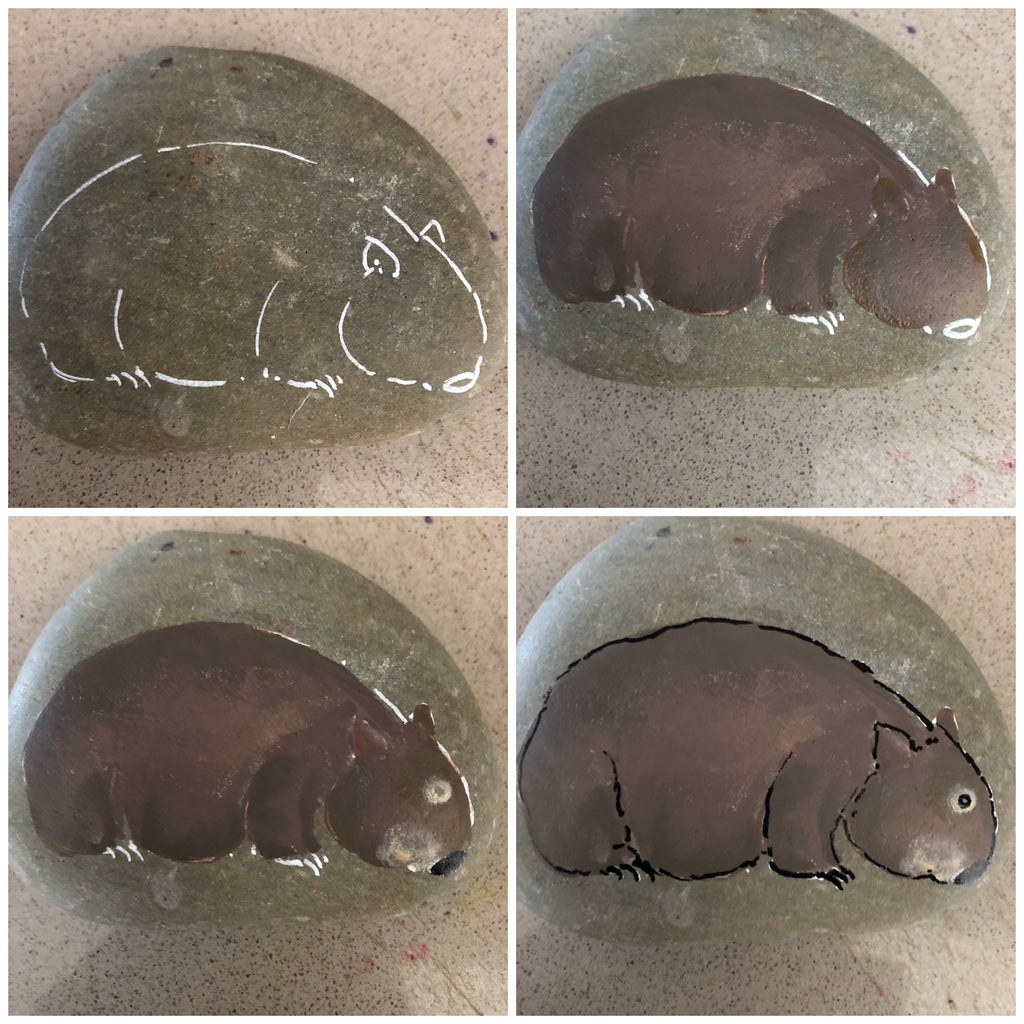
Step three:
Around the mouth and eye region place a lighter colour- white, light brown or skin colour will work great. Place a small dot of colour and quickly smear it again. Imperfections actually look effective in this case to add to the wombats personality!

Step four:
Give definition with an outline. Outlines are messy and broken -so is nature and lines of fur. A dark smooth line around the edge wouldn’t suit our wombat. If you have a copy of the book have a close look and there are tiny fur lines around the edge of the wombat.
Step five:
Next step is to perfect the eye and ear of the images - for the eye just do a small black circle then a single tiny dot. Wait for these to dry before adding a black dot to show where the wombat is looking. Define the inner ear with a small line in a lighter shade then a black line.
Step six:
Finally to complete the image add some grass in random strokes along the ground. The grass could also be used to hide any imperfections!
Activity 4: Poppy hill rock tutorial
Rock painting with Life of Colour paint pens for ages 5-8
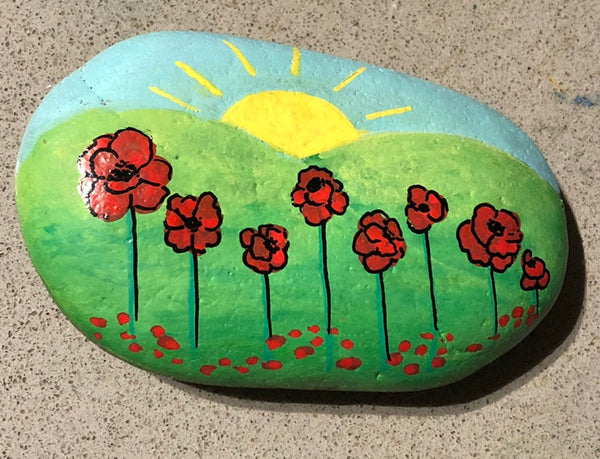
Materials
- Life of Colour paint pens
- Rocks
- Clear protective spray sealer
Step one:
Using a blend of your green Life of Colour paint pens create a set of rolling hills with a pale blue sky in the background.
Step two:
Add a bright cheerful yellow sun in the middle of your rolling hills and add some yellow lines to make sunbeams.

Step three:
Place different sized green lines to make stems for the flowers in the front of the painting.
Step four:
Our flowers are added by using a red paint pen with odd small shapes which we will later add more details to. At the bottom of the flowers spread some tiny specks of red to make more small scattered flowers.

Step five:
Fine detailing using the 1mm black comes last, starting with the centre of the flowers then moving outward creating petals in assorted frilly shapes until all of the red has been included into the flower. Continue to place trace black outlines around the stems, hills and sun.
Step six: Drying time! Add extra drying time to make sure that your paint is dry and get an adult to help spray small amounts of sealant onto your rock, wait for that layer to dry and repeat. Always make sure to follow the instructions on the spray can and to do your spraying outside.
Activity 5: Paint a Rock Mandala
Rock painting with Life of Colour paint pens for ages 8-12
This lesson plan uses Life of Colour Metallic paint pens but you could choose any colours that you like.
Materials
- Life of Colour paint pens
- Rocks
- Compass and pencil
- Clear protective spray sealer

Step one:
Using a compass draw a small circle onto the middle of your rock. Around the outside of this circle draw another circle using the compass and continue this until the rock has five circles.
Paint each circle a different colour using the Life of Colour paint pens.
Step two:
Turn each of your circles into flowers by painting different coloured triangular shapes around the edges. Change the petal positions and colours from each circle to the next. Two different techniques are shown in the image where you can fill in the petal painting forward or back towards the outer circle depending on what colour you would like to keep for your flower petals.
Step three:
To finish off the mandala add some smaller details and dots onto the triangular shapes.
Use the spaces in between petals for small circles and on the bottom of petals place some more triangular shapes. White dots work really well as they stand out against the darker colours. Try to make spaces even between dots and to make a pattern so that the final product looks effective and most importantly don’t forget to have fun!!
Step four:
When your rock is dry, get an adult to help you spray small amounts of sealant from a distance, wait for that layer to dry and repeat until you have sealed the rock.
Activity 6: Dinosaur eggs Jurassic Park rock
Rock painting with Life of Colour paint pens for ages 8-16

Materials
- Life of Colour paint pens (Special Colours and Classic 1mm box sets)
- Rocks
- Clear protective spray sealer
Step One
Get a rock (like we always say, primed is best, to paint easier and preserve your pens for longer) and depending on the size of the rock, draw one or two eggs using your neutral tones from the Life of Colour Special Colours acrylic paint pens (or Earth Colours).
Step Two
While the egg is wet, shade using brown, use the water brush (or any brush you have available) to blend the colors.

Step Three
While you wait for your egg or eggs to dry, use the light blue to paint the sky.
Step Four
Your eggs should be dry by now, so pick your dinosaur colour and make a small shape with jagged edges. It will look like the dinosaur broke the egg and is looking to the outside world! You can do the traditional green, or like in this case pink and purple.
Step Five
Using brown and black make the nest on the bottom of the rock. It should look shabby and nest-like so don't worry about blending

Step Six
Using your 1mm black pen, draw the outline of the hole and make some cracks coming out of the angles. It's OK if you mess it up the first time, you can cover it with the base colour and try again until the cracks look natural.
Step Seven
Paint the base of the eye in white and leave it to dry. You can make a realistic eye or a cartoon eye.
Step Eight
Using any colour you want, make tiny specks on the eggs. If your dinosaur fan gives you permission, you could even decorate the eggs with Easter patterns — mine voted against!

Step Nine
Find a 1mm pen that's darker than your dinosaur colour and stipple it around the edges of the hole to give it a bit more texture. Stippling is basically making dots very close to each other. If you want to, you can make small scales to add the realistic touch.
Step Ten
Using a white pen or a lighter neutral, make lights on the edges of the hole and the top or the egg to help with the 3D effect.
Step Eleven
Colour the pupil using black, and adding two white drops for a cartoon style (or go all in and make a realistic eye!)
Now you have a very cute and different egg hunt to enjoy for years to come, and nice decor for your dinosaur enthusiast's room! The dinos in our collection loved the newcomers and welcomed them with open arms and many rawrs!
Activity 7: City lights rock
Rock painting with Life of Colour paint pens for ages 12-16

Materials
- Life of Colour paint pens (metallic and classic box sets)
- Rocks
- Clear protective spray sealer
The city sunset and red moon

Step one:
With a blue metallic paint the top half of the rock. If you don’t have a set of Metallic paint pens you could also use a blend of any blue and white.
Step two:
Use a mixture of orange, red and yellow to make the sunset fading into the blue sky. Keep layering small amounts of each colour in sections until your sunset is complete.
Step three:
To begin the red moon- start off with a white circle, this will help all of the other colours stand out on top of the blue sky. The next colour over the white is orange and then red, the colours can be patchy as long as the edges of the moon are fairly solid in a circle shape.
Step four:
Put a small amount of black paint onto the tip of your finger and gently dot the centre of the moon to make craters.
Step five:
Draw a black bumpy line at the bottom of the sunset to start to start the hillside and city scene leaving a small area to make the “top of the hill” imagine you are standing at the top of the hill looking down onto a city below.
Step six:
To complete the outstretched tree draw some twiggy branches in the moon and join the together on the edge, paint the trunk bending down towards the ground. This method is a little backwards but will make sure that your branches are positioned perfectly in the moon.
Outstretched tree and the city below
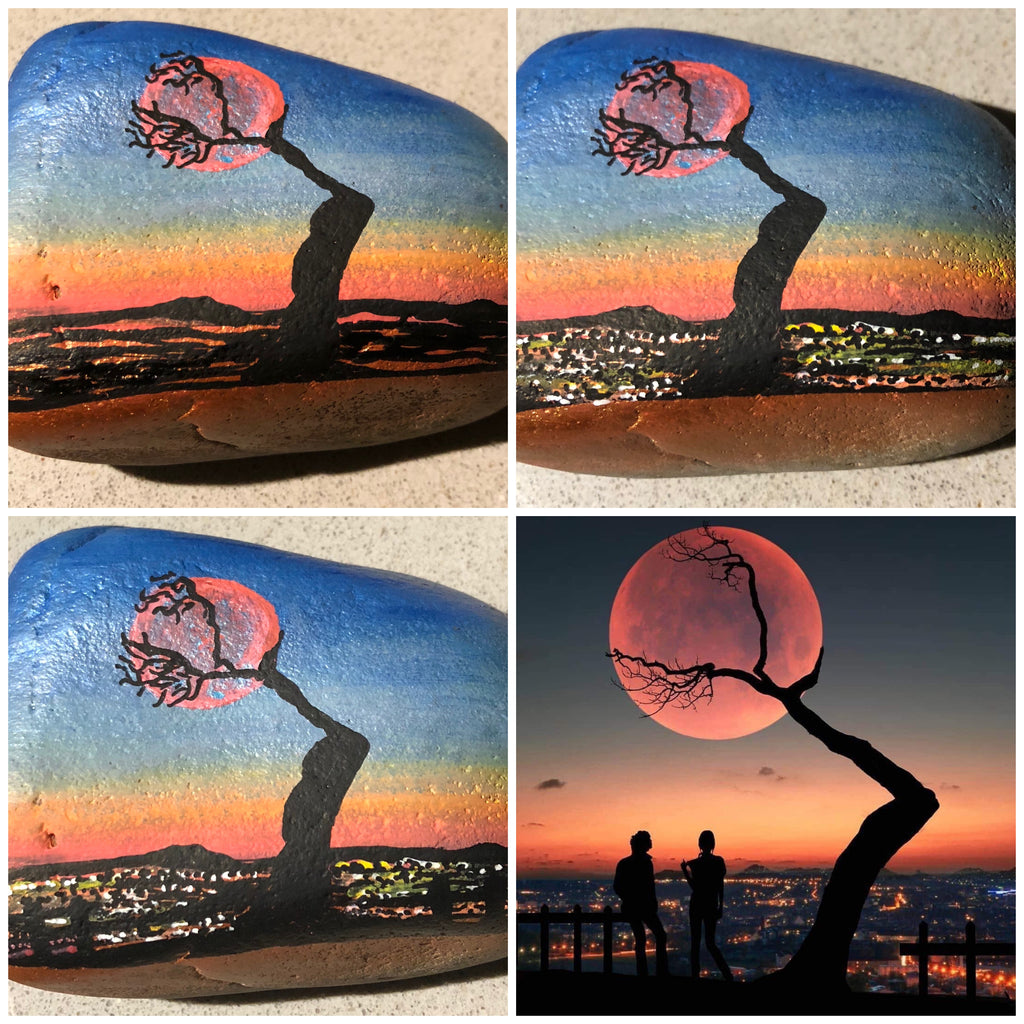
Step seven:
For the city lights paint small orange and yellow lines.
Put small black and white dots to make your city come to life with lights.
Step eight:
To finish off this rock paint a few black fence posts on either side of the tree and join them together with black railings.
Step nine:
When your paint is dry take your rock outside and spray with a coat of clear sealer.
Activity 8: Solar System Planet Rocks
Materials
- One rock per planet, 8 if you're not including the dwarf planets, 5 more if you are
- Life of Colour paint pens (can be achieved with any of our sets, we reccomend Earth Colours and Classics, or Specials and Classics)
How to paint an Earth rock
The start of our space journey begins with our mother planet Earth.
Fun fact- You can see Earth’s magnetic field at work during light shows which are commonly known as auroras. Locations with these lights occurring closer to the North Pole are called an aurora borealis or northern lights.

Step one: After pencilling the series of planets circular shapes using a lead pencil and compass paint over the top of the lead lines using the specific base planet colour. In the case of the planet Earth we use a blend of Life of Colour blue and white acrylic paint pens.
Step two: Crack open your Life of Colour Earth colours to paint the land masses of Earth, don’t worry if you cannot get the shapes accurate as a light cloud cover in the next step will help disguise distinguished features.
Step three: Earth's atmosphere is constantly full of cloud cover and to create the appearance of these clouds is completed by smearing your white paint pen with your finger or using a paint brush.
How to paint a Mercury rock
Mercury has a hot atmosphere and surface but not too hot for ice! It is the closest planet to the sun.
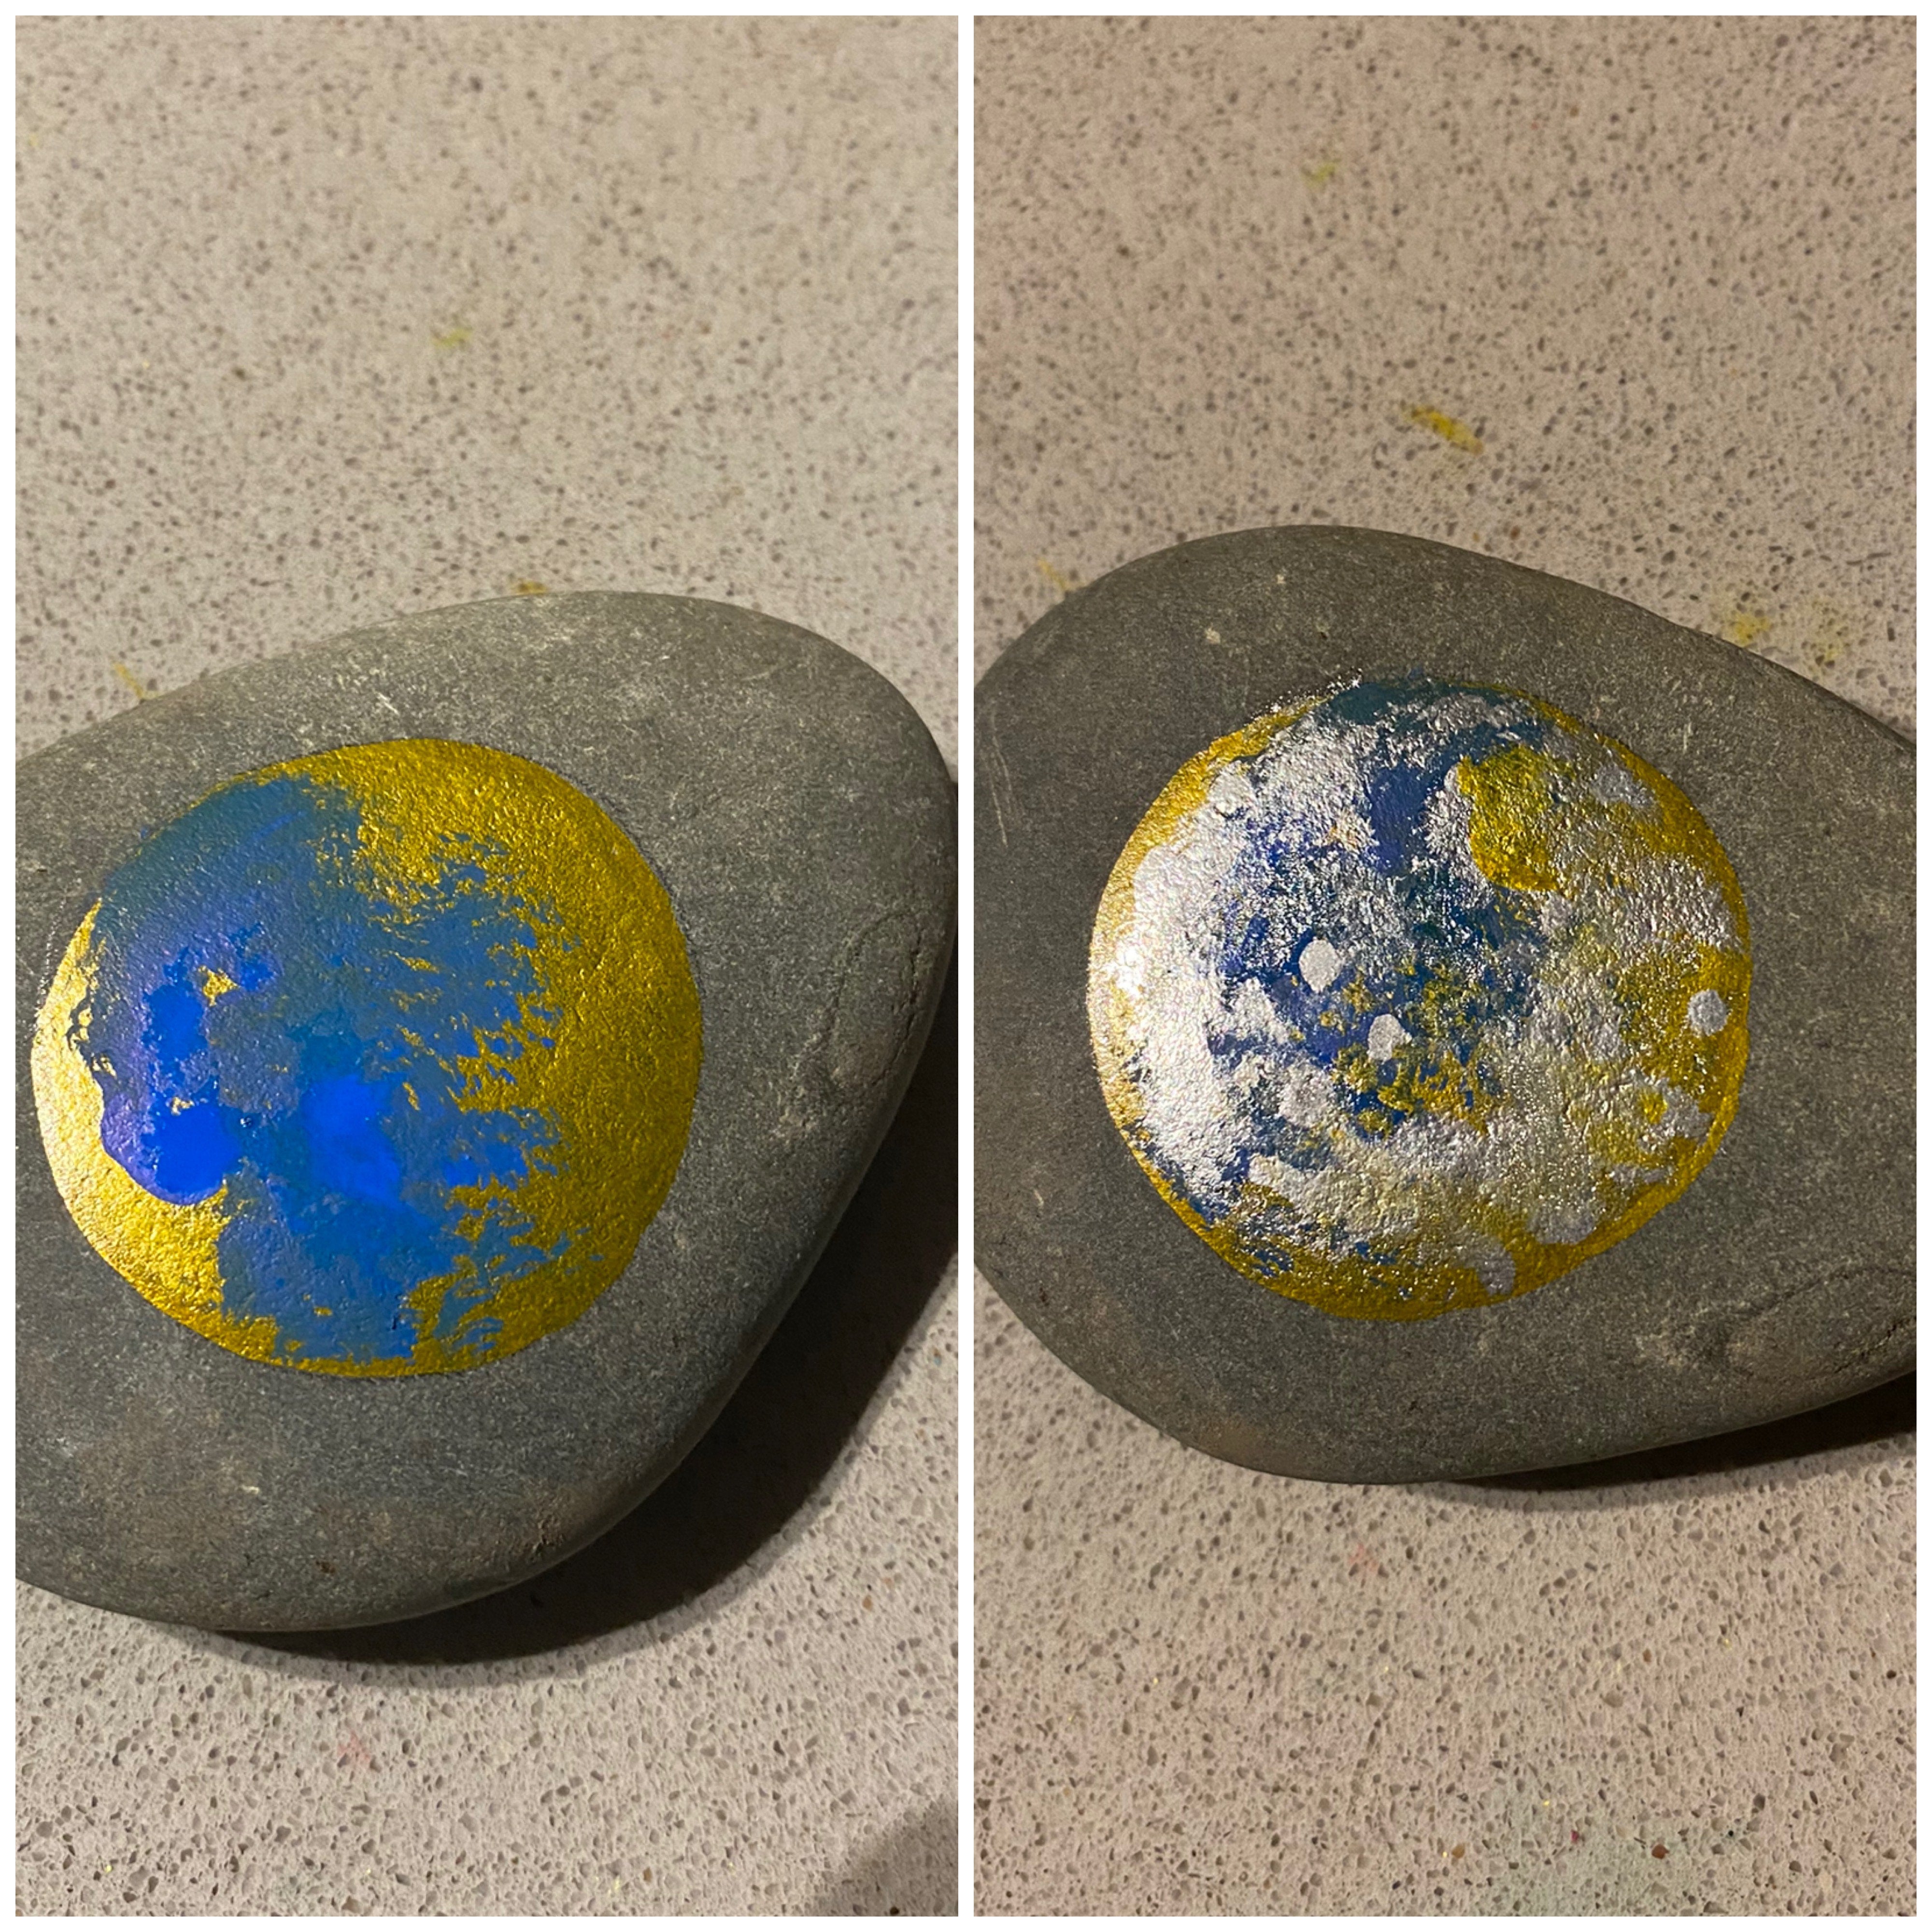
Step one: Draw a circle using your template, then fill it with metallic gold Life of Colour paint pen to make the basic planet shape for Mercury
Step two: whilst the paint is still wet smear a shade of blue over the top, like shown in the above picture.
Step three: Add metallic silver dots and smear some of them to give the surface a sparkling appearance.
Venus rock
Venus is the second planet from the sun, and just like Mercury, it doesn’t have any satellites. Did you know... One day on Venus lasts 243 Earth days? This happens because Venus spins backwards, with the sun setting on the East.

Step one: Base coat with a tan colour (you have various options in the Earth Colours and the Special Colours)
Step two: Add a smear of blue at the tip of the planet, we used a beautiful blue from the Earth Colours
Step three: Make uneven, organic lines with your white and brown Life of Colour acrylic markers. If you want a more detailed breakdown of this step, keep scrolling and find all the info on Jupiter's tutorial below!
Step by step Mars rock
Mars is the most explored planet, asides from Earth of course. This planet is a dusty, cold, desert world with a very thin atmosphere.
While a day on Mars is roughly longer than a day on Earth... The martian year lasts 687 Earth days!

Step one: Fill in a circle with a blend of red and orange for the base of the planet, you have the perfect dusky reds on the Earth Colours set
Step two: Add a white atmosphere at each end
Step three: Smear spots of black to represent the land masses and crevasses found on Mars.
Step four: Using a vibrant orange (can be the Classics orange or the Fluro orange) create a few highlights on the red surface.
How to paint a Jupiter rock
Jupiter is the largest planet in the Solar System, and unlike our home planet, it's a gas giant so it lacks a solid surface. Jupiter has over 75 moons, the first ones being discovered by Galileo in 1610

Step one: Jupiter has a base colour of tan - template a planet shape and fill in with any of your Life of Colour tan pens, you have different options in the Special Colours and Earth Colours
Step two: Add lines in red and white
Step three: While the red and white is wet, using either your finger or paint brush, smear the lines for a faded look
Step four: use red, you can also add in a bit of black or brown, to make the Great Red Spot
Step by step Saturn stone
The sixth planet from the Sun is not the only planet to have rings, but none are as spectacular or as complicated as Saturn's.
Another fun fact is, Saturn's day is very short - not even 12 Earth hours - but it takes the planet 29 years to orbit the Sun!

Step one: A blend of tan, yellow and white creates the base for Saturn.
Step two: Fill in the background with black to help Saturn’s rings stand out. Using the three base colours create bands across the planet in a semi circular pattern
Step three: Add Saturn’s rings using your white, brown and yellow fine tip markers
Step four: Refine Saturn’s rings - add darker colours closer to the planet to create depth.
How to paint Uranus and Neptune rocks?
Uranus was the first planet found with the aid of a telescope, in 1781. Neptune is a dark and cold planet, whipped by supersonic winds.

The painting process for both planets is very similar
Step one: you have two powder blue options (in the Special Colours and Earth Colours), any of them is perfect for painting the surface of Uranus. For Neptune, make a base with our Classic blue - if you're feeling fancy, you can add a bit of the FLURO blue to make it pop.
Step two: Add depth by placing tiny dots over the top of your base coat. For Neptune, blend some of these white spots horizontally.
What about Pluto and the rest of the dwarf planets

There are five Dwarf planets that are currently recognised by the International Astronomical Union (IAU) - no matter where your Pluto sympathy lies - and are as follows:
Pluto - pictured as a yellow planet.
Haumea - pictured as a white football shaped planet.
Ceres - pictured as the smallest white planet.
Eris - pictured as the largest white planet.
Makemake - pictured as a red planet.
You can use the same blending steps you learned for the rest of the planets to make these five dwarf planets!
Paint Pen care: How to clean a dry, clogged or dirty paint pen
The common culprits for dry paint pens are usually the following three:
- The pens were stored vertically for quite some time.
- The pens have been overpumped
- The nib is just gooey and stuck
Watch a video to learn how to unclog your Life of Colour Paint pens. You will also be able to read the step by step instructions for some very important upkeeping and troubleshooting tips to make your paint pens stay vibrant and ready to use for much longer.


