
Creative Kids Crafts and Textile Activity Sheet
The Crafts and Textile Kit is the perfect combination of art supplies to get started into fabric painting on denim, canvas and other textile surfaces - while also having the paint pens to use on all the materials of your house, like cardboard, paper, enamel tins, wood, etc.
Table of contents:
- Activity 1: Paint your shoes
- Activity 2: Paint a piece of clothing
- Activity 3: Geometric landscapes on canvas bags
- Activity 4: Upcycle old objects with colourful art
- Activity 5: Swirly patchwork art
- Activity 6: "My favourite things" memory game
ACTIVITY 1: PAINT YOUR SHOES!

For this activity, you can go grab cheap shoes on your local store, or revamp a pair of used shoes you have at home.
You can use both the fabric pens and the acrylic paint pens on shoes, keep in mind the fabric pens are permanent but the acrylic paint pens will fade if not protected with fabric protector, or if washed too frequently (we recommend you use the paint pens on pairs of shoes that don't need to be washed as often).

Step 1: Grab your supplies. Canvas shoes are the easiest, white preferably for the fabric pens.
Step 2: Use a pencil to plan out and sketch your design on the shoes. In this case we are going for a dripping rainbow effect, so you'll need to make a squiggly line alongside the front of the shoe and some round blobs to make that fun dripping effect. Shoes by Jaz (13 years old, mum Daphne Birett).

Step 3: Grab your fabric pens and paint stripes of different colours to make the rainbow gradient.
Step 4: Line up the edges (where you marked with pencil) to make the dripping paint effect pop!

More shoe ideas you'll love:
"Bee kind" shoes by Bronwyn Giblin, with lovely bees and sunflowers. These shoes were painted using the paint pens, over the black canvas shoes. It's best to do a white coat first and finalize your painting process with a clear fabric protector (Bronwyn recommends Scotch Gard which is water repellent).


Superhero shoes are every kid's fantasy, so why not make their own Spiderman, Superman, Batman (and all the other fantastic heroes out there!).

Hayley Harding

Katrina Dean

Nicole Stark
Flower power shoes
Invite your kids to make a delicate flowery design, start with the green brances using freehand lines, add little leaves using a lighter green colour... and then add colourful flowers all around! Design by Bea, mum Daphne Birett


Activity 2: Paint a piece of clothing
Pretty butterfly on white singlet

Painting on clothes is one of the easiest ways to enjoy your artwork while wearing it. This butterfly may look intimidating to paint but doing bit by bit it’s so satisfying to see it done…so worth it!
You’ll need a few materials: black, white, grey and 3 shades of blue paint pens or fabric pens (keep in mind the fabric pens will be permanent, whereas the paint pens will start to fade earlier), a pencil, a singlet and a piece of cardboard.
STEP 1:
Insert the cardboard inside the singlet and lay flat, sketch the butterfly with a pencil
STEP 2:
Start painting using your favourite colours. Using a paint brush makes it easier to blend the colours together for that ombre effect.
STEP 3:
Let it dry for 24 hours and to seal, iron your shirt on low heat for 5 minutes and now it’s done and ready to wear!
Other fantastic ideas:
These painted jackets were made by Jen Hall, you can find her on Facebook as Painty Hands.


You can also paint and revamp an old overall with flowers, animals or geometrical designs.
 quirkybohemianmama.com


Activity 3: Geometric landscapes on canvas bags
Follow this quick tutorial below with step by step instructions, some tips and inspiration for you! Each of the five bags has a unique colourful landscape theme on the front, allowing you to play around with colour choices and creativity!
By @its_artsy_ella

Preparing the bags with sketches:
Start off by ruling a rectangular box on the front as your little “canvas,” keep it simple, leaving a few centimetres from the edge. You can see how light the sketch is in the picture…we don’t want pencil lines peeking through!

Making the little scenes:
You can see that each bag has a unique scene and colour theme. For example, the bag with orange and tan coloured tones has a cactus in the forefront, clearly making it look like a desert. It’s really nice how simple looking each bag is, but also how diverse each colour combo is and each natural scene.
Choosing your colours:
Each bag has a different theme so choose your colours to sort of match the vibe. We liked cool tones for mountain scenes and warm tones for desert scenes

Painting Each bag:
It’s pretty straight forward how to paint each little section. But remember you don’t want bleed through onto the other side. Placing a firm little cut out section of cardboard inside the bag gives you firmer canvas and stops any bleeding.

Outlining around the shapes:

To finish off the design, outlining around the shapes is definitely recommended. In these pictures a waterproof fine liner was used to outline as it had a smaller point allowing a thinner line. You could even use the Life of Colour black fine tip paint pen for a thicker, bolder effect.
Have fun making these cute bags!

ACTIVITY 4: Upcycle old objects with colourful art
Upcycle items found around your home and try these DIY designs using Life of Colour paint pens ideas. You can use the paint pens on virtually any surface, and complement them with the fabric pens on totes, shoes and more! Here are some ideas for you developed by Ella Hore @its_artsy_ella
DIY painted craft boxes!

Whether it’s a circle, triangle or square they would work perfectly for a small DIY project like this!
STEP 1:
These boxes had already been painted before, so giving them a coat of white before starting makes coverage a lot easier.
STEP 2:
For a simple design like these, sketch out some outlines and colour in the block areas with paint pen colours of your choice.
STEP 3:
Outline the shapes with a black fine tip paint pen and colour the “rim” with a colour you have used.
That’s it for a cute craft box like these, a super easy and fun idea for the day!
Paint a Doorstop

How cool is this doorstop? It makes it easier to find, and such a cute little design for an everyday object! Basically, this is just a little wedge of wood, but I already had this doorstop and thought it needed a little paint. It makes it so much easier if you use a pencil to outline the shapes. No need to paint it all white first as the paint pens attach amazingly to wooden surfaces.
You could even switch up the colours, maybe a pastel look, or Fluro? It’s up to you. So, grab a doorstop and your paint pens and make this design!
Colour your pen holders

Most of us would have pen tins or holders nearby, depending on the colour you can try painting cool patterns of designs on the front to make the space a little unique and interesting.
For this DIY all you need is a pen holder and your selected paint pen colours.
Wipe over the area on the pen holder - or sand if needed - so the paint can stick onto the surface easier.
For these tulips no sketching was needed beforehand. They are a pretty simple design, just paint each colour separately and don’t overlap colours!! Have fun DIY-ing your pen holders!
Mini paper bag designs!

One of the most interesting ideas is painting crazy designs on mini paper bags!
For these designs they are ocean inspired and are playing with different techniques:
- The seahorse is made to look like a stamp,
- The penguins are a series of retro coloured posed images
These three have used only paint pens and paint pens only to create and look so cute as a room decoration or gift bag for a friend!
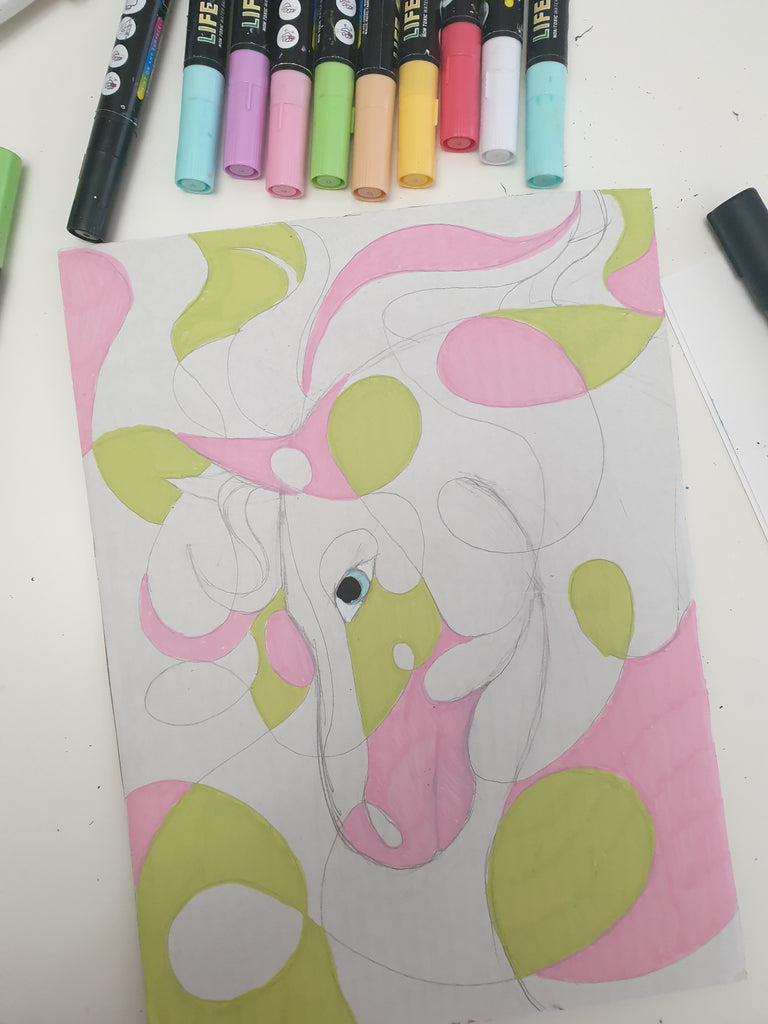
Activity 5: Swirly Patchwork Art
By Natalie Harrison
Natalie shared: "I really have no idea what to call this type of art, but someone did suggest ‘patchwork’, so we will stick with that". We completely agree, this type of artwork is perfect for relaxing and keeping kids of all ages colouring for hours!

But most importantly have fun! Do not be too hard on yourself, practice and patience is key.
For this fun patchwork project you will need the following:
- Pencil and eraser
- Life of Colour pens, in this case we'll be using the Special Colours, black and white
- Cardboard or a type of cardstock (thick paper)
- A reference if needed
Step 1.
Draw your design on to your cardstock. Keeping in mind, at this stage we just want a simple outline. We are not adding the swirls just yet.
As you begin to work on your image, and through the whole process, you will probably find you will want to change bits here and there to suit the image, this is all part of the process. An art teacher always told my son ‘it’s not finished till you say it’s finished’.
Step 2.
Once you feel satisfied with your simple outline you can begin to add the swirls. Let your hand and pencil flow around the image and put the swirls so they flow with your image. Example, I added a swirl to form the nostril for the horse, and swirls connecting with the hair (following it’s curves). Don’t be too rigid but be aware not to go overboard with swirls near the eyes (if you’re drawing a portrait).
Step 3.
Now the fun part! Start colouring in with your paint pens. Stick to a theme eg. bright colours, pastels, blue tones, black and white or simply rainbow! Try to not let the same colours touch side by side if you can. If you do find you have made that boo-boo remember you can always paint over it with your pen in another colour. You may need to apply another layer or two for some of the colours.
You will notice towards the end of this project I changed a few swirls and colours. If you feel something is not working in your piece, change it 😊. If you cannot seem to put your finger on what is wrong with your piece leave it for a day and come back to it with fresh eyes. This tip is something I rely on with my larger pieces. One of the best tips I have received for art so far.
Once your happy with your colours, you can add the patterns.

Step 4.
Add patterns to your patchwork. Keep the same pattern for the same colour. As show below.

Some pattern ideas: hearts, swirls, spots, circles, zigzag, flowers, butterflies, stars etc.
With some of the patterns I like to outline them with a thin white paint pen. You could use any colour to match your image.

Step 5.
You are almost finished! Again, when your satisfied with the colours and patterns you can now outline your picture. I used the thick nib black paint pen for this.
The image below was taken when I thought my image was complete totally missing the fact, I had not outlined everything! Be aware your eyes may deceive you 😉. Can you spot it?

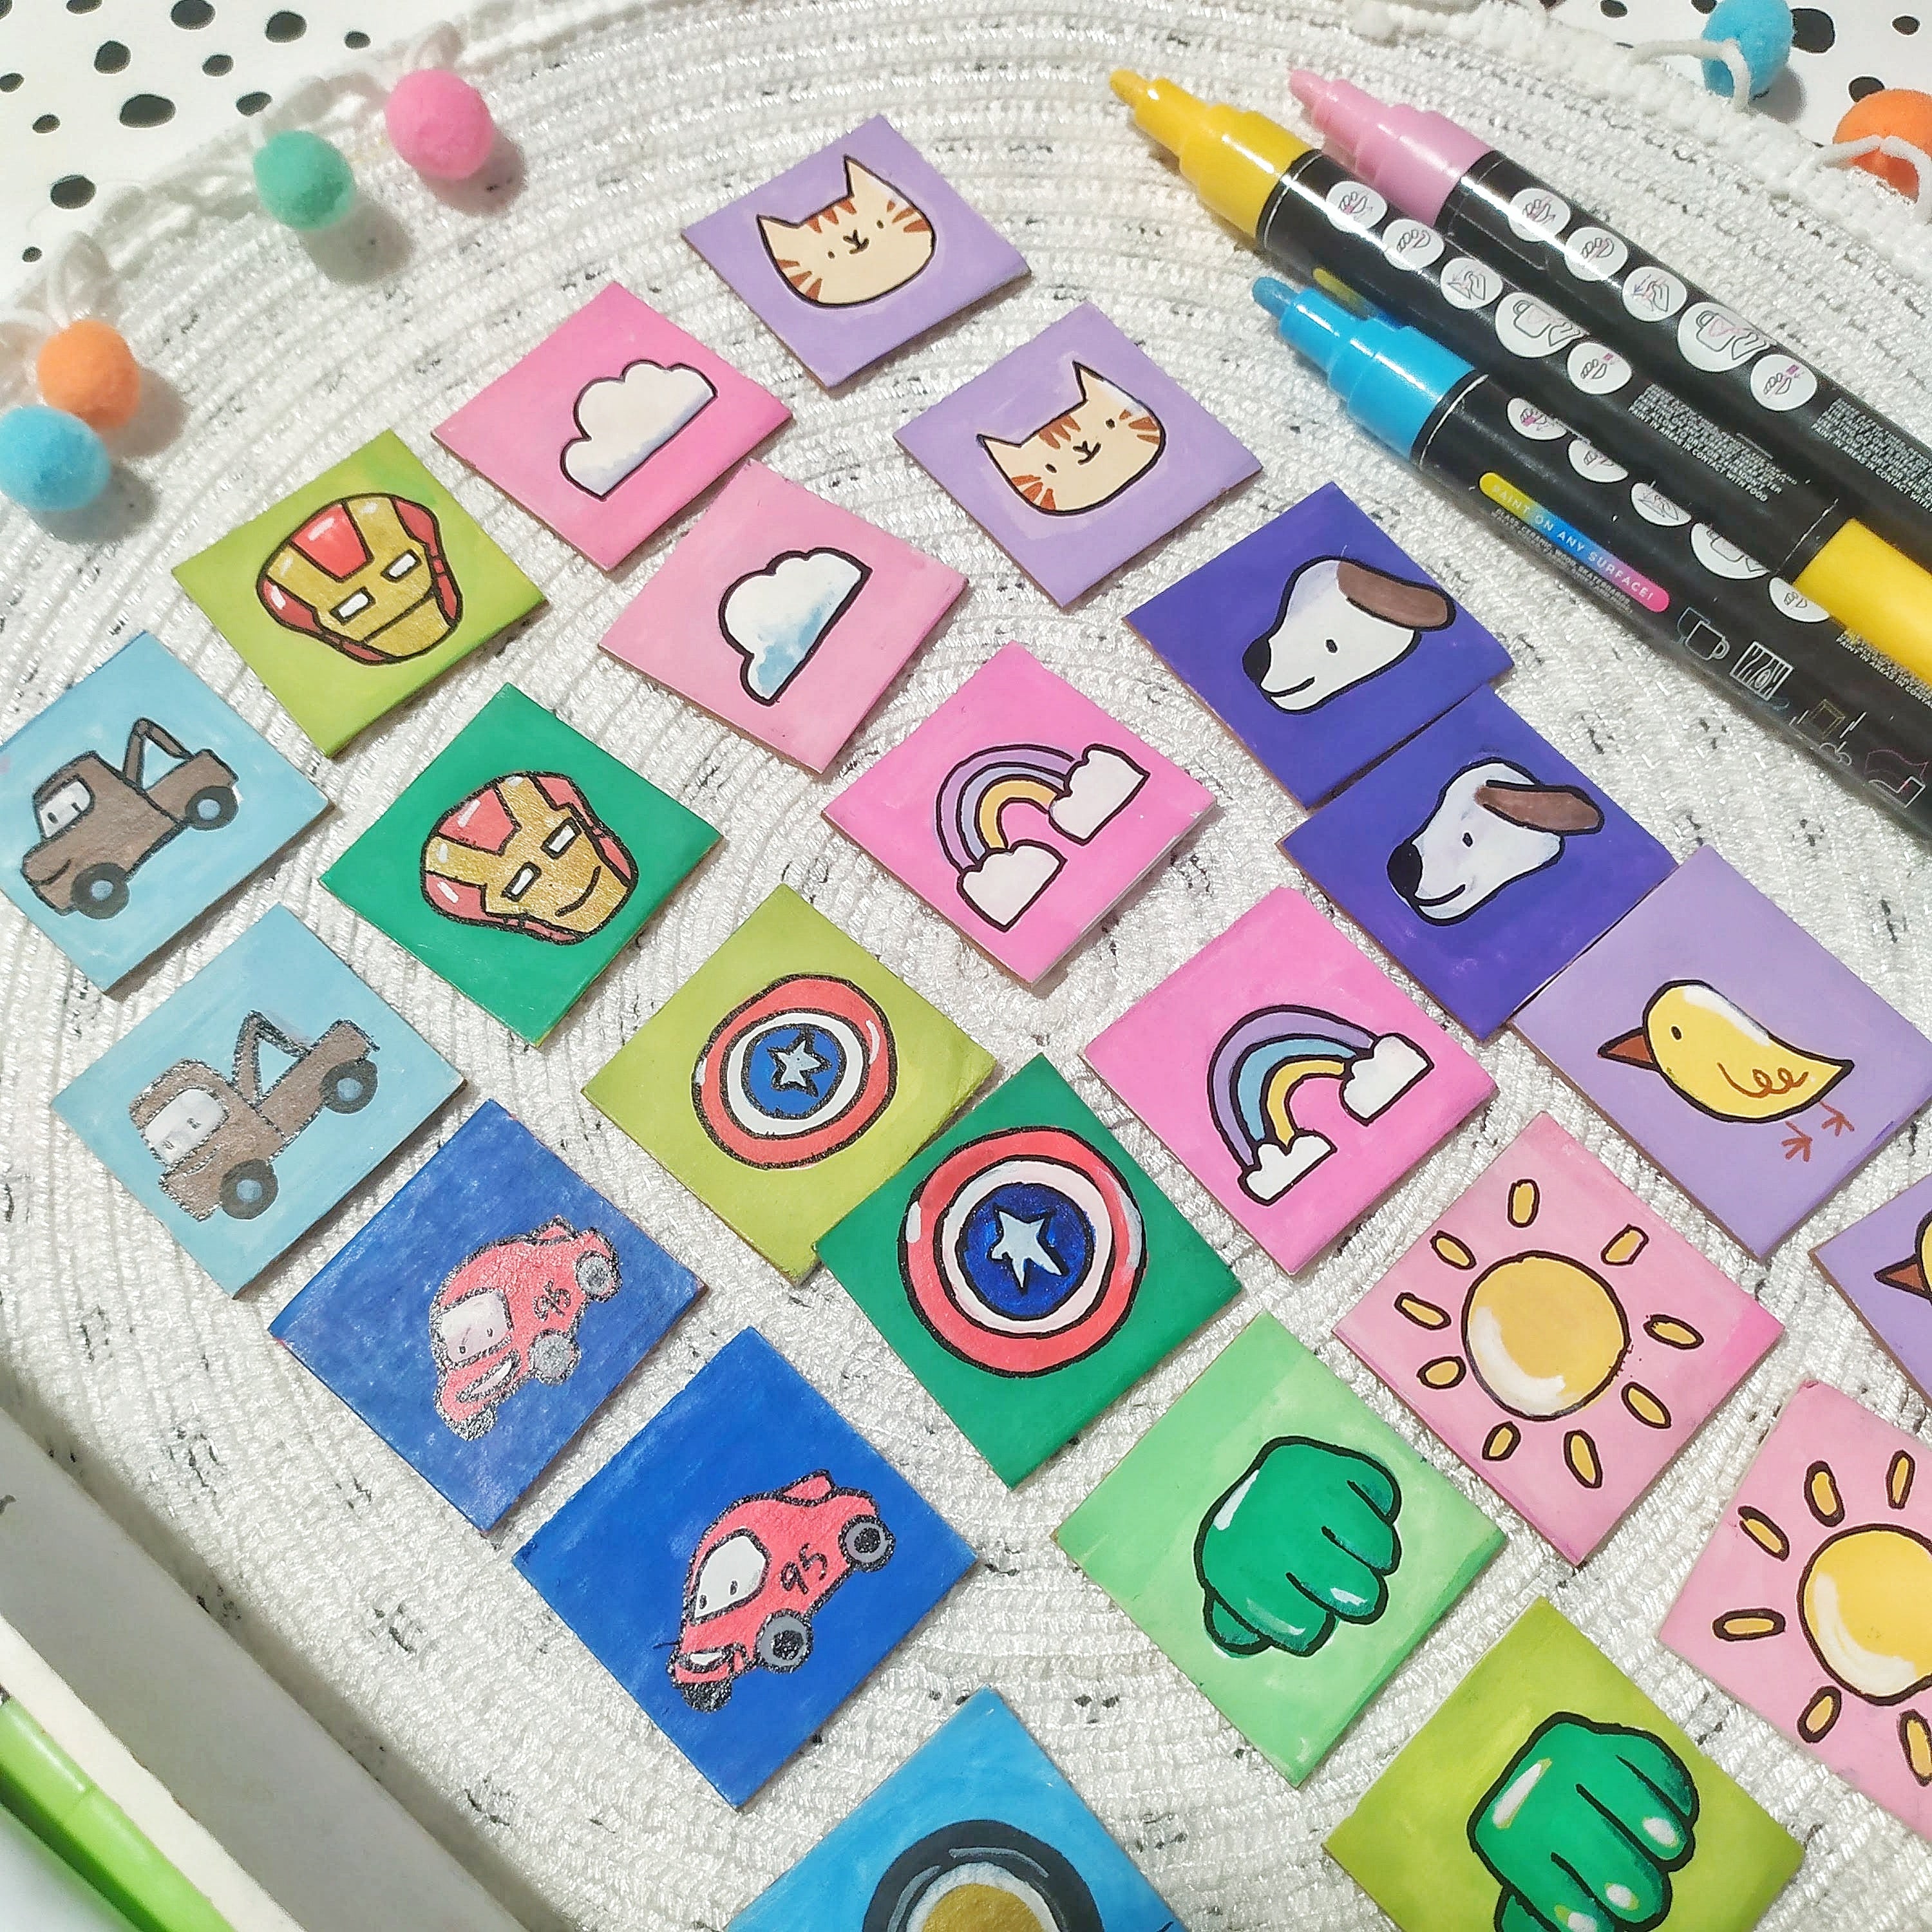
ACTIVITY 6: "MY FAVOURITE THINGS" MEMORY GAME
We've seen the memory games sold at stores, they have generic animals or items that most kids don't feel identified with. A pair of cows and a pair of ducks are fun... but how about inviting your kids to paint their own chips with characters and objects they love?
Materials
- Cardboard (can be rocks, wood slices, bottle or jar caps)
- 3mm Special Colours Paint pens
- Black pen for linework, optional
- Ruler
- Pencil and Eraser
- Cutter or scissors
- White acrylic to prime - recommended
- Masking tape - optional
Instructions
Parents can help make this step quicker, by preparing the tiles upfront
Step 1: Prime the cardboard with white acrylic, it's of course optional but recommended! Go a step further and prime the back too
Step 2: Mark the tiles on the cardboard, depending on the age of the children and the cardboard you're going to be using, figure out an appropriate size and amount of tiles. For younger children, 4 tiles for each kid, of around 5 or 6 centimeters. With older children, teens or adult helpers, you can make more tiles of a smaller size.
Tip: Cut a stripe for each participant, without separating the squares so it's easier for kids to draw on them.

Step 3: Hand out the kids their stripe and let them choose a background colour. It doesn't matter if they have the same taste in characters and hobbies, because each kid will have it's own background colour.
Step 4: Sketch your favourite characters and objects in pairs. There should be a pair of each design since this is a memory game, and each kid, teen or adult taking part will be painting their own fun pairs!
If two kids want the same character, they can each do their version and use a different background.

When run out of ideas, use a motif from the same character or object in a different position or size! For example two car tires, two crowns, two doggy collars, etc.
Step 5: Colour using paint pens
Start applying layers using the 3mm paint pens and let it dry before painting above the previous layer. Since acrylic paint pens are opaque, you can layer light colors above bright colours (white over red).
It doesn't matter if they look perfect, it's all about having a game we made ourselves, with our favourite people, our favourite colours and characters!
The time you take drawing the tiles is also part of the fun, so if the kids get a bit tired or bored, consider removing some pairs of unfinished tiles so they can start playing sooner.
Step 6: Colour the backgrounds using the colour you got or chose.

Step 7: When its all dry, make the lineart using the 1mm black paint pen. You can also add highlights using the 1mm white paint pen.
Step 8: PARENTS: Protect the set and cut the tiles
Parents: you can spray a coat to protect the game (use a layer of acrylic varnish or modge podge). Quick drying is best so there's no waiting involved!
Cut the tiles and start playing!

How to play
Place all the tiles on the table or the carpet with the drawing facing down making clear rows and columns. This will be important to help each player remember where each drawing is, memory games encourage kids since a very young age to use and train their visual memory, short term memory and attention to detail
The first player takes two tiles at random and flips them, so the drawings are visible to everyone.
If the tiles have the same drawing, the player can take them off the board.

If the tiles have different drawings, the player has to put each tile back in its place with the drawing facing down.

The next player does the same steps after the previous one either took their pair or put the mismatched tiles on the respective spots. Since it's a game about remembering where the tiles were, it's not cheating if the next player uses the information to make themselves a pair in their own turn.
The game ends when no tiles are on the table, and whoever has the most pairs wins!


