
Cheap art ideas for children to do at home
Planning art for kids can often become an unnecessary added expense to the budget, we are going to show you how to turn everyday items found in the home into wonderful art! Cardboard rolls, odd socks, collections of paddle pop sticks and paper plates will be transformed from trash to treasure!
Toilet Paper Roll Bugs
Turn an empty cardboard tube into a brilliantly bright, fun and colourful craft is the aim of the game here! So save those toilet paper rolls and cardboard rolls that you usually throw away to make these cute little insects! Not only are they super easy, they are interactive, and the kids can use them for puppetry play afterwards!

Cardboard Tube Buzzy Bee
Step 1- Gather your cardboard rolls, a pencil and a pair of scissors. Cut a circle with antennae for the bee's head and two wings. (You can cut the butterfly parts at this stage too, detailed below).
Step 2- Measure the size of the toilet roll into white paper. Cut to size. Use our honeycomb stencil to create the perfect pattern for your toilet paper roll bee. We chose a lovely pastel yellow from our Gouache Stix set to add a soft touch to our little friend! (if you are using our Silky Paint Stix, you can use the yellow from that set).
Step 3- Mark out lines across the page using a pencil and ruler, these will become the stripes for the bee. Fill every second space using your black Silky Paint Stix - so quick and easy!
Step 4- To create the bee's face, use your black paint pen to draw a heart in the centre of the circle. Colour the area outside the heart with the same black pen, leaving the tip of the antennae and the inside of the heart blank.
Step 5- Draw the bee's face features on the inside of a heart shape using a fine tip black paint pen.

Step 6- Paint the face and antennae with a yellow paint pen. A couple of pink spots on the cheeks complete the buzzy bee face. Both colours are included in our handy Classic set of 12 medium tip paint pens.
Step 7- Wrap the black and yellow paper around the toilet roll and glue into place. On the opposite side of the glued seam, fasten the face.
Step 7- Colour the wings you cut out in the first step with our wonderful silver metallic paint pen. Next, use the honeycomb stencil with your fine tip black paint pen to add a lovely detail.
Step 8- Glue the buzzy bee wings towards the back sides of the bee so that the curves of the cardboard stand out. There you have it, a Buzzy Bee zzzzz!

Cardboard Roll Rainbow Butterfly
Step 1- Cut out a circle with antennae and four butterfly wings (two large and two small). You will also need to cut out six small, cute hands that will be used for butterfly legs.
Step 2- Measure the size of the toilet roll into white paper. Leave around 2 or 3 cm around to make sure it's easy to paint, you will cut to size when you are finished painting the paper.
Step 3- Choose a rainbow spectrum from the Gouache Stix (yellow, orange, pink, green, blue and purple) to add colour to the wings, paper, face and hands of the butterfly. The Gouache Stix are the perfect medium to complete this fun and colourful background quickly, and they blend together beautifully!
Step 4- Colour the butterfly's face and hands with a colour on the darkest side of your rainbow spectrum - we used purple!

Step 5- Let's create a bashful pattern on the rainbow paper. Take a gold metallic paint pen and paint cheetah spots and shapes all over the rainbow paper. Leave the rainbow wings blank for now.
This pattern was so effective because the gold shimmering across the page turned out to be a stunning effect, and the fine design was a cinch to complete.
Step 6- Cut to size and glue the shimmering rainbow paper onto the cardboard roll.
Step 7- Paint the wrists of the tiny hands with a purple metallic paint pen.
Step 8- Google a picture of a Monarch butterfly and use it as a guide to design the butterfly wings. We used our purple and gold metallic paint pens for the ease of use when it comes to fine details. The shimmer details really add depth to the wings!
Step 9- Our bashful butterfly wouldn’t be complete without a unique face. Paint details using a black and white fine tip paint pens, and don’t forget to add a couple of flicks to the eyes too!
Step 10- Once the face is dry, it is ready to be glued into place. The butterfly hands are also glued in a line towards the centre of the cardboard roll, leaving space for the brilliant wings to fit in too.
Step 11- To attach the wings in place it would be handy to use a hot glue gun so that they set in place almost immediately- alternatively you could prop them up so that they sit correctly to dry!

My kids are still buzzing, fluttering and flying around with their bees and butterflies!
Rainbow Tie-dye Sock Puppets
Life of Colour Fabric Pens are designed to be used permanently on fabric and are the star of the show when it comes to upcycling an old white sock into a cute puppet. No sewing is required for the assembly, just some string and glue!

Quick rainbow tie-dye effect
We will show you a way to use the fabric pens to create the appearance of the sock being tie-dyed in only a fraction of the time compared to using soaking methods, follow along to learn how!

Step 1- Time to transform that dreaded odd sock into a work of beauty! Choose the brightest shades from the fabric pens - yellow, green, orange, purple and blue. A white or lightly coloured sock works best for getting colours vibrant and true.
Step 2- Dampen the sock with water and start adding circular shapes of colour, the combination of water with the fabric pens will achieve a bleeding blend of colour.
Step 3- As more colours are added to the sock the spaces begin to fill when colours are close together they will blend in the middle due to the damp material.
Step 4- Once the sock has been completed, it’s time to put it in the clothes dryer or hang it in the sun. Drying the sock will further assist you to lock the colours into the sock, and it will be ready to create a craft with.
No-sew Rainbow Caterpillar Sock Puppet
The beauty of making these no-sew sock caterpillars is that the kids can probably manage to make them by themselves. Minimal help plus cheap makes for a great activity!

Step 1- Let's turn this rainbow sock into a caterpillar critter by placing the filling inside the sock and secure the end with string or an elastic. You can use cotton balls, fabric scraps, wool, etc.
Step 2- Make the shape of the caterpillar by tying string around sections of the body. The head should be slightly bigger, and the tail should be slightly smaller.
Step 3- Add two button eyes with glue. Twist the ends of a pipe cleaner to make them resemble antennae.
No-sew Rainbow Bunny Sock Puppet
There are so many colourful creatures to make using the rainbow sock. We have chosen an adorable no-sew bunny. Once the bunny is complete, it will bring a smile to both children and adults alike.
The versatile fabric pens allow this craft to be highly customisable, allowing you to add cute designs and details to make your bunny a one of a kind.

Step 1- Place your chosen filling inside the sock and tie the end leaving at least 5-8 cm of sock, then make a small circular shape for the head and secure it with a piece of string.
Step 2- Use your scissors to cut the end of the sock (from the top to the head) to shape into two ears. Tie string around the tip of each ear with a bow.
Step 3- Turn the bunny over and give him a cute cottontail by tying a piece of string around a small amount of the stuffing and sock.
Step 4- Using the black fabric pen, paint a unique face. The emoji faces are a great tool for choosing an expression to use!
Paper plate Hootie Owl
Tu-whit tu whoo, tu-whit tu whoo!
Ready for a hooting good time? We have pooled our creative resources to bring together a bright fluro owl!
Whether you’re the owl-obsessed friend in your group or that title belongs to one of your kiddos, these owl plates will be like a feathery best friend.
To create this fluro owl, we will be using our most vibrant colour packs: Life of Liquid Chalk pens and Fluro paint pens. You will also need two paper plates and two white paper cups.
Step 1- Cut the edges off one of the plates to make wings, use the leftover piece of plate to cut out two bird feet and a triangular shape for a beak.
Cut the two cups in half and use the top sections to cut out tail feathers.

BEAK AND FEET
Paint the pieces you cut for the beak and feet with your orange chalk pen. When dry, trace around the edges using the black chalk marker.
EYES
Cut many slits into each paper cup, so that you can begin to create the fluffy area surrounding the owl's eyes.
Blend yellow and orange inside the base of the cup. Then add green, blue and purple on the tips of the feathery tips.
Wait for the surface to dry and paint a pupil in the middle with a couple of spots of white to represent light shining into the owl's eye.
Repeat the whole process for the other cup so that you have two eyes for your owl.
WINGS
To create the wings, cut feather shapes along the edges of the pieces of plate. Use a pencil to sketch out feather shapes following along the cut feather edge.
Paint an outline over the top of your sketched feathers - two rows in purple and the other two in blue.
Paint with green inside the blue outlines, and paint with pink inside the purple outlines. This will make very striking and colourful wings!
Time to give each feather on the wing a black outline. Complete the other wing and try to keep it looking the same as the other and set them aside to dry.
TAIL
Using the same colours that were chosen for the eye for the next step to paint the tail feathers - combine the blue and purple to smear over the surface with the darker purple painted around the edges.
Repeat this method for the other feathers using yellow and orange together and the green yellow and orange for the centre tail feather.
Next step for the feathers is to go around the edges with black and add a centre line to each feather.

FINISHING TOUCHES
(Adult help needed for this step) Heat up the glue gun ready to assemble the owl. Securely glue the eyes and beak in place onto the leftover oval plate. Paint some coloured curved feather lines onto the owl around the area beneath the beak!
Attach the tail feathers onto the underside of the plate, and the bird feet at the base of the plate as pictured. The wings need to be glued onto the sides of the plate to complete the owl. Your owl is now ready for a hooting fly around!
Paddlepop/Popsicle Stick Puzzles
Stepping up the educational factors for this craft for kids by creating puzzle challenges that will support the creativity of children along with cognitive brain power to solve the puzzle too! You can choose any image for your puzzles keeping in mind the age appropriate type of challenge that you wish to create.
We took a stroll down memory lane for our sweet milkshake puzzle, Think of your favourite childhood lollies - rainbow straps, strawberries and cream, swizzle sticks and lollipops - colour galore! Luckily the Life of Colour paint pens have every colour under the sun to match so that you can re-create.
Time to grab all of your most vibrant colours in your Life of Colour collection- fluorescent heaven here we come!!

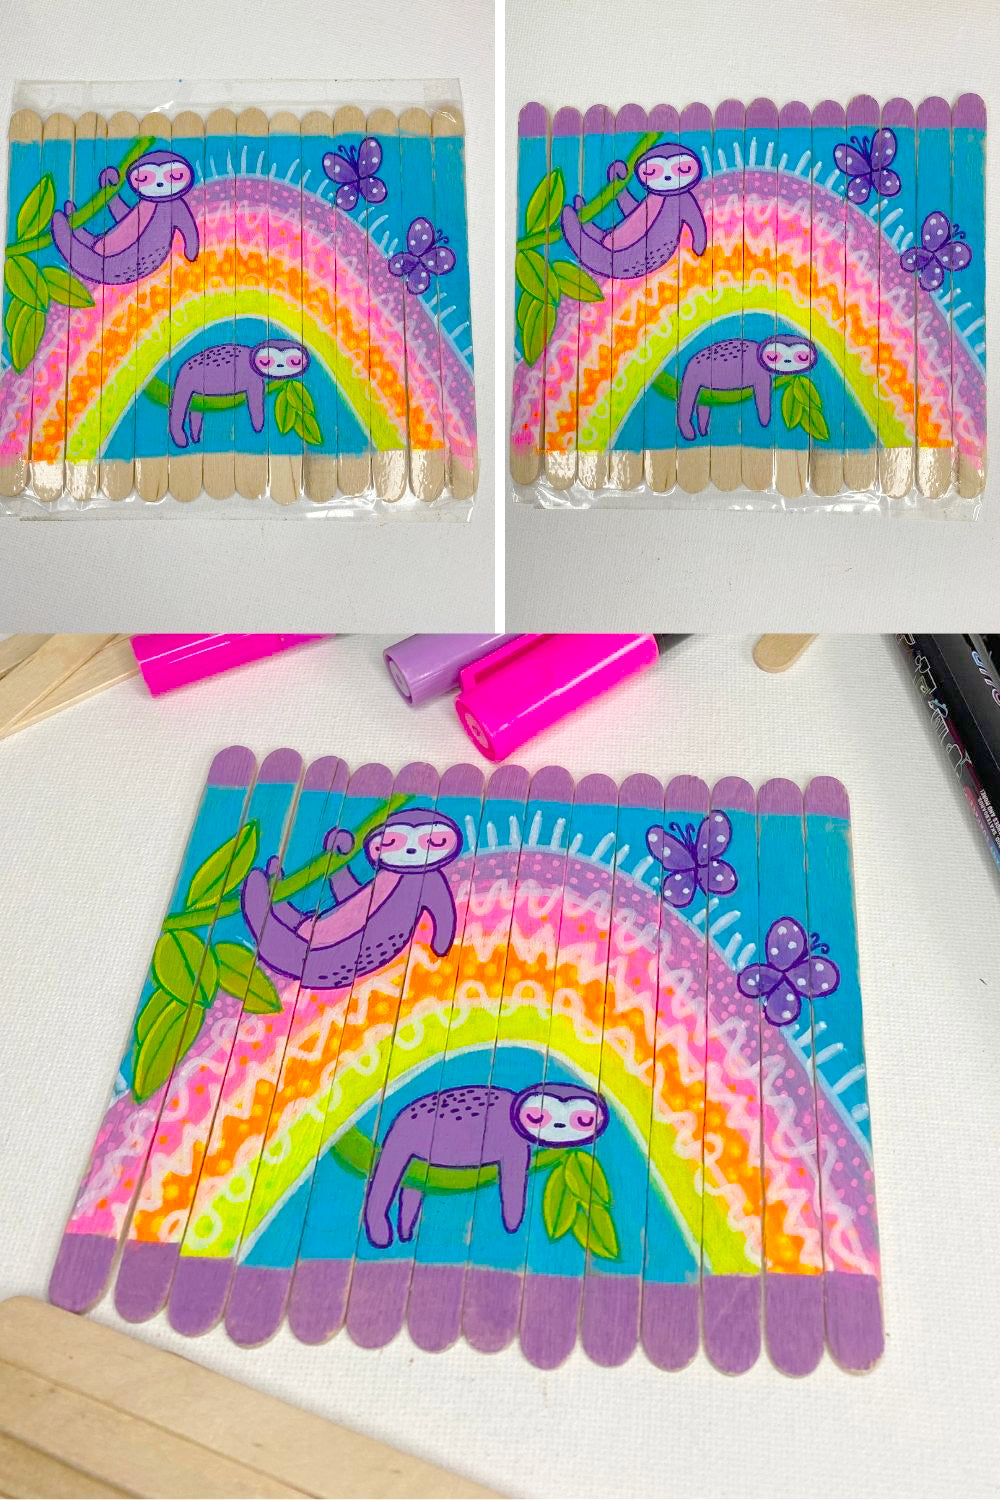
Sleepy sloth puzzle
Step 1- Fasten 14 paddle pop sticks together using sticky tape and gather your Fluro paint pens for maximum vibrancy and complete a curved rainbow with a blue background with the paddlepop sticks sitting vertically.
Step 2- Sketch a couple of sloth hanging from vines with leaves- one in the top corner and one underneath your rainbow. Add a couple of simple butterflies fluttering around in the sky.

Step 3- Using the Life of Colour Essential brush pen set for the convenience of brush accuracy to carefully colour the sloths and butterflies purple. Deepen the colour with many layers towards the inner edges of the butterflies. Use white on the sloth faces to show a good contrast in colours.
Step 4- Paint the sloth branches green with a variety of shades, the essential set offers two shades of green to use. Neaten up the edges of the sloth and butterflies using a fine 1mm purple paint marker.
Step 5- Add patterns of white around the edges of the rainbow and a few spots on top of the butterflies wings- either a 3mm or a 1mm paint pen would be suitable for these lines. Continue adding the finer features to the sloth faces, vines and leaves - we utilise the fine tip for paint accuracy for this.
Step 6- Take care to remove the sticky tape from the outside edges of the paddle pop sticks and complete the edges with the essential brush pen in a purple - you will notice the tip of this pen easily paints in the small creases and crevices.
Step 7- Pull the puzzle apart, mix up the pieces and then it’s time for the brain challenge to put it back together correctly! Have fun!
Candy loaded milkshake puzzle
Step 1- Fasten 14 paddle pop sticks into place with sticky tape and sit them horizontally ready to paint.
Step 2- Use your Gouache stix to quickly add a rainbow to the paddle pop surface, glide your finger over the top of where the colours meet to blend them together.
Step 3- Sketch a candy loaded milkshake in the centre of the puzzle.
Step 4- Hot pink from the 3mm Classic paint pen gives an added “POP” of colour to this sweet delight. Use the pink for the milkshake jar, lollipops and straw. It would be a crime to cover up all of the beautiful blending from the Gouache stix so turn part of the milkshake froth into the main details by placing a fine line around the dripping shake.
Step 5- Paint a smug face onto the milkshake jar (you’d be happy if you had a head of sweets for hair too!!) Begin to fill the lollies with colour- white, red, blue and bright green to name a few from the 3mm sets - fine enough to allow for neat edges and filling in the opaque colours fast.

Step 6- Strawberry cream froth on the top of the milkshake is achieved using a blend of red and pink.
Step 7- Add pink and white swizzle sticks, a rainbow strap, a blue and white swirling lollipop, peach pop and a heart stirring stick. All that is left to do is add sprinkles, sparkles and pizazz! A mixture of circles and dashes spread around for fun then a layer of sparkling silver for added shine and sugar. We always lean towards our Metallic range to add shimmer and shine!
Step 8- Remove the tape from the edges and run a silver paint pen around to complete the candy loaded milkshake puzzle.
Paper craft Lion King Mask
“Do you suppose we’ll meet any wild animals?…mostly lions and tigers and bears!!” My favourite line from the movie “Wizard of Oz” that marks the moment our character’s meet the supposed fierce Lion! Well it’s time to make a Life of Colour Lion of our own to use as a mask to prance around the room like a Lion too!
A combination of Life of Colour products are used for this craft- including the Gouache stix (we will show you the watercolour effect) and the Metallic brush pens for precision and to add a striking shimmer!
You will need cardboard to create this amazing mask! Bonus points for reusing cardboard that has served its purpose.

CUTTING SHAPES
Step 1- Take a plate and place it on top of your piece of cardboard and use it as a template to cut out a large circle.
Step 2- Cut a large “v” section from the base of the circle and sketch a circular lion face onto the centre.
Step 3- Use the leftover pieces to cut out a pointy triangle and two joined circles with a triangular shape for a nose.
Step 4- Cut long strips of cardboard that are slightly wider than the space that has been created for the lion's mane.


PAINTING
Step 1- Draw a diamond shape and paint it using a brown silky stix (for a deep tone of brown) and cut it out leaving tabs on the outer edge.
Step 2- Paint the Lion jowls with the brown from the Gouache stix (it’s a light creamy brown) and has the ability to blend with a damp paint brush to create a watercolour look.
Add a deep brown nose.
Step 3- Utilise the Metallic bronze brush tip to colour in a line formation over the top of the long strips of cardboard. The brush pen glides across the cardboard to easily achieve this textured shine.
Cut it into about 20 x 1 cm strips then cut a few long strips that can be used as whiskers.

Step 4- Glide the creamy light brown gouache stix across the outside of the face of the Lion and use a damp brush to spread a layer of paint towards the middle.
Step 5- Place a circle of blue, light blue and purple gouache onto your palette and use a paint brush to water down each colour. Paint the lions mane in a pattern of stripes using these colours. Use a deep brown for the inside of the cute ears.

Step 6- Wait for the paint to dry and then add an outline of black to the face and nose section. Add a set of whiskers to the nose with a few dots.
Step 7- In between each colour around the lion's mane, glue down a strip of bronze cardboard and glue the nose onto the bottom section of the face.
Step 8- Paint the pointy triangle hot pink from the silky collection and fold it in half and glue it into place.
Step 9- It’s time to add character to the mask by adding extra patterns to the mane- use Metallic white and gold to paint fine details -swirls, lines, dots and “v” shapes are simple to complete when using the brush tip pens.
Step 10- For even more character we have curled a few whiskers, glued on some eyebrows and put the diamond nose in place for a 3D effect!

Will you try any of these fun ideas? Let us know in the comments below, or share your art with us on social media.


