Learn to paint a wombat on a rock with this easy step by step tutorial
Story stones are sets of painted/pictured stones that are used to tell a story - each stone has a picture prompt such as a character, scene or object to assist the compilation of a whole story.
If you just got here and are unfamiliar with story rocks, read these blog posts first so you can see the bigger role this adorable Wombat plays! We have chosen to create a set of stones with our Life of Colour acrylic paint pens inspired by the book “Diary of a Wombat” written by Jackie French with illustrations by Bruce Whatley.
If you're just excited to draw your first wombat, then enjoy the tutorial below!
Here’s a wombat tutorial for you to follow!
Step one:
To start off use your fine tip Life of Colour 1mm white to complete an outline of the wombat.
Step two:
I prefer to use a dry smudging technique when it comes to bringing Australian mammals and animals to life as it gives a textured look to their fur coats.
Achieving a dry smudge is easy - put a solid line of colour then quickly get your finger and rub the colour towards the inside area. Continue this method until the area is completely coloured in.
For a general rule, when trying to complete a shape to give it a 3D appearance, remember dark to light to dark again. This effect makes the middle section appear closer and the darker area further away.
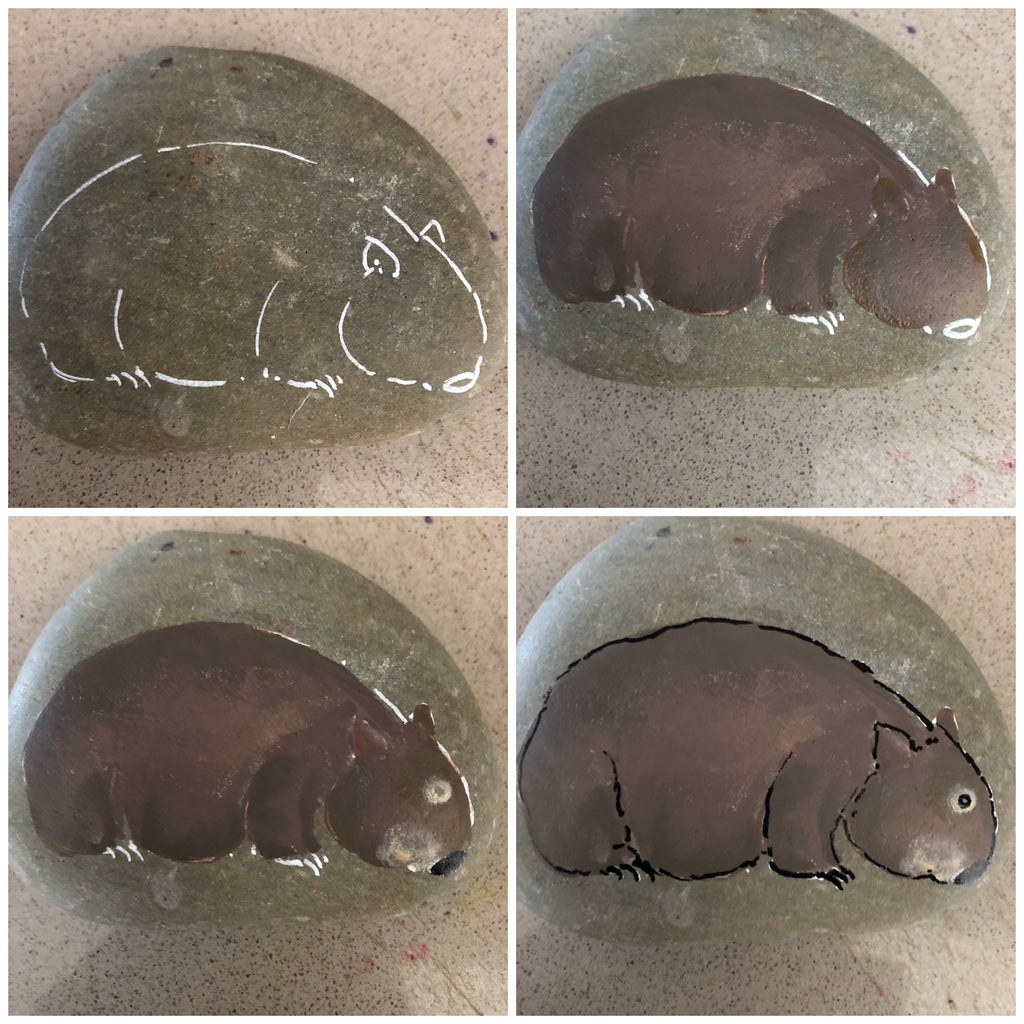
Step three:
Around the mouth and eye region place a lighter colour- white, light brown or skin colour will work great. Place a small dot of colour and quickly smear it again. Imperfections actually look effective in this case to add to the wombats personality!

Step four:
Give definition with an outline. Outlines are messy and broken -so is nature and lines of fur. A dark smooth line around the edge wouldn’t suit our wombat. If you have a copy of the book have a close look and there are tiny fur lines around the edge of the wombat.
Step five:
Next step is to perfect the eye and ear of the images - for the eye just do a small black circle then a single tiny dot. Wait for these to dry before adding a black dot to show where the wombat is looking. Define the inner ear with a small line in a lighter shade then a black line.

Step six:
Finally to complete the image add some grass in random strokes along the ground. The grass could also be used to hide any imperfections!