
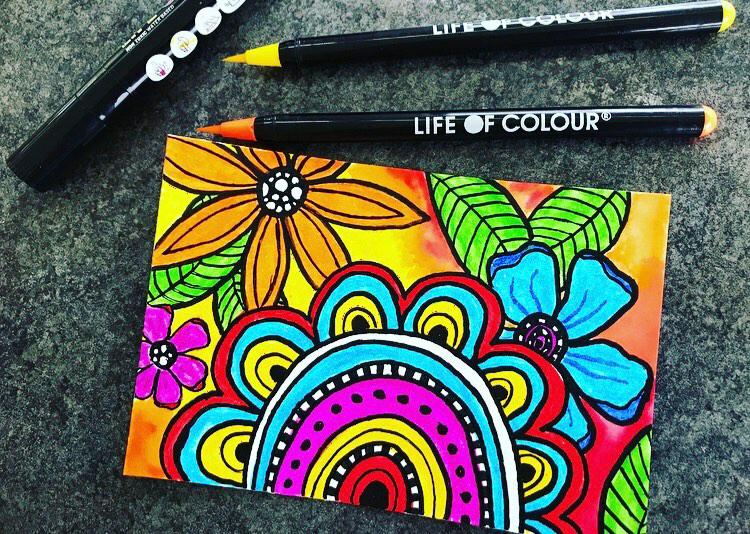
Watercolour Card Making Kit Activity Sheet
Table of contents
- How to use the water brush?
- Different watercolour effects you can achieve:
- Activity 1: Colourful loose flowers
- Activity 2: Make a safari greeting card
- Activity 3: Easy camping scene watercolour card
- Activity 4: Mermaid Art using all the colours of the rainbow
- Activity 5: Geometric patterns with watercolour brush pens
How to use the water brush?
The water brush is meant to be used with water, before you use it for the first time, unscrew the cap and fill it with water.
The more pressure you apply to the flexible barrel, more water will come out. Very little water means you'll blend colours without making a splash and more water means you'll be able to make full on watercolour effects!
Each 20-colour set of Life of Colour watercolour brush pens comes with a water brush you can use for any wet technique, including the paint pens, Stix and more.
Different watercolour effects you can achieve:
Watch this fun video before moving on to the different activities. This video will teach you and your children about watercolour basic effects and techniques.
1) Basic "wash"
A "watercolour wash" is a layer of watercolour, it can have only one colour or a mix of different colours... it all depends on how playful you feel (and how much water and pigment you mix on the paper).
For a light, transparent wash, paint softly on your paper with any colour of watercolour brush pen. It's OK to leave uncovered areas. Then add water by pressing the barrel of the water brush very lightly, making a swirling motion.
For a solid and intense wash you should add pigment evenly and creating an almost solid shape, like shown in the video. In this case you'll need to apply a heavier and steady pressure to the barrel of your water brush to distribute the pigment evenly and avoid hard marks. After you've diluted most of the pigment evenly, you can optionally add more water to some patches to make a texture.
2) Watercolour bleeds
It's called bleeding when two wet colours crash into each other, causing amazing mixes of colours and textures!
This can be a very fun effect, but please remember if you're going for neat and controlled layers, you need to wait for the previous layer to dry to prevent bleeds.
A burst is a localized "splash" of colour achieved by adding pigment to an already wet area in a controlled way.
3) Droplets
Apply tiny droplets of water to the paper, then touch the droplets with any colour.
Some of them will cause more vibrant results than others.
You can also use your brush right after painting a wash, and lightly tap it to release even tinier droplets of coloured water.
4) Blend two colours with the water brush
Just like one would blend with watercolours, creating a water "bridge" between two colours will help them blend.
The results will depend on which colours to mix, so we encourage you to explore different colour combinations until you find which work for the art you're trying to make, and which don't.
Paint two separated patches of different colours using the same technique you used for a basic wash, soft grip for a subtle wash and heavier grip for a saturated wash.
Wet the lighter color's edge first and then the opposing side on the darker or more staining colour. Start moving the water to bring the colours closer. Enjoy creating beautiful watercolour effects and achieving different gradient textures!
4) Blend two colours without the water brush
Follow the same process as in the previous step, but instead of making a bridge with water, bring the darker colour closer using the lighter coloured pen. Remember to clean the pen afterwards!
5) Mix your own colours
By adding different colours to a ceramic plate or plastic surface, you can mix your own colours.
Apply them to paper using your water brush!
Activity 1: Colourful loose flowers
This tutorial was developed with Aussie artist Tammy Klingner (@tambarambaa on Instagram).
Get inspired by the warm and bright mornings of Spring and Summer, watering your garden and spotting new flowers, and insects, birds and butterflies...
Idea 1: Turquoise and green

Start by making your central flower on the left side of your mixed media paper using your turquoise watercolour brush pen on the petals. Then follow the shape of the flower and make organic lines of magenta and yellow.

Use the rest of the space to create flowers of different colours, but also, using a different shape as your main flower. This helps create contrast and make the main flower, pop!
Paint the backgound using the different shades of green that come in your watercolour brush pens set, and make watercolour effects using your water brush.

When you're happy with your watercolour base, use your black and white acrylic paint pens to make modulated lines. Let go of perfection and instead embrace the beauty of nature and use black and white lines to make your different floral elements come to life.

You can add different doodles too! Dots, stripes, circles - and even mix in extra colours, like Tammy did using her blue paint pen to add a dash of contrasting colour here and there.
Idea 2: Mandala flower
Start by lightly sketching your mandala flower idea into your mixed media paper, the mixed media cards are the perfect size to try this technique. For this piece, the main flower will sit in the middle, touching the edge of the sheet.
To make your mandala flower, think of a huge center and smaller, rounded petals. The center will have the mandala effect by layering concentric circles of lines and colour.

Just like we did on the previous project, think of differently shaped flowers and add leaves to make the background of your piece.
Don't be afraid to combine contrasting colours and flowers, in this case the leaves also help create a contrasting element.

Now that you coloured the flowers, move on to the background, using different tones of orange, yellow and a smidge of red.
When your watercolour base is dry, use your 3mm black paint pen to create the fantastic linework that will bring life to this Spring scene.

Create funky patterns with different thickness of lines, dots, squares, semi-circles and more!

Idea 3: Purples and blues

This last idea, combines elements from the previous two! See if you can spot them!
Grab your mixed media card, and sketch the main purple flower on the edge of the paper. The center will also be decorated like a mandala, so think of stripes and different colours - in this case, in the same family of blues and purples.

Just like before, bring your main flower forward by creating contrast in colour and in shape: add organic leaves and brances, and new flowers!
Make a soft multicoloured background to match this colourful bunch!

Now that it's dry, have fun again with the black and white lines, dots and markings to bring this Spring creation to life!

Activity 2: Make a safari greeting card
In this tutorial we will show you how to make a beautiful safari greeting card using watercolour pens!
What you will need:
- Life of Colour Mixed Media Paper
- Life of Colour Watercolour Brush Pens
- Load the water brush that comes with the set by unscrewing the top and adding tap water
- Life of Colour Washi Tape
- Life of Colour 10 pack stencils
- Life of Colour Black fine paint pen or any black pen
- Any Pencil
STEP 1:
Choose your colours: we used dark red, light red, pink, orange and yellow.

STEP 2:
Take out your paper and cut it to size. Put some washi tape around the borders to keep it white. (You will peel it off right at the end when everything is dry).
Lay down your colours in a gradient. Reds, yellows down to orange and pink.
Take your water brush which is included in the Watercolour Brush Pens set and blend the colours together. The idea is to get a sunset effect like you see below as we will be drawing in a silhouette of the animals in the end.
If this is your first time blending, just play around, don't expect to get it right the first time you try. Different paper will also give different effects. I have used watercolour paper in this tutorial, mixed media paper will work just as well. Blending is incredibly fun and therapeutic and once you have done it once you will be hooked! We have hundreds of blending options in our pack of 20 watercolour pens, so make sure the colours work well together and blend away. Don't be shy with the water either.

STEP 3:
Wait for the watercolour background to completely dry. Take our your stencil pack and find the animal one with all the cute little animals, including our giraffe and elephant. (If your kit doesn't come with stencils, you can copy the animals from our pictures).
Outline the stencil with pencil. I chose the giraffe and elephant for this but there are many other options to choose from.

STEP 4:
Get your Life of Colour 1mm black pen and colour in the animal drawings. Make sure the paint is all completely dry to get a good solid finish.
Our black watercolour pen will also work very well here with a softer black finish.

STEP 5:
Add some details. We used the plants stencil to add some flora to the silhouette. You can add anything you want at this point.
Another great idea is to use the banners, borders or letters stencil sheets to add in your message or greeting. You can also turn the card around to do that on the other side. We love the look of combining the plants and animals to make it look like a real safari scene.
If you did use tape for your border, you can now slowly peel it off to reveal your clean white border.
You don't have to use the stencils to follow this step either, make leaves and different plant shapes with your pencil first and then fill in with black.

NO more steps! You are done. Now write your greeting and give it to someone you love. You can stick it in an envelope and post it to someone who lives far away. Everyone loves receiving a card in snail mail!

Activity 3: Easy camping scene watercolour card
The best way to express your inner watercolour skills is on gift cards! Simple designs like this easy ombre sky with Life of Colours brush pens look fabulous on a blank white card.
Once you master the ombre blending, there’s so many colour combinations you can try to create your own set of original gift cards
What you will need:
- Life of Colour Mixed Media Paper
- Life of Colour Watercolour Brush Pens
- Load the water brush that comes with the set by unscrewing the top and adding tap water
- Life of Colour 10 pack stencils, optional
- Life of Colour Black fine paint pen or any black pen
- Mixing palette

STEP 1:
Scribble a little colour from one or multiple pens onto your palette and then mix them with your water brush.

STEP 2:
Start by applying the colour at the top of the page by using any of the brush techniques below.
Depending on what type of sky you want, you can blend different colours like in the picture or just different shades of a single colour.

STEP 3:
Next allow the watercolour to dry. Patting it with towel or using a hairdryer is a quicker way to do this.

STEP 4:
Finally add some illustrations down the bottom. On this card there’s a little house, smoke, and trees drawn in black fine tip along the horizon of the sky. But be creative and maybe try something different!
You can make a sketch using a pencil and then trace the lines using your black pen, or go directly into the paper and free-style it.

Now your personalised card is finished!

Activity 4: Mermaid Art using all the colours of the rainbow
Today's idea is brought to you by a 🌈 rainbow mermaid 🧜♀️, you can make this fantastic effect on cards, notebooks or to make a fun piece of art for your room!
You'll need:
- Mixed Media Paper
- Life of Colour Watercolour Brush Pens
- Load the water brush that comes with the set by unscrewing the top and adding tap water
Other materials you'll find handy:
- Washi Tape or Life of Colour 10 pack stencils
- Life of Colour Black fine paint pen or Golden pen (optional)
- Any Pencil

Step 1
Find the hexagon shape in the stencil pack, you can choose any shape you want but aligning the hexagons is very easy! If your kit comes with washi, make hexagon shapes using the washi (or make any shape you desire).
Use a regular pencil to trace the hexagon, in this case, we didn't leave any space between one hexagon and the next one. The linework details at the end go on top of the watercolour.
Step 2
Figure out your colour order and sort your pens in rough groups. We did: purples, blues, greens, yellows, reds, pinks, browns.
You can stick to the same colours for example all blues and purples or greens and yellows.
Step 3
Start adding your first colour in the hexagons on the right. You don't need to cover every nook, that's the water brush's job.
The idea is to create variety by adding more or less water to each hexagon. If you did a very dark one, make a few that are very watered down next to it.
Step 4
To make the nice transition between colours without showing a clear vertical line where it changes from purple to blue, the trick is to mix both! That's why we put them right next to each other, so we can blend them slightly and make the smooth transition.
Make some hexagons that carry more of the colour on the right and others that have more of the colour on the left. For example, a teal closer to blue, versus apple green closer to yellow. You can also play with water to get even more shades of colour!

Step 5
Wait for the watercolour to completely dry. Don't go in with the paint pen until your watercolour is completely dry!

Step 6
Remove the washi tape if that's what you used.
Get your paint pen (can be Golden 3mm or Black 1mm) pen and trace over the edges of all the hexagons. It will give it a nice elegant pop.
Activity 5: Geometric patterns with watercolour brush pens
In order to create these geometric patterns, you will need the following materials:
You'll need:
- Mixed Media Paper
- Life of Colour Watercolour Brush Pens
- Washi Tape
- Load the water brush that comes with the set by unscrewing the top and adding tap water
- Optional: ruler, Life of Colour glitter pens, etc.

1. First, I start by forming a pattern or shape with the tape. There is no right or wrong way to do it, though if you want to frame it later, measure out the appropriate dimensions.
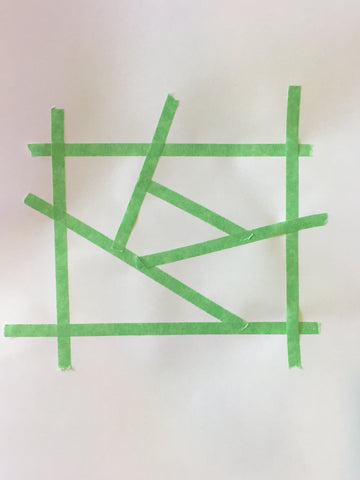
2.Next, pick colors to fill in the shapes. Try to pick colors that will blend well when adjacent and complement each other well. My go to colors are purple, pink, yellow, and blue but you can go as bright or neutral as you want.
3. Next, you will color the wedges/shapes. I recommend doing one at a time and working fast. To color the wedges, I start with the darker colors and then follow with lighter adjacent colors to attempt to “pick up” the dark color into the lighter one to facilitate blending. You can color the shapes in any pattern or shape you wish, whether it be a vertical, horizontal, or shaped gradient. I recommend keeping darker colors near the perimeter to maximize the contrast with the tape lines.

4. Once you finish adding colors to the wedge, grab your water brush (or a paint brush dipped in water) to begin blending. I always start from the light colors and work my way toward the darker colors, but after each color combination, I wipe off the brush to avoid too many colors lingering on the brush and making a muddy mess.

Try to work relatively fast such that the wedge remains wet upon completion of the water brush blending. By doing so, one thing I like to do to jazz up the shapes is add additional small drops of water to the wet surface to add little crystal like shapes. Less is more because they grow before they completely dry.
5. Repeat steps 3-4 for all shapes and wait for the ink to dry.

6. Once the art is completely dry, peel off the tape. Hopefully, the lines are crisp but if not, a white gel pen can clean up any color that leaked onto the taped regions.


7. You can stop here if you want, or you can add lettering or drawing over your beautiful finished product.


