
Mixed Media Artist Kit Activity Sheet

Get your Mixed Media Artist Kit here
The first activity in the Mixed Media Artist kit is to make a rainbow tie dyed notebook cover using the watercolour brush pens. These wonderful art supplies can be used for card making and general school work!
As a second activity, kids will learn to paint a pot using paint pens. They can later use the paint pens on any other surface of your home, including rocks and more!
The final activity invites them to upcycle a piece of plain or old clothing by using fabric pens.

Activity 1: Watercolour painted rainbow book cover
Stand out from the crowd and cover your books in unique art using some simple and effective watercolour painting.
Materials:
- Life of C0olour watercolour brush pens (included in your kit)
- A piece of Art papers the same size as the book you are covering
- Ruler
- Clear contact
- Pencil for sketching
- Glue stick
- Scissors

Instructions
Step one
Use a pencil and ruler to plan the design of your book cover. Our theme is rainbow colours and the pattern was inspired by tie dye art. The method uses the water brush that is provided with the Life of Colour set of watercolour brush pens.
Rule a border line down the whole length of the page.
Step two
Mark out lines that zig zag down the page and try to keep them around the same triangular shape and size.
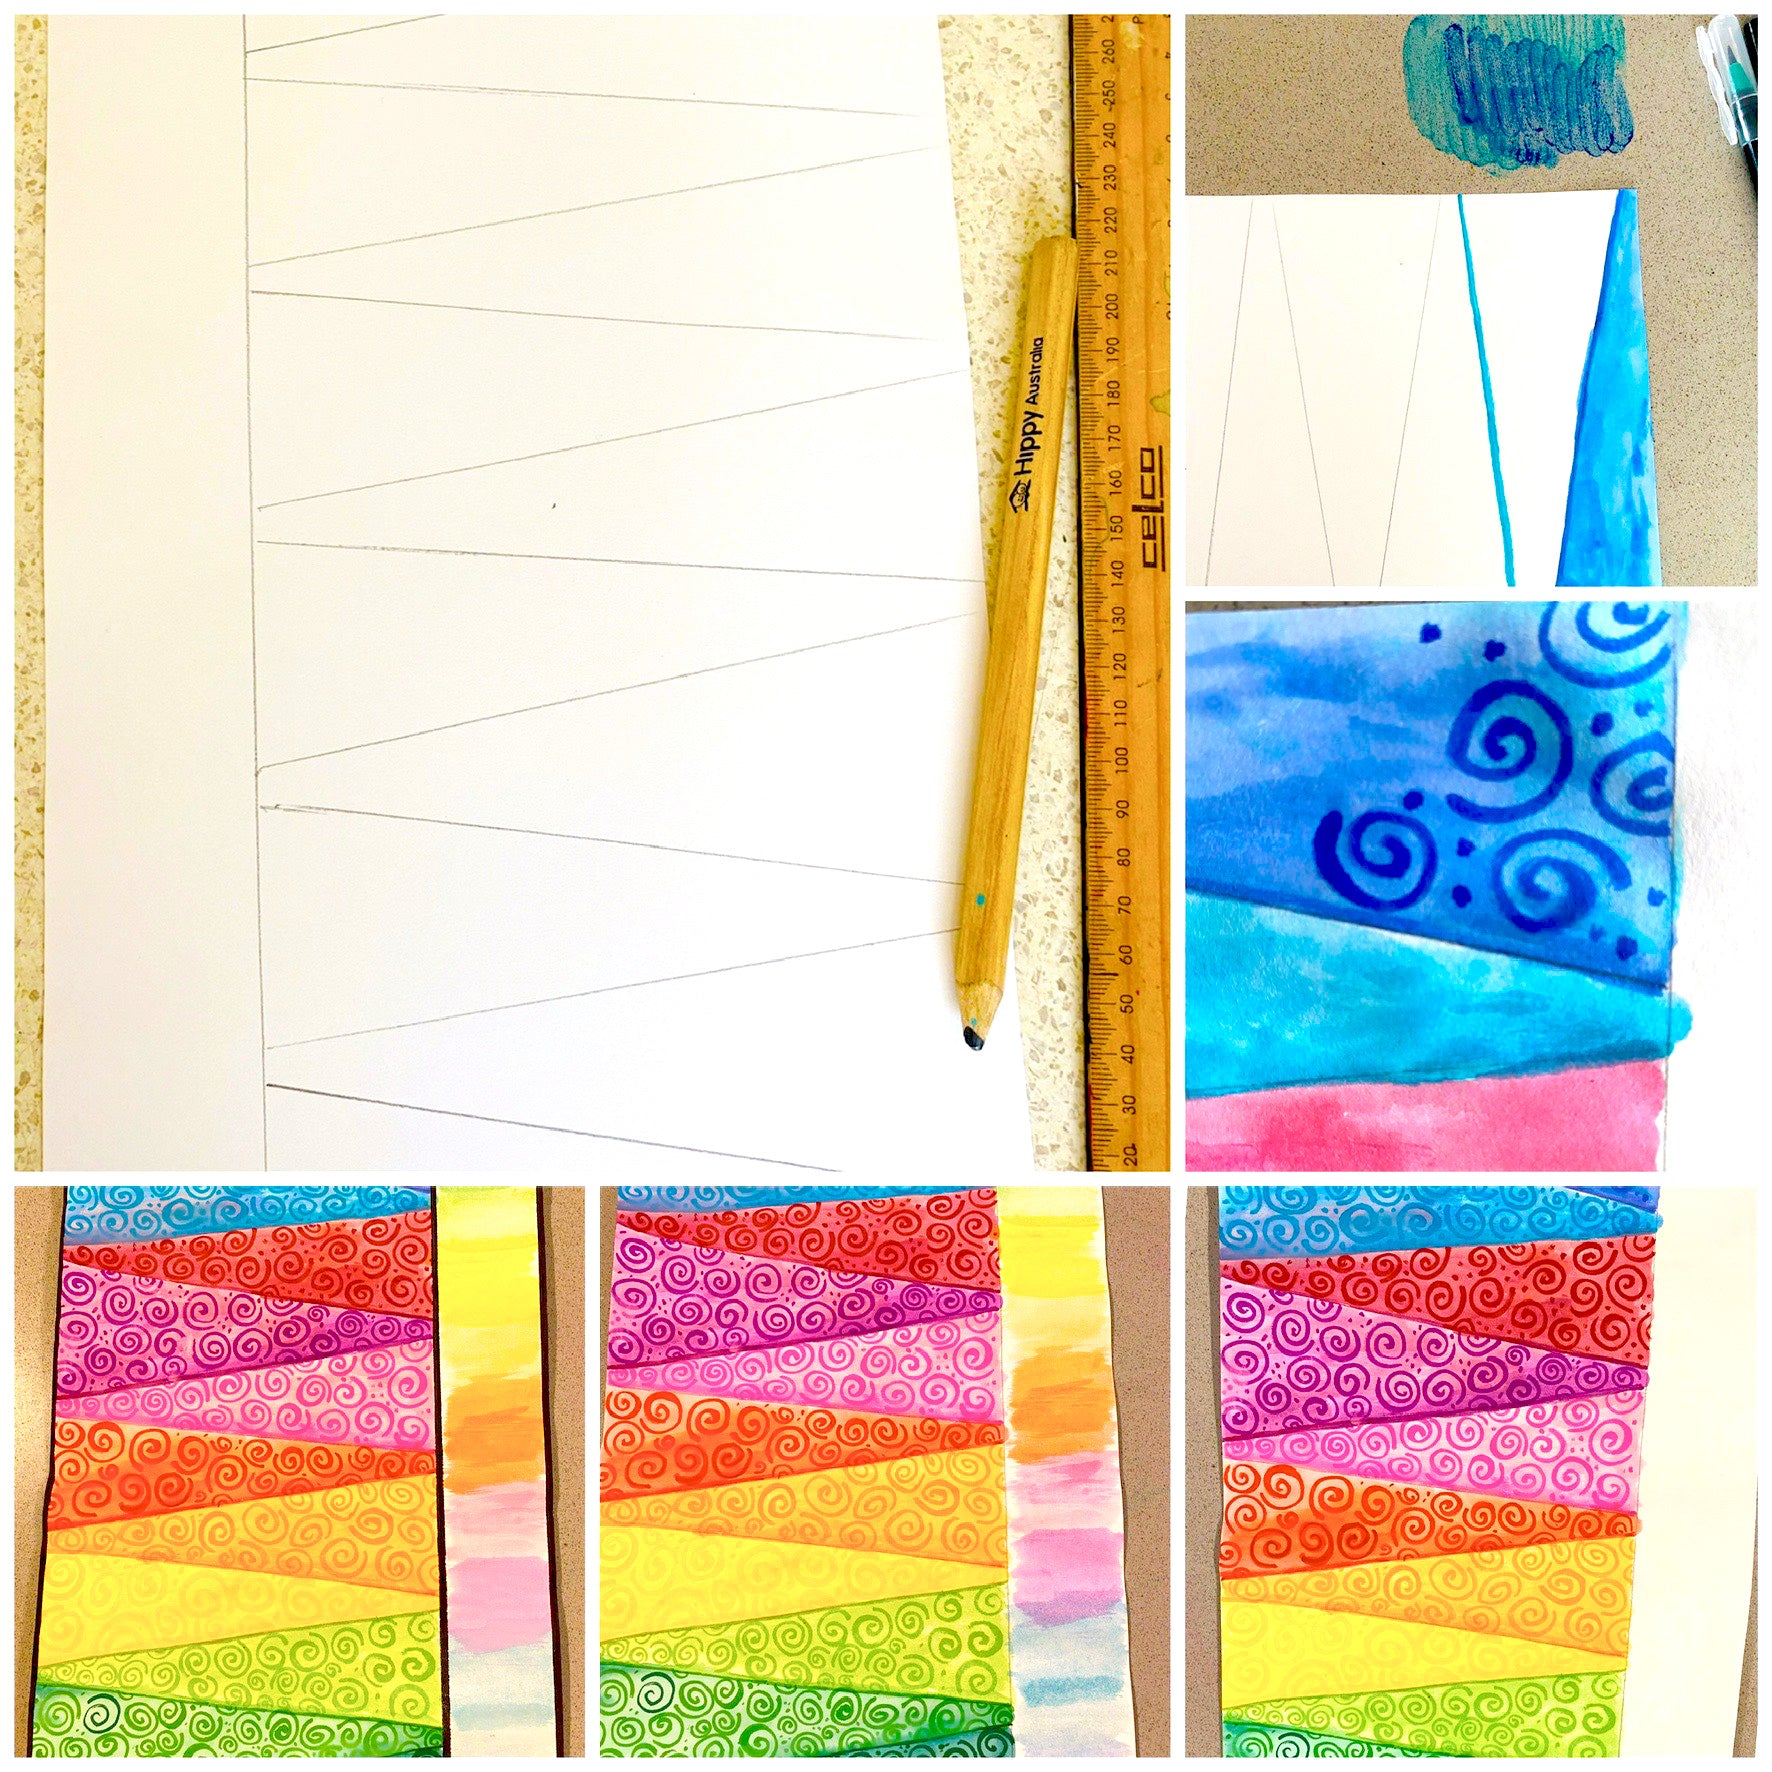
Step three
Use a watercolour pen to paint the solid edge line of the triangle. It’s best to blend the watercolour colours on a ceramic plate, piece of marble or sheet of plastic, as you can see in the picture we use a stone cutting board which is also suitable because it doesn’t absorb paint quickly. Place solid colours down and blend them together with the water brush pen to paint the triangular shapes in.
Step four
Continue step three for all of the triangles remembering to try not to paint too darkly. Once this first layer has dried then use the watercolour brush pens over the top to paint swirls and dots or any other shapes that you like.
Step five
Now it’s time to reverse the rainbow colours order down the border edge, complete this painting using the blending method and water brush the same as before. Allow this to completely dry before finishing the edges and writing over the top.

Step six
Use the black watercolour brush pens and a ruler to go around the edge of the page and side border.
Choose which subject your cover is for and practise writing the word.
Write the subject name down the side of the page in the border section in pencil first then go over the top using the black brush pen.
Step seven
Glue your painted picture onto the front of your book and neatly cover with contact paper.
Activity 2: Funky Mini pots for all ages
There’s lots of crafts you can use your Life of Colour paint pens to do- grab a surface and give them a try, the only real limit is imagination.
Materials
- Life of Colour paint pens (included in your kit)
- Mini pots, you can get a cheap set of plain pots on Kmart, Big W, Bunnings and most bargain stores.
Instructions

Step One
Paint the shape of a flower onto one of the pots using contrasting colours, we used yellow for the center and red for the first line of petals.
Step Two
Fill the petals in another contrasting colour (pink in this case), and keep playing with colour making a think contrasting line that follows the contour of the flower (blue). You can do any funky shape you want!
Step Three
Draw a semi circle around the flower and fill it in with another contrasting colour (orange), think of this as a new center for your flower, and add more petals around it.
We made pointy petals using thick lines of blue, lilac and red. Circles are painted into the spaces between the pointy petals, using contrasting colours again.
Step Four
Use your black paint pen to line the entire flower, including the petals and the different coloured lines.
Add dots for the center of the flower.
Step Five (ask your parents to do this step for you!)
This step requires adult supervision.
Ask your parents to preheat the oven to 180 degrees Celsius and place pots in the oven for ten minutes. Turn the oven off and wait until pots have cooled before removing them.
Other ways to paint your pots
Cactus and owls
Geometric shapes
Adding different shapes in assorted colours can be an easy and effective way to decorate your paint pots using the Life of Colour paint pots. This method is open to everyone of all ages- just go ahead and create a pattern and repeat it all over the pot.

Decorate a jar or coffee container to turn it into a vase
Old coffee jars are the perfect size to create a nice flower vase- Just remove the labels with hot soapy water and you're ready to go.
Geometric shapes are created using sticky tape randomly placed in lines every which way then colour is added to the spaces left behind. Wait for the paint to completely dry before peeling the tape off and use a different colour to give the shapes outline.
Once you have completed the Life of Colour glass art you can seal it in the oven or with a spray sealer.

More pots and planters inspiration:

Pot by Ella Flood

Pot by Helen Horgan

Pots by Kayley KE Potz

Pots by Samantha Dorahy

Pots by Nidhi Pathak
Activity 3: Paint colourful giraffe using fabric pens
This fantastically coloured Giraffe was completed with our Life of Colour Fabric pens. No matter what colours are added to a Giraffe those spots and stand out characteristic features will always be recognisable, so why not go all out!
Materials
- Fabric pens
- Fabric (You can use this design to put onto any fabric surface)
Instructions

Step one:
Place a sheet of cardboard in between layers to avoid ink going through then get started! You can use any item of clothing you have in your home, or choose a new and plain item (like a white t-shirt).
Sketch an outline of the image to create a starting point, you can get inspired by this giraffe outline, but don't worry, it doesn't need to look the same.
Step two:
Dark blue and green Life of Colour Fabric markers replace the usual black mane of the Giraffe. The effect of the colours together works extremely well as they sit next to each other on the colour wheel- it’s always a sure thing to use a colour wheel as reference to colour combinations that pair well.
Go crazy with colour and blend, blend, blend!
Step three:
Start the rainbow journey from bright blue and green around the edges with a mixture of yellows blended together in the centre and around the giraffe spots.
Step four:
The spectacular colourful pink spots add flair to our Giraffe, achieved with a blend of the pink Fabric pens!
Other fabric ideas:
Cheerful sunshine pillow case
Grab an old white pillow case and place a piece of cardboard in between the layers to prevent paint going through and paint it with this cheerful sun design using your fabric paints. It’s sure to be the brightest pillow in the house.

Paint an earthy burlap bunting flag
We have used the new Life of Colour Fabric pens to create a Steiner inspired earthy bunting flag which I think has turned out so effective and was really easy to achieve.


