
Get kids creative in the summer holidays with the FLX Mascot Competition!
We wanted to bring you the most creative and crafty summer activity of all time, so Life of Colour is teaming up with Flexischools for a fantastic competition and the craftiest summer!
Find fun artsy activities to keep kids busy in the School Holidays in our blog below, and inspire the children in your family to join the competition fun!
Flexischools is inviting kids to design a fun and colourful mascot for FLX, their prepaid card and savings app for kids, used by families from more than 2,500 Australian schools.

About the competition
In collaboration with Life of Colour, FLX is inviting kids to design a fun and colourful mascot for FLX.
The mascot should emphasise financial literacy and inspire kids to earn, save and spend.
There are more than $3,000 worth of awesome prize, including prepaid cards and art supplies!
Grand prizes
Two lucky winners will receive:
- Life of Colour Super Kit ($1000 worth of Life of Colour products)
- A FLX prepaid card with $100 credit
Runner up prizes
Eight lucky runners up will receive:
- Life of Colour Art Kits (over $100 worth of Life of Colour products)
- A FLX prepaid card with $50 credit
Judging
FLX will choose the top 5 mascots in the following categories:
Ages 4-8
Ages 9+
Winners will be chosen based on creativity, originality and skill.
FLX will choose the top 5 mascots in each category and then open it up to public voting so you and your kids can vote for your favourite one. Visit the FLX website to download the template for the mascot submission, and upload your completed artwork.
Download the FLX mascot template and upload final artwork here.
Competition commences 12 December 2022 and entries close 12 January 2023.
*Terms and conditions here.
All Flexischools kids get 15% off our entire store when they use the code FLX15.
Read the blog below and get inspired to start creating!
The coolest kids craft imaginable
We sorted through our social community network to present so many bright and colourful craft activities jammed into one space for your convenience so that you can keep the kids entertained for the holidays and for you all to gain some inspiration to create your own mascots.
Time to get busy and create something together!!
Colour in a painted tote bag
This has become the favourite craft for get-togethers and birthdays. One side of this Life of Colour tote bag comes with a convenient ready to colour image, and the other side is blank left for the kids to make their very own design.
All you need is a set of Fabric pens and an imagination filled with colour.

Monster Madness Pencil Caddy
This pencil caddy is easily crafted with a small box base and cardboard rolls inserted into place in the middle.
Design some fun spotted paper using Life of Colour dot pens and construct monster faces using recycled cardboard and pipe cleaners.

Bottle to Fairy Fantasia
Fairies have always been so magical and enchanting with the shimmer of fairy dust sprinkling our imaginations we were able to make our very own fairy house that can be kept at our bedsides so we can imagine that maybe a sprite might visit us at night. Inspired to make one yourself? Follow along to see how!

Step one- Make DIY air drying clay (mix 1 cup of cornflour, 2 cups of baking soda and 1.5 cups of water together over low heat in a saucepan until the mixture thickens. Cool the mixture and gently knead it. Bring the clay together into a ball and store it in a wet tea towel until ready to use.
Step two- Prepare an empty bottle by gluing tissue paper over the entirety and then start sculpting your clay into place whilst the surface is still wet with glue. Add sculpted leaves, vines, rounds of imprinted flowers and of course a Fairy door.
Step three- Glue a cute paddle pop fence around the base. Wait for the bottle to dry completely and then paint in magical combinations of colour using Life of Colour Metallic brush pens.
Paper Mache Cacti
Once upon a time we all made use of the construction method known as paper mache. The handy recipe calls for using only pantry ingredients and recycled newspaper. Find the formula instructions below- we guarantee that the children will love making, mixing and then creating all sorts of wonderful of treasures to behold.

Sourced from Artbarblog
Step one- In a mixing bowl add one cup of flour and two cups of water with a teaspoon of salt and mix well. Adjust the consistency by adding flour if too runny and add water if it is too thick.
Step two- Tear pieces of recycled paper into ready to use strips and scrunch other bits of paper into cacti rod and cut some cardboard into circular shapes disc shapes.
Step three- Dip the strips of paper into the flour mixture and paste onto the cacti shapes and begin building the shapes to become solid.
Step four- Allow the cacti to dry and then paint a base coat of white acrylic paint. Next you can paint the cacti green with a set of Earth Colours paint pens and arrange them into small pots using pebbles to keep them in place.
Fun Patterned Paper
Colouring in pieces of patterned paper can be therapeutic for the soul and the results are absolutely stunning when you use the Juicy Gel pen range from Life of Colour.
We found a fabulously coloured wood slice that we replicated into a paper print that was then coloured using a similar combination of pen colours.

Intergalactic spaceman card
Do you know someone that has a heightened interest in all things intergalactic? This craft idea can be completed using a Life of Colour space stencil along with the easy-to-use silky paint stix!

Step 1- Use the Life of Colour stencil to trace space shapes (A spaceman, rocket, telescope and planet) Paint the shapes with silver and add- blue highlights to the spaceman, flames to the rocket and a gold ring around the planet.
Step 2- Neaten up the edges with the 1mm black paint pen and cut each shape out carefully.
Step 3- On a separate piece of paper our spacy sky was created by simply smearing the silky paint stix in a pink, blue and purple in patterns mixed together. Add tiny silver dots for constellations across the sky.
Step 4- The moon is painted by simply placing down some silky-smooth white paint stix with a dash of black around the craters. You can use your finger to smear the black into the white paint to add depth and soften the edges.
Step 5- Time to put it all together! For the final construction of the card, we then pasted the spacy sky onto a card with the moon, spaceman and space items into place. You can add pieces of cardboard behind the spaceman and objects will give the card an amazing pop-up effect!

Happy Little Vegemite Rocks

The perfect rock for painting on can be difficult to find but search no longer because Life of Colour has the stone for you. Take a popular design and make it your own by adding different features, wording using a set of Life of Colour Essential Brush Pens and “hey presto” you have a mascot to be proud of.

Jungle Animal rocks
We have chosen five of the cutest jungle animals that you have ever seen to create some quick and easy to follow picture tutorials for you to try out. We used the fantastically round shaped and perfectly carved flat Life of Colour stones! Simply sketch the animal outline onto a white primed rock, paint them using your favourite Life of Colour Brights acrylic paint markers and then add black outlines for definition.

We have discovered that you all love cute animals so with that in mind we have found five of the most adorable little creatures for you to try. Follow the steps shown in the pictures below!
1- Groovy Giraffe

2- Toucan Sam

3- Perfect Panda

4- Purple Elephant

5 - Zippy Zebra

Egg Carton Animal Portraits
Portraiture paintings have always been a popular form of art and these animal portraits will make exceptional wall hangings for your children to display.
The first step is deciding upon an animal to paint, animals with long protruding noses like rabbits, foxes, pigs, raccoons, giraffes and birds are some examples that would work well to achieve the desired effect.

Art by Nylah Khan
Step one- Cut the spikes off an egg carton and use other pieces of the egg carton to make ears or tails and other animal parts.
Step two- Take another flat piece of recycled cardboard to fashion a picture frame shape for example a diamond, oval, square or rectangle. Paint a frame around the entire edge of the cardboard.
Step three- Sketch your chosen animal into the middle of the frame and then add loads of colour with your paint pens. Add your animals body parts (egg carton nose, ears and tail) making sure that all the parts are painted in colours that match the animal face. Glue everything into place!
Hootie Owl Paper plate
Tu-whit tu whoo, tu-whit tu whoo!
Ready for a hooting good time? We have pooled our creative resources to bring together an owl with a difference! The Life of Colour Chalk pens and Fluro paint pens were released from under our wings to show a magnificent combination of colours for this bird that is one of a kind.
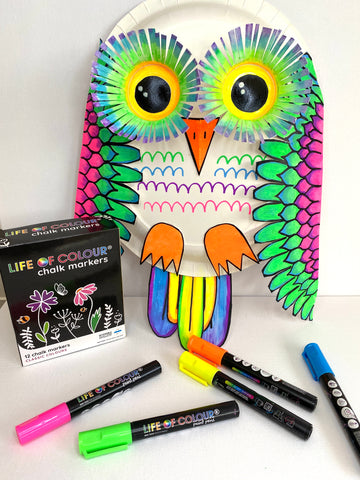
Materials needed include-
Life of Colour Chalk markers or Fluro Paint pens
2x Paper plates
2x Paper cups
Scissors
Craft glue
Step 1- Cut the edges off one of the plates to make wings, use the leftover piece of plate to cut out two bird feet and a triangular shape for a beak.
Cut the two cups in half and cut slits down to the base of the cup. Use the leftover sections of the cup to cut out tail feather shapes.

Step 2- Make everything bright and colourful using the Fluro or Chalk pens! Paint the tail feathers and also put feathers onto the wings in rows. Next you need to paint a black edge to each feather. Add yellow, orange, green, blue and purple onto the cut cups and add a big black circle in the centre to complete the owl eyes. Make the beak and feet shapes all orange for a standout effect.
Step 3- Construct the owl onto the spare paper plate using glue and add. For the final step add layers of wavy feathers onto the chest of the owl.

Under the Sea Spotted Seahorse
The spectacular Spotted Seahorse has a million dots that were painted using a Life of Colour dot pen. Provide the children with a colouring in image or a simple hand drawn sketch that they can use to complete with their dot pens using the stippling technique (many dots) to fill the picture in with colour. This is guaranteed to keep anyone occupied for hours.

Perfectly Painted Pots
Grab yourself a pot, carbon paper and a few various sets of Life of Colour acrylic paint pens along with your favourite print to copy!
Simply copy the design onto the pot and go crazy with colour then trace around the edges with a black paint pen to define the pattern. Seal in the oven and with a light spray of clear acrylic paint to make it last in the outdoor elements.
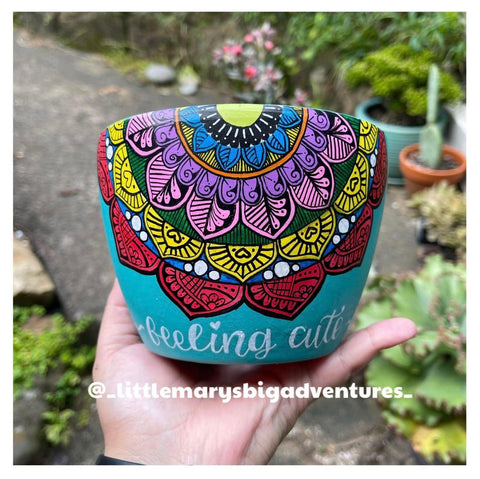
Art by Mary-Anne Ramirez
Rainbow Dot Pen Pot
Beautiful art has never been so easy when you can achieve the perfect dot art using the Life of Colour Dot Markers. Simply apply the paint in a rainbow pattern onto a raw terracotta pot and then seal the deal with a coat of clear acrylic spray paint.

Art by Curious Columbus
Everlasting Cacti Pot
Ever wondered how to keep a plant in a perfect condition forever? It's completely possible when you make a pot like this filled with Cactus made of rocks - so low maintenance it of course will last until the turn of time! Paint your rocks and then construct them into cactus plants and arrange them into a pot.

Tin can recycling with rocks
Everyone loves painting rocks and recycling so we put the two together and came up with this neat idea! Paint a tin blue, glue green felt hills around the base then glue painted rock houses and trees all around the hillside! To complete the funky tin add some clouds and butterflies that can be constructed from white cardboard with black line-art.

Rainbow Air Dry Clay Starfish
Starfish are my favourite marine animal and I love having these arranged on a table to display. Alternatively, you could add holes and turn them into hanging ornaments. Our stars are moulded with a cookie cutter out of air-dry clay. We have found that the most successful air-dry clay creations are left to dry slowly and naturally in a warm environment. Turn the creations carefully every so often to dry them evenly. When the creations are dry you can give them a spray with a clear acrylic spray paint to make them easier to paint.

Step one- Make DIY air drying clay (mix 1 cup of cornflour, 2 cups of baking soda and 1.5 cups of water together over low heat in a saucepan until the mixture thickens. Cool the mixture and gently knead it. Bring the clay together into a ball and store it in a wet tea towel until ready to use.
Step two- Flatten the clay into a one centimetre slab and use a cookie cutter to mould stars. Place the stars onto a baking sheet and allow them to dry slowly. Turn over every day to evenly dry.
Step three- Spray dried stars with a clear acrylic paint to seal and allow to dry.
Step four- Choose Life of Colour rainbow coloured paint pens to paint them in bright colours and once they dry coat them with clear acrylic spray finish them off.
Fantastic Floral Spoon art
Keep all of those split wooden spoons to upcycle into puppets. A fun flower design can be painted onto the handles with a set of easy to apply Life of Colour Floral brush pens. The brush pen design simply glides across the surface every time!

Art by Curious Columbus
Step one- Paint the handles of the spoons white and add alot of flowers and leaves.
Step two- Add darker coloured outlines to everything to make it all pop.
Step three- Draw some facial features onto the spoon face- you can even glue some woollen hair into place too!
Fruity Maths
Learning at home can be fun when you get to create your own maths fraction fruits and you could add magnets on the back of them so that the kids can continue learning all day.

Step one- Take a compass and sketch circles onto a piece of recycled cardboard.
Step two- Use a set of Life of Colour Gouache stix and paint the circles with fruit designs.
Step three- Cut the circles out and into mathematical fractions. Glue magnets onto the backs of the fruits, display them on the refrigerator and let the learning fun begin!
Cardboard Ice cream Dream
Turn pieces of cardboard into delicious treats. All that you need is a pair of scissors, some craft glue and a set of Life of Colour acrylic paint markers to make the ice cream dream! You could even take this craft a step further and make a mini ice cream stand to keep the children entertained for hours. Add faces to the popsicles and you also have an instant mascot!.
Craft by @emaloukidsartcraft

Chrome Bike and Skateboard helmet
Look at the glee on that little face - he is just so proud to have been able to get creative with the Life of Colour Chrome pens. Transform a plain dark coloured bike or skateboard helmet into a personalised helmet featuring the children's favourite animal using a set of Chrome paint markers. Our child chose a shark and for added effect they also placed splashes of water and bubbles everywhere.
The chrome paint pens glide easily across the helmet surface and adhere without the need for a sealer!

Mega Marble Run
There’s no better art than something that can actually become functional once it has been completed!
Start the process of building a marble run by placing a couple of large, weighted boxes in the centre then add painted ramps, obstacles and tunnels all around the outside from top to bottom. This craft requires cognitive planning to assess where ramps should be positioned to be successful, you will be bound to use loads of recycled crafts so start collecting!

Creepy Crawly Cups
Save your used cups from the kids next party to create some cool hanging spiders. They are so quick and easy that you will have time to make a whole gang of spiders! Many phantasmagorical creatures or other animals such as octopus could also be constructed in the same manner.

Step one- Paint the outside of the cup - use one colour for all of it or paint the bottom inch of the cup one colour with stripes for the remainder of the cup.
Step two- Turn the cup upside down and paint two eyes and a mouth on the side of the cup (close to the bottom edge)
Step three-Cut leg slits from the top rim of the cup about an inch or so away from the bottom then make folds so that the legs bend. Turn one of the strips into two fangs.
Step four- Make two holes in the base of the cup to thread string through so that it is ready to hang.
City Building
Chalkboard houses, cities and cut outs come in readily made kits that can be painted together as a family to make a perfect play set.
The Life of Colour Chalk pens would be the ideal medium to use for the chalkboard surfaces- simply construct the building and then add colourful details everywhere.

Mini Canvas Art
Everything is better when it’s beautiful, especially when you can create rainbow art that brightens up your life.
Provide your kids with a Life of Colour mini canvas that they can easily complete in one sitting using the Life of Colour Silky Stix. The stix are so easy to apply to the canvas and they dry quickly too for a mess free art result.


DAD Rainbow Canvas
Step one- Cut out the word "Dad" in capital letters and paste it onto the middle of a mini canvas.
Step two- Provide the kids with a set of silky stix and let them go crazy with colour.
Step three- Carefully peel away the letters and the masterpiece is complete!
Eggheads
The masterful craft of painting eggshells will teach the children fine motor control and they will also learn how to be delicate enough not to crack their eggheads.
By Curious Columbus

Step one- Puncture a hole in the egg at each end using a pin and then blow through one hole until all of the egg runs out of the other end.
Step two- Allow the empty eggshells to dry out in the sun and then use a set of acrylic paint markers to give each egg a character face.
Step three- Save an egg carton and create a cute little place for your egg characters to live!
Freaky Friday brushes
Repurposed art at its best 💚”

Reused, recycled and repurposed art at its finest, simply add paper mache or air dry clay faces along with trinkets, string, wool and buttons to the brushes and then paint everything with a set of Life of Colour acrylic brush paint pens which will easily get into all the grooves, holes and spaces.
Mr Doodle Supermascot
A great design idea is to sketch your main superhero image into the middle of a piece of blank white paper and then fill the background with lots of patterns and doodles. Add a minimal amount of colour to the background pattern to help make your image stand out even more!

Art sourced from Art Teacher Life
Magical Watercolour Blow Art
Keep your eyes peeled for this fantastic portable Life of Colour watercolour set. We used a combination of the fabulous watercolours with a bold black design layered over the top to achieve this magical blow art Zebra image.

Step one- Pick up the watercolour paint with a brush and create a slightly watery mix on the palette
Step two- Transfer the paint onto the page one colour at a time and use a straw to blow the colour all over the page
Step three- When the watercolours are dry you can add your bold black outlined image over the top.
Scribble Sneakers
We all love designing our own art and now you can also design your own fashion clothing! Just imagine the look on everyone's face when they complement your designer shoes, and you tell them that you made them yourself!

By Curious Columbus
Purchase a pair of white canvas sneakers and use a black Life of Colour Fabric marker to draw fun doodles all over them and then let the children colour in the images with the fabric pens.
Rainbow Painted Shells
Here is a wholesome fun family activity for you all to enjoy on a beach day outing. Take your portable Life of Colour paint markers along with you and collect shells together that can be painted right there on the beach!

Rainbow Painted Shells
Nature art importantly connects the children back to their natural environment, which is essential for development- plus nature is conveniently everywhere around us wherever we go! Collect it and then paint it for a fantastic learning experience.

Step 1- Take your set of Life of Colour 3mm Classic paint markers in rainbow colours and paint blocks of colour following the shell's contour. We have used the 3mm pens to blend our green and yellow, and pink with blue together to achieve softer shades.
Step 2- Using a silver 1mm paint pen we are able to place fine lines in between each rainbow colour and around the spiral of the shell to set a dividing line between each colour.
Step 3- Following the spiral in the centre, paint a second silver line then using a black fine tip place paint almond leaf shapes.
Step 4- Fill the black almond shapes with silver to wrap up the job!

Sunset Abalone Trinket shell
Step 1- Prime the abalone shell white.
Step 2- Paint yellow with a hint of orange using the 3mm markers for fast coverage, gently blend the colours.
Step 3- Mix orange with pink and red to achieve a sunset magenta that leads into a deep blue sky.
Step 4- Continue using the blue paint pen to fill the bottom half of the shell to resemble the sea.
Step 5- Merge hints of white into the blue to lighten the sea in small sections.
Step 6- Next we completed delicate features with a black and white 1mm paint pens such as the black mountain range on the horizon and white caps on the waves.
Step 7- For added perspective we completed a few palm fronds with a green 1mm paint pen around the edges.
Step 8- To add an antique feeling to the shell we painted a rough gold edging and continued to paint the back of the shell in gold as well. Spray the shell with a couple of coats of clear acrylic to protect your trinket shell and then it’s ready for displaying!

Rainbow Pippy shell
Step 1- For a quick opaque coverage use 3 mm Classic acrylic paint pens to paint the shell in rings in the following rainbow pattern - purple, blue, red, orange, yellow green, purple and pink.
Step 2- Allow the shell to dry and start applying tiny dots with the precision of a 1mm paint pen. Create a rainbow pattern upon each coloured ring, leaving out the colour that you are painting upon.
Step 3- Continue the dotted rainbow pattern until you reach the centre and leave a line blank and the centre pink spot to finish your shell!
Winter Camping canvas Relief Collage
When I was a child I owned a book by Jeannie Baker, her illustrations were created in the style called relief collage. Displaying a variety of materials like bark, moss, leaves and twigs upon the canvas we were able to use Life of Colour paint pen products to bring a camping scene to fruition.

Materials
Life of Colour silky paint stix, Earth colours
Natural resources- paperbark, leaves, twigs, moss and various bark matter.
Step 1- Draw a simple campsite and paint the background with a selection of colourful silky paint pens. We went for a winter scene and happily combined bright green with dark green for the grass and light blue, blue and purple for the sky.
Step 2-Paperbark was cut into neat pieces to create a tent, we added a natural wood and stone colour over the top using the Earth paint pens. The moon was cut from bark and the white silky stix added the white textured surface.
A cute campfire made from bark and moss was pasted into place after being painted using the stix.
Step 3- It’s time to get creative with silky green painted leaves and make tiny pine trees- these are a bit fiddly but also fun to create.
Step 4- Layer the trees around the tent and arrange painted moss to resemble grass around the front of the scene and tent. We achieved a “yurt” looking tent by pasting a host of tiny twigs sticking up from the peak.
Step 5- Random bark and twigs were arranged around the scene for logs and we also painted them in places with the Earthy succulent green.
Where will your camp scene take you? Try adding extra details like people sitting on the campfire logs for an added challenge!
Dot Koala Poster art
We proudly present to you Cassie the Koala, she is a dear friend to our beloved Life of Colour mascot "Kai the Koala" When making a poster it is a good idea to make sure there is a balance of patterns, shapes and colour.

The combination of dot pens and dual pens complement each other to complete the perfect background patterns and leaving a white border around the foreground images means the design is not lost in colour.
To conclude our compilation of shared creativity we would like to wish you good luck with your crafts and invite you to join our wonderful Life of Colour social media outlets and community where you can be kept up to date with our ideas as they come rolling in.


